12 DIY Coastal Craft Ideas for Beachy Home Decor
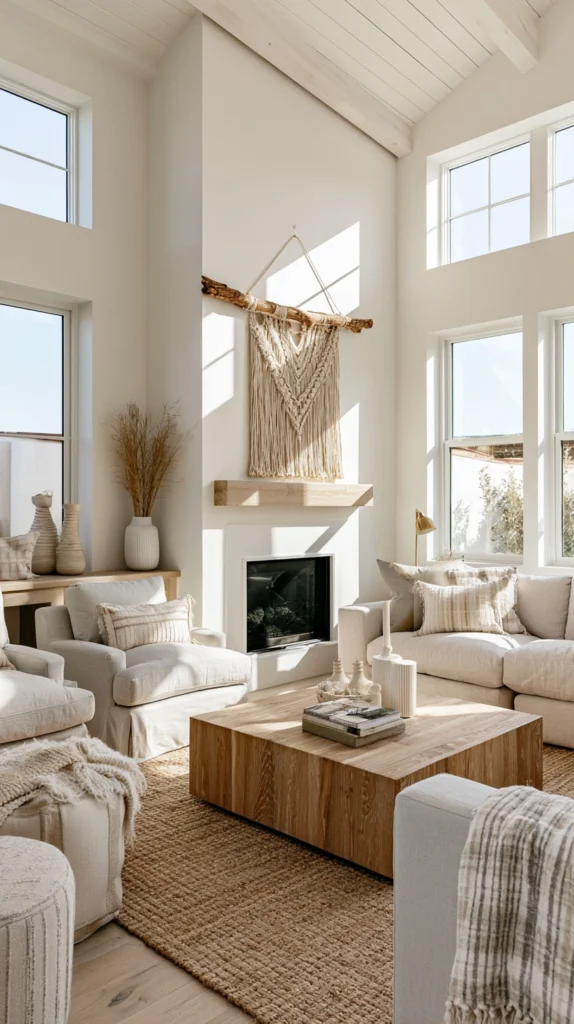
Coastal craft projects work best when they commit to the material logic of the coast — rope, driftwood, shell, linen, sea glass, weathered wood — rather than reaching for blue paint and calling it a beach house.
The difference between a coastal room that feels genuinely collected and one that feels like a theme park is almost always material authenticity. A piece made from actual rope ages well. A piece made from plastic rope painted to look like rope does not.
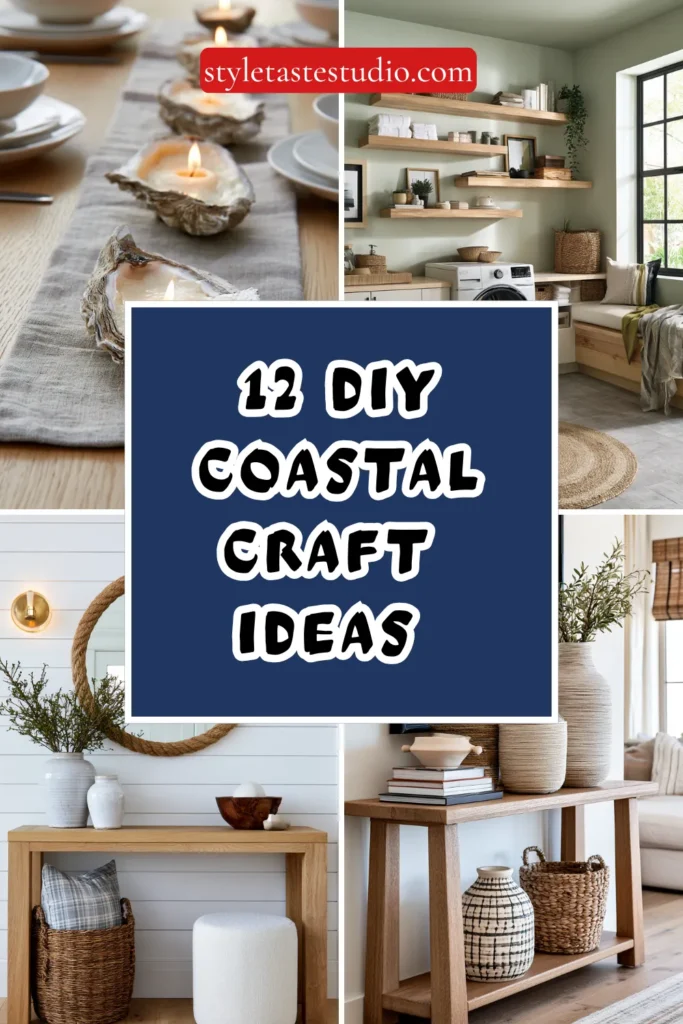
The projects below are organized from wall treatments to surface accessories to lighting, with specific techniques, measurements, and product sourcing for each. None requires advanced craft skills, but all require more than an afternoon of distracted attention. That investment is what makes them look handmade in the right way rather than rushed. If you want to see how these pieces work in a finished room context, the coastal grandmother summer decor ideas on this site show exactly the kind of interior these crafts belong in.
1. Woven Rope Wall Hanging with Driftwood Rod
A large-scale rope wall hanging is one of the few DIY projects that fills a significant wall area — 18 to 36 inches wide, 30 to 48 inches long — with texture and visual weight at a fraction of the cost of commissioned fiber art. The technique is macramé, which sounds intimidating but in its basic form requires only two knots: the square knot and the lark’s head knot.
For materials, use 5mm single-strand cotton rope for the main body and 3mm for any finer detail sections. Single-strand untwists into beautiful fringe; three-strand rope does not fray cleanly and looks mechanical when cut. For a hanging 24 inches wide and 36 inches long, you need approximately 120 feet of 5mm rope cut into 30 lengths of 4 feet each — the finished length is roughly half the starting length once knotted.
Mount the rope lengths onto a driftwood rod using lark’s head knots, spacing them evenly at approximately three-quarters of an inch apart. Work in rows of square knots across the full width, alternating the knot groupings every two rows to create the classic diagonal mesh pattern. Leave the bottom 8 to 10 inches unknotted for fringe, then brush out with a stiff pet slicker brush — this separates the fibers into the full, soft fringe that defines finished macramé rather than the tight rope ends of unfinished work.
For the driftwood rod, look on any beach after a storm or source from Etsy sellers who collect and dry it properly — green driftwood warps as it dries and will pull the hanging off-level within weeks. A rod 2 to 3 inches longer than the hanging width on each side gives the piece enough visual grounding on the wall.
Tip: Hang finished macramé with two nails rather than one, spaced at 80% of the rod’s length. A single nail allows rotational movement at the center — the rod bows forward and the hanging loses its flat presentation within weeks.
Budget: $22–$55
2. Sea Glass Mosaic Stepping Stone or Trivet
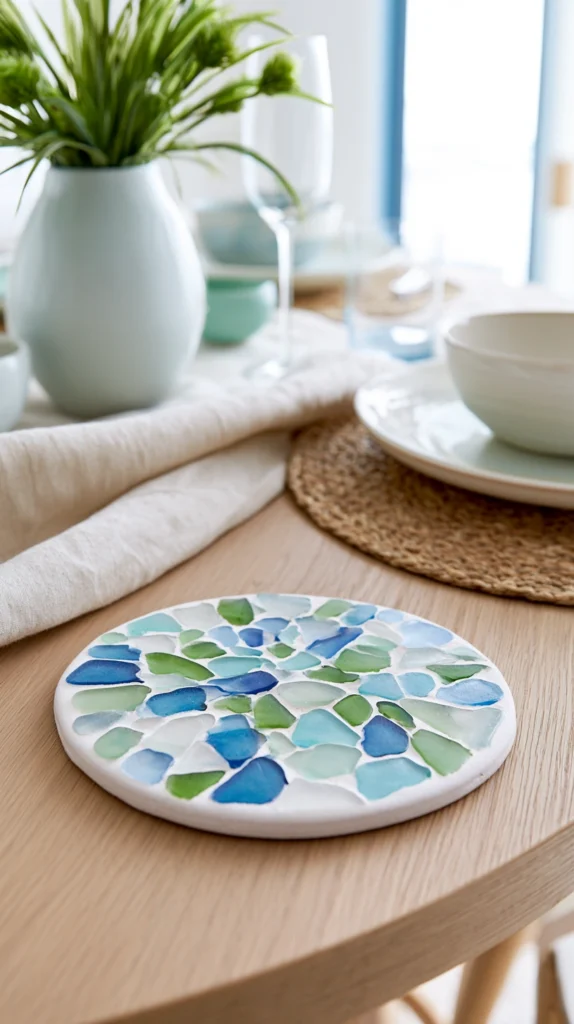
Sea glass mosaics are the coastal craft project most often executed badly — pieces placed randomly on a surface with grout applied too thick, producing something that looks muddy rather than luminous. The technique that produces glass-quality results is more specific than most tutorials describe.
For a 12×12-inch trivet or an 18-inch round stepping stone, you need approximately 80 to 120 pieces of sea glass in graduated sizes, a concrete paver or tile backer board as the base, unsanded tile grout in white or light gray (sanded grout scratches glass surfaces and dulls the finish), and mosaic adhesive rather than standard tile mastic. Mosaic adhesive remains slightly flexible when cured, which matters for outdoor stepping stones that experience freeze-thaw cycles. If you enjoy working with stone and natural materials outdoors, the stepping stone path ideas on this site show how individual handmade pieces like this integrate into a larger garden design.
Sort sea glass by color and size before placing a single piece. The placement decisions made before adhesive is applied determine the quality of the finished piece — rearranging glass after adhesive contact damages the bond. Work from the center outward, placing the largest focal piece first and building the composition around it. Leave grout joints of approximately 3mm between pieces — wider than that and the grout dominates visually; narrower and grout application becomes impossible to execute cleanly.
Apply grout with a rubber float held at a 45-degree angle, pressing into joints without dragging over the glass surface. Allow 15 minutes of setup time, then wipe the surface with a barely damp sponge in circular motions. A grout haze will remain on the glass — remove it after 24 hours with a dry microfiber cloth and a small amount of glass cleaner. Do not use acidic cleaners on cured grout.
For sea glass sourcing, beaches on the northeastern US coast, northern England, and the Irish coast produce the densest natural deposits. If local beach collecting isn’t practical, genuine sea glass is available on Etsy from $8 to $18 per pound, sorted by color. Avoid craft store “sea glass” — it’s tumbled glass without true surface frosting and looks artificial in finished work.
Tip: Seal the finished piece with a penetrating grout sealer 48 hours after grouting, and re-seal annually for outdoor use. Unsealed grout in a stepping stone absorbs moisture and stains permanently within one season.
Budget: $18–$65
3. Driftwood Coastal Photo Display
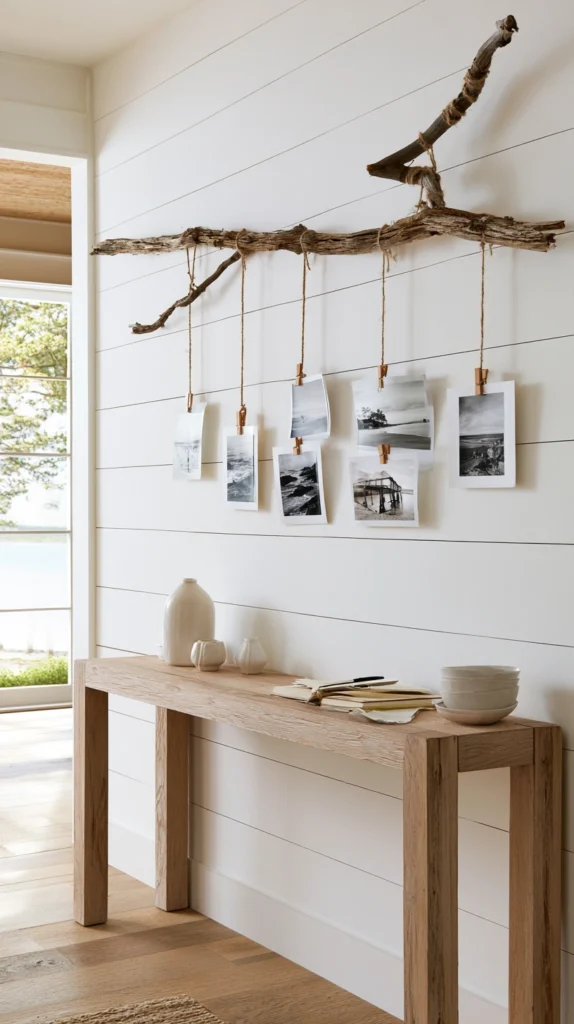
A driftwood branch used as a horizontal photo display rod — prints hung from it with linen twine and small clips — is a coastal alternative to standard gallery wall framing that’s easier to reconfigure, lighter on the wall, and visually warmer than any metal or wood frame arrangement.
The branch needs to be straight enough to hang level and dry enough not to warp further. Test dryness by pressing a thumbnail firmly into the bark — if it leaves no impression, the wood is dry. A branch 36 to 48 inches long and 1.5 to 2 inches in diameter provides enough span for five to eight prints without sagging. Sand any sharp bark edges with 120-grit paper but leave the natural surface texture otherwise — the weathered quality is the point.
Mount the branch with two screw eyes installed in the top surface at 80% of the branch length. Run picture hanging wire between them and hang on two nails. For the prints, use 4×6-inch or 5×7-inch prints on matte stock rather than glossy — matte prints read as considered in this context; glossy prints look like gas station photo kiosk output. Hang each print with a small binder clip and a 6-inch length of natural linen twine tied to the clip ring.
Space prints at slightly irregular intervals rather than perfectly even spacing — the hand-hung quality is what makes this look curated rather than rigid. Odd numbers of prints (five or seven) are visually easier to balance than even numbers.
For print content, black and white coastal photography, watercolor illustrations of shells or boats, or hand-lettered coastal quotes in simple sans-serif typography all work well. Color photographs of people or pets break the material cohesion of the display and draw the eye out of the composition.
Tip: Attach a small fishing weight or a flat river stone to the bottom of any print that curls at the edges. Tape a loop of linen twine to the back of the print and clip the weight inside the loop — invisible from the front and effective at keeping the print flat.
Budget: $15–$45
4. Knotted Nautical Rope Bowl
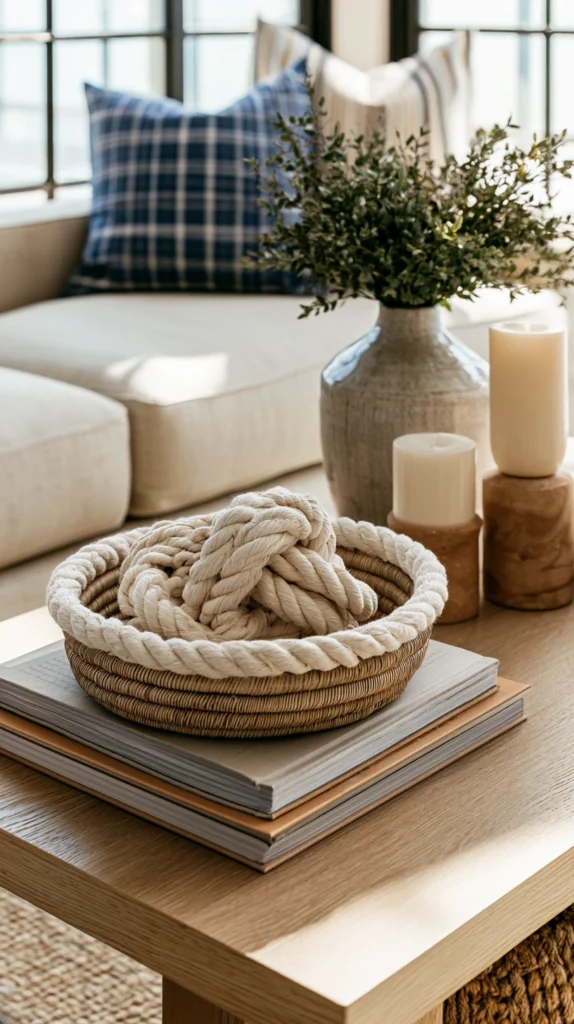
A coiled rope bowl made from thick cotton or jute rope is one of the most structurally satisfying coastal crafts — the technique is simple, the materials are inexpensive, and the finished object is genuinely useful as a fruit bowl, a key catch-all, or a planter cachepot.
For a bowl with a 10-inch diameter and 4-inch sides, you need approximately 50 feet of three-strand cotton rope in 3/8-inch diameter. Three-strand rope coils and stitches more cleanly than braided rope for this application. The construction technique is continuous coiling — begin with a tight flat coil for the base, stitching each new row to the previous one with waxed linen thread and a large tapestry needle, then gradually angle the coil upward to form the sides.
The stitch that holds the coils is a simple whip stitch pulled tight enough to compress the rope slightly at each connection point. Spacing stitches at 1-inch intervals produces a sturdy bowl; 1.5-inch intervals produces a more open-weave look that works better for fruit or decorative storage. Keep tension consistent — loose stitches allow the coils to separate and the bowl loses its shape when anything is placed in it.
For finishing, apply a 50/50 mixture of white craft glue and water to the interior surface with a foam brush and allow to dry fully before use. This stiffens the rope slightly and helps the bowl hold its shape without becoming rigid. The exterior can be left natural or lightly whitewashed with watered-down white paint for a bleached driftwood effect.
Tip: Dampen the rope slightly before coiling — dry rope is stiff and wants to spring back. Misted with water and allowed to sit for 10 minutes, the rope becomes cooperative and holds the coil shape while you stitch.
Budget: $12–$30
5. Oyster Shell Candle Holders
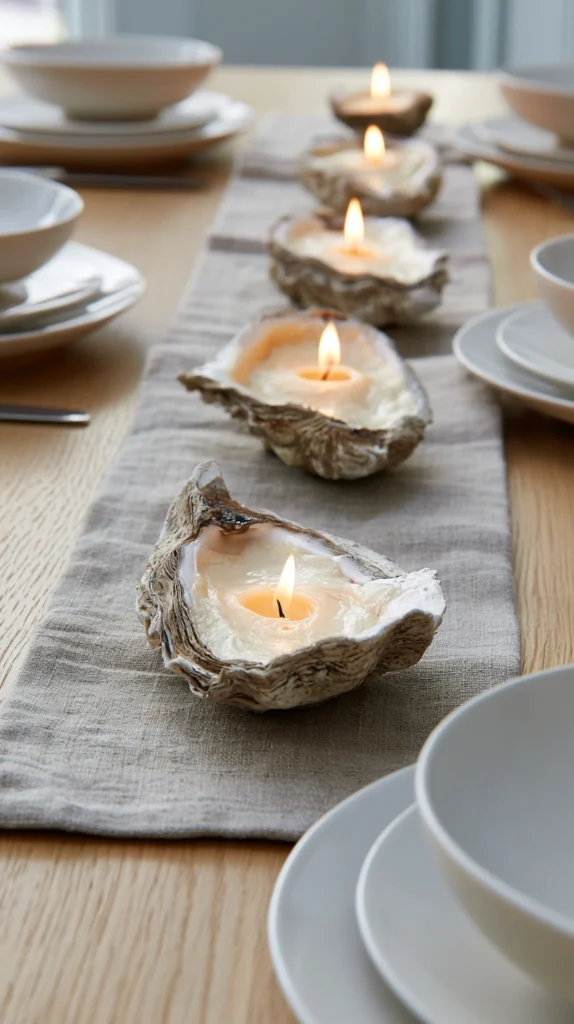
Large oyster shells make natural candle vessels that require almost no craft skill but produce results that look like something from a coastal boutique hotel. The technique is simple; the sourcing and preparation take more time than the making.
Source large oyster shells from seafood restaurants, fish markets, or after-dinner collection over a season. Shells used as candle holders need to be cleaned thoroughly — soak in a 50/50 bleach and water solution for 30 minutes, scrub with a stiff brush, rinse, and allow to dry completely in sunlight for 48 hours. Any residual organic material will smoke when heated near a candle. Shells that aren’t fully dry will crack when wax is poured into them.
For the candle itself, soy wax is the most practical choice for shell candles — it has a lower melt point than paraffin, which means less heat stress on the shell, and it releases fragrance effectively at low temperatures. Melt soy wax to 170°F, add fragrance oil at 1 oz per pound of wax (coastal fragrance options: sea salt and driftwood, ocean breeze, fresh linen), and allow to cool to 135°F before pouring. Pre-warm the shell slightly with a hair dryer before pouring — cold shell against warm wax creates a temperature differential that causes cracking and sinkholes in the finished surface.
Use a wick rated for a 2 to 3-inch diameter container — CD-12 or ECO-4 wicks are appropriate for most oyster shell diameters. Center the wick with a wick bar (two pencils taped across the shell opening work identically) and pour slowly. Allow 24 hours of cure time before trimming the wick to 1/4 inch and burning.
Tip: Create a stable base for curved shells by pressing each one into a small pile of uncooked rice or sand in a shallow dish. This prevents the shell from tipping during pouring and during use — a tipping candle in a shell is a fire hazard rather than a decoration.
Budget: $15–$40 for a set of six
6. Linen and Rope Wrapped Vase Collection
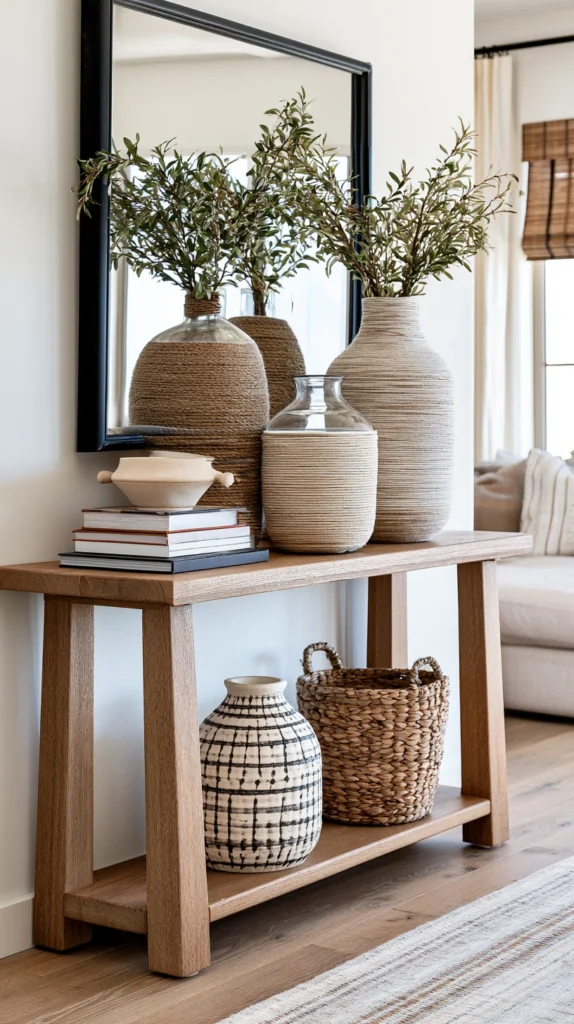
A collection of three vases wrapped in natural linen twine or jute rope — in graduated sizes, grouped together — creates the kind of layered surface display that takes 20 minutes to make and looks like it came from a coastal home goods store at four times the cost.
Start with glass or ceramic vases in varying heights: 4-inch, 7-inch, and 10-inch work well as a trio. Cylinder forms are easier to wrap cleanly than tapered or curved forms. Apply a thin layer of clear-drying craft glue (Aleene’s Tacky Glue or similar) to the exterior of the vase in 2-inch horizontal bands as you work — don’t apply glue to the full surface at once, as it dries before the wrapping reaches it.
Begin wrapping from the base, keeping each row of twine or rope tight against the previous one with no gaps. Press each row firmly into the glue before advancing. For the cleanest finish at the top edge, angle the final wrap inward slightly and secure with a drop of super glue rather than craft glue — super glue bonds the last end invisibly without the slight lifting that craft glue can produce at high-tension points.
Vary the wrapping material across the trio for visual interest: jute rope on the largest, linen twine on the medium, and natural raffia on the smallest. All three materials sit in the same neutral natural-fiber palette but differ in texture and weight, which produces depth in the grouping without introducing color. For more ideas on how natural fiber textures build a coherent room palette, the raw linen and rattan living room ideas on this site are worth reading alongside this project.
For a more refined finish on the largest vase, tie a simple overhand knot in a 12-inch length of slightly thicker rope and glue it to the front face as an accent — it reads as intentional decoration rather than finishing detail.
Tip: Place each wrapped vase upside down to dry for 30 minutes after completion. Gravity pulls the wrapping tight against the surface as the glue sets, which produces a cleaner bond than right-side-up drying where gravity pulls wrapping away from the base.
Budget: $10–$28 for a trio
7. Driftwood and Shell Wind Chime
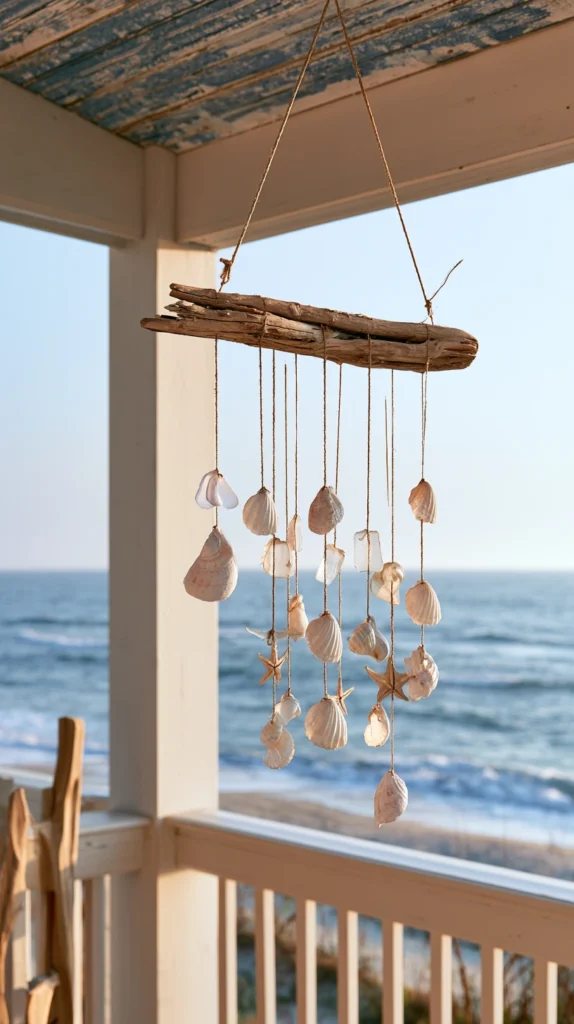
A coastal wind chime made from driftwood, shells, and sea glass produces a sound completely different from metal chimes — softer, more irregular, less musical in the conventional sense but more evocative of the actual sounds of a beach. It’s also one of the most structurally forgiving crafts in this list.
For the hanging rod, use a piece of driftwood 14 to 18 inches long and approximately 1 inch in diameter. Dry and sand as described in the photo display project above. For the hanging elements, you need 8 to 12 shells with natural holes or drilled holes — moon snail shells, jingle shells, and auger shells all have forms that hang well. Supplement with 4 to 6 pieces of sea glass and 2 to 3 additional driftwood pieces cut to 3 to 6-inch lengths.
Drill holes through shells that don’t have natural openings using a 1/16-inch diamond-tipped drill bit at low speed with the shell submerged in a small dish of water. Drilling dry shell produces cracks — the water keeps friction heat low enough for clean penetration. Practice on a shell you’re not attached to before drilling the ones you plan to use.
Thread each element onto a separate length of waxed linen cord — 8 to 12 inches per strand for the outer elements, 14 to 16 inches for the center ones. Tie a small bead or knot at the bottom of each strand to prevent the element from slipping off. Attach strands to the driftwood rod at irregular intervals, varying the hanging lengths so no two adjacent strands are exactly the same length. The irregularity is what produces the characteristic coastal chime sound — elements of different weights hitting each other at different intervals.
Tip: Apply a thin coat of clear exterior sealant to the driftwood rod and any untreated wood elements before assembling. Outdoor driftwood that isn’t sealed will absorb humidity, expand, and eventually crack the knots tied around it.
Budget: $8–$25
8. Bleached Burlap Coastal Table Runner
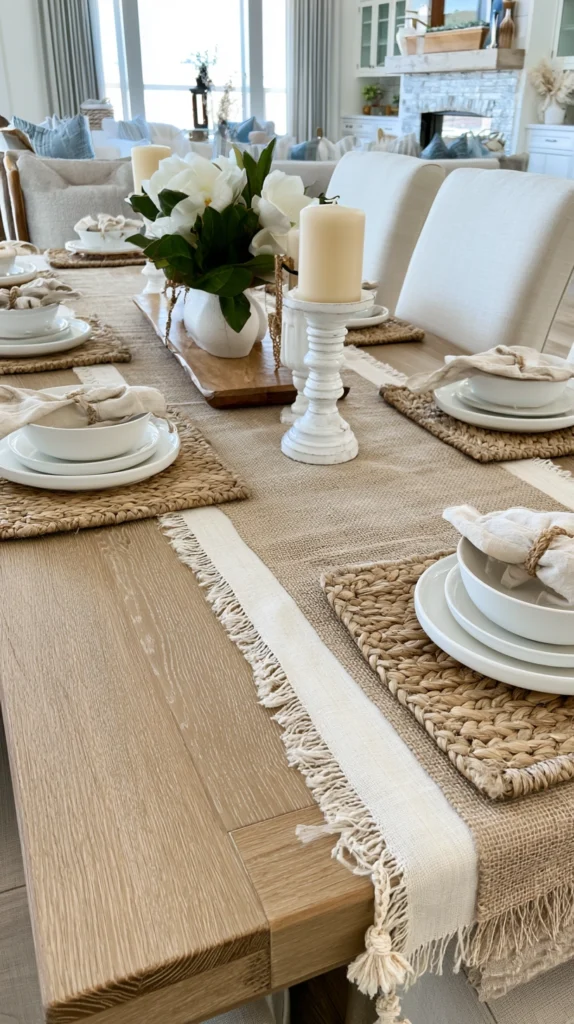
A bleached burlap table runner with a knotted fringe edge is a project that costs under $10 in materials and produces a result that functions in both everyday use and for entertaining — it’s substantial enough to protect the table surface and visually strong enough to anchor a full table setting.
Standard burlap is available at fabric stores and on Amazon at $3 to $6 per yard in 60-inch width. For a standard 6-foot dining table, cut a runner 16 inches wide and 90 inches long — this overhangs 15 inches on each end when centered, which is the proportion that reads as intentional rather than undersized. For a coffee table, cut 14 inches wide by 48 to 54 inches long.
To bleach, prepare a solution of one part household bleach to four parts water in a plastic tub large enough to submerge the runner flat. Submerge fully and check every 5 minutes — the burlap will lighten from tan to a warm cream within 15 to 30 minutes depending on desired tone. Remove when it reaches a color slightly darker than your target, as it lightens further as it dries. Rinse thoroughly in cold water, then neutralize with a solution of one tablespoon of white vinegar per quart of water to stop the bleaching process. Air dry flat to prevent distortion.
For the fringe edge, pull horizontal threads from each short end of the runner — remove threads one at a time working inward for 2 inches. The remaining vertical threads form the fringe. Tie groups of six to eight threads in simple overhand knots at the base of the fringe to prevent further unraveling and to create the knotted texture that distinguishes this from factory fringe.
Tip: Apply a light mist of fabric starch to the finished runner and press with a warm iron before first use. Burlap flattens and holds its shape significantly better when starched, and the slight stiffening makes table setting much easier.
Budget: $8–$18
9. Coastal Lantern with Sand and Shell Fill
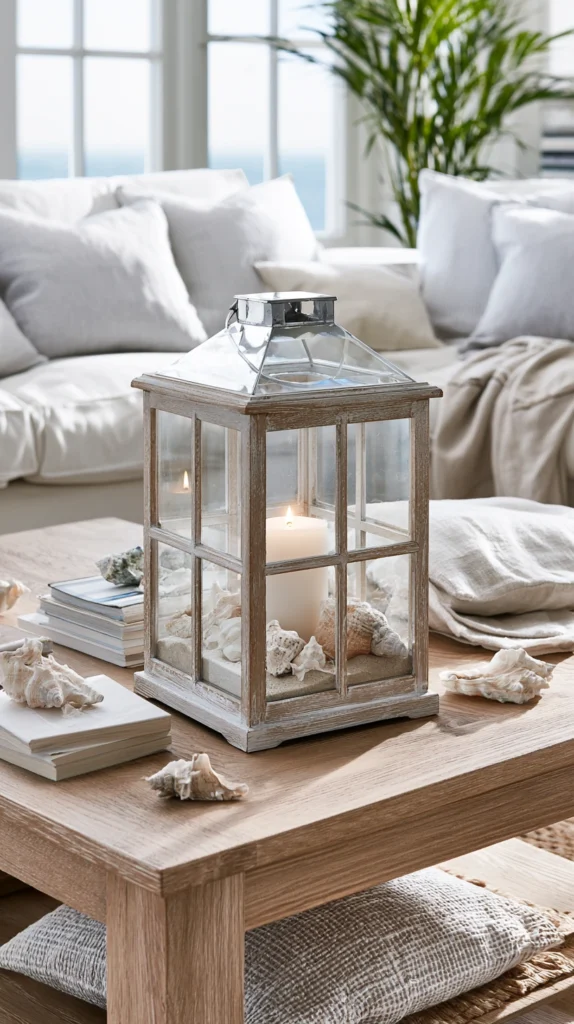
A glass lantern filled with a base layer of fine sand, a few shells arranged on the surface, and a pillar candle or LED insert above is the coastal decorating shortcut that appears in every beach house for good reason — it works, it’s portable, it’s easy to restyle for different seasons, and the materials cost almost nothing.
The technique is in the proportions and the layering sequence. For a lantern with an 8×8-inch base, use approximately 2 cups of fine sand as the base layer — enough to fill 2 inches of depth. Use real sand rather than craft store sand when possible; real beach sand has color variation and texture that craft sand doesn’t replicate. Spread evenly and press slightly to create a stable base. Arrange three to five shells on the sand surface before placing the candle — shells placed after the candle is in position are harder to arrange naturally. Use shells of varying sizes rather than identical ones; uniformity reads as artificial.
For the candle, a 3×6-inch white or cream pillar works in most standard lanterns. Unscented or lightly scented in sea salt or driftwood. LED pillar candles are practical for enclosed lanterns where real flame creates heat accumulation — Luminara’s realistic-flame LED pillars are the benchmark option at $20 to $35 and are essentially indistinguishable from real flame in photographs.
Layer additional detail on top of the sand before final arrangement: a small piece of sea glass, a sand dollar fragment, a single small starfish if ethically sourced. The maximum number of shell or glass elements on the surface is five — beyond that, the layering reads as crowded rather than collected.
Tip: Hot glue the pillar candle base to a small flat stone before pressing it into the sand. The stone creates a stable base that prevents the candle from tilting as the sand compresses under its weight over time.
Budget: $18–$55
10. Nautical Rope Mirror Frame

A flat-backed mirror with a rope-wrapped or rope-coiled frame is the coastal wall accent that offers the most visual impact per dollar of materials in this list. The rope frame reads as substantial and custom; the making process is straightforward and requires no specialized tools.
Source an inexpensive round mirror with a flat backing — Ikea’s LOTS mirror at 11.75 inches diameter costs $4 and provides exactly the right backing surface for this project. For a larger version, an unframed round mirror from a craft store or Amazon in 16 to 20-inch diameter gives the project more presence on a wall.
Working technique depends on the frame style you’re after. For a coiled frame, apply construction adhesive (Loctite PL Premium or similar) to the mirror backing in a ring starting 1 inch from the mirror edge. Press 3/8-inch natural rope into the adhesive, coiling continuously outward and pressing each row tight against the last. Continue until the frame is 2 to 3 inches wide. Allow 24 hours cure time before moving. For a knotted frame, cut 16 lengths of 1/4-inch rope at 24 inches each, fold each in half and mount to the mirror backing with a lark’s head knot through a drilled hole or around the backing edge, then work continuous square knots around the perimeter to form a knotted ring frame. This technique produces more texture than the coiled version but takes 3 to 4 times longer.
For hanging, attach two D-ring picture hanging brackets to the rope frame backing with epoxy rather than screws — screwing into rope-covered backing produces poor purchase. Epoxy bonds to rope and backing simultaneously and holds a mirror of this weight easily.
Tip: Finish the rope frame with a light mist of clear matte sealant spray. Raw rope in a bathroom or coastal environment absorbs humidity and can mildew within a season. Sealed rope resists moisture infiltration and maintains its color significantly longer.
Budget: $15–$45
11. Pressed Seaweed or Botanical Art in Coastal Frames
Pressed seaweed art — sometimes called nature printing or phycology prints — was a common Victorian drawing room craft that has come back specifically because it produces results of genuine beauty: the delicate branching structures of seaweed, pressed flat and mounted on cream or white paper, look like botanical illustrations with no artistic skill required beyond careful collection and pressing.
Collect seaweed at low tide, choosing pieces with intact branching structures rather than torn edges. The species that press most successfully are delicate feathery types — Ceramium, Callithamnion, and Polysiphonia — rather than thick kelp, which holds too much moisture to press flat. Rinse collected seaweed in fresh water to remove salt, which attracts moisture during pressing and can cause mold.
To press, float each piece in a shallow tray of fresh water and slide a sheet of watercolor paper or heavy card stock underneath it. Lift the paper slowly and let the seaweed arrange itself on the surface as the water drains — this is the technique that produces the naturally spread forms that make pressed seaweed beautiful, rather than manually arranging the seaweed on dry paper. Transfer the paper with seaweed onto a folded piece of newsprint inside a plant press or heavy book. Replace the newsprint daily for the first three days to absorb moisture. Full pressing takes 7 to 10 days.
Mount finished pressed pieces with archival mounting corners rather than adhesive — adhesive contact damages the delicate pressed structure. Frame behind UV-protective acrylic rather than glass to prevent light damage. A grouping of three frames in a consistent raw wood or white frame in 5×7-inch, 8×10-inch, and 5×7-inch sizing creates a cohesive coastal botanical display that would cost $80 to $200 purchased as art prints. For ideas on how to arrange multiple pieces on a wall without the result looking random, the thrifted living room decor ideas on this site include solid gallery wall guidance that applies directly here.
Tip: Photograph each piece before framing with a macro lens or phone camera set to portrait mode. The photographs produce high-quality prints if the originals are ever damaged, and they serve as a catalog of the collection.
Budget: $20–$55 for framing materials
12. Coastal Scent Diffuser Using Sea Salt and Essential Oils
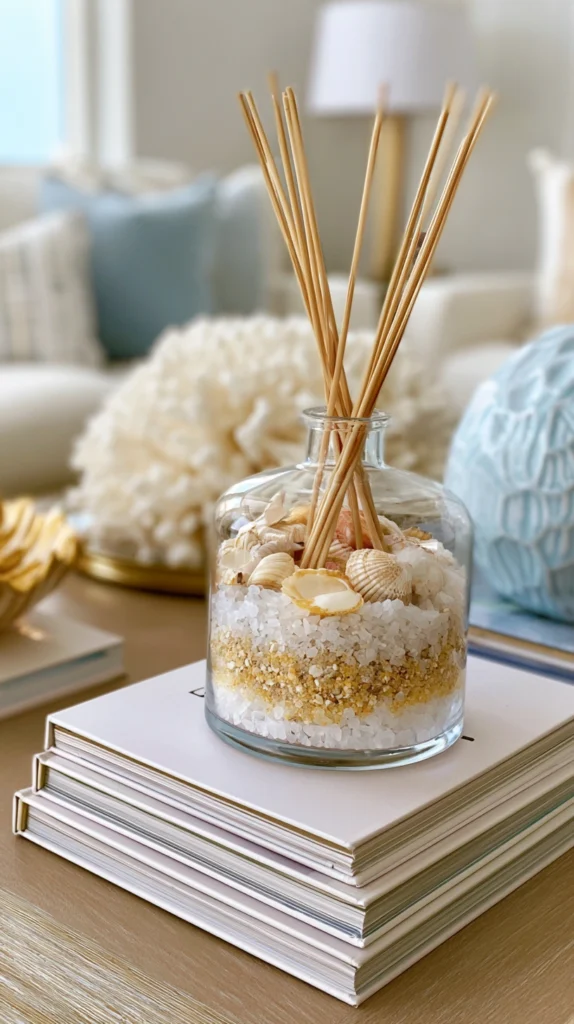
Scent is the most underused dimension in coastal home styling — and a handmade reed diffuser using sea salt crystals, a clear glass vessel, and a coastal essential oil blend addresses the olfactory dimension of the aesthetic while adding a visual element to any surface it occupies.
The construction is simple. Use a clear glass apothecary jar or a narrow-necked bottle in 4 to 8-ounce capacity — narrow necks slow evaporation and extend diffuser life. Fill the bottom 2 inches with coarse sea salt crystals, which absorb and slowly release the fragrance oil blend placed on top.
For a coastal fragrance blend, combine carrier oil (fractionated coconut oil or safflower oil) with essential oils at a ratio of 70% carrier to 30% essential oils. Coastal blends that work well include sea salt accord with eucalyptus and a drop of vetiver for a northern Atlantic coastal profile, bergamot with cedarwood and a small amount of blue tansy for a Pacific coast register, and lemon with rosemary and sandalwood for a Mediterranean coastal note. Pour 3 to 4 ounces of the blended oil over the salt crystals. Insert five to seven rattan diffuser reeds — available on Amazon at $6 to $10 for 100 reeds — and flip them after 24 hours to saturate the full length. Fragrance throw is strongest in the first week and diminishes over 4 to 8 weeks depending on oil concentration and room temperature.
For a more visual presentation, add a small layer of fine sand above the salt crystals and place a single small shell on the surface before inserting the reeds. The layered interior visible through the clear glass becomes part of the coastal surface styling rather than a purely functional object.
Tip: Store diffuser oil blends in dark glass bottles away from heat when not in the diffuser vessel. Carrier oils oxidize in light and heat, which produces a rancid undertone that no amount of essential oil can mask.
Budget: $14–$38
Final Thoughts
The coastal crafts that age well are the ones that use actual coastal materials — rope, shell, driftwood, sea glass, linen — rather than manufactured stand-ins painted or printed to resemble them. Real materials develop a patina over time that makes them look more considered, not less. The fake versions do the opposite.
Start with one or two projects that fit the surfaces you most want to address — a wall, a table, a windowsill — and work with the same material palette across all of them. Rope appearing in the wall hanging, the rope bowl, and the mirror frame creates visual coherence across the room that no single showpiece achieves on its own. The projects above are designed to be layered rather than standalone, and the rooms they work best in are the ones where the maker understood that restraint is the defining quality of every coastal space that actually feels like one. For the broader room picture that ties these individual pieces together, the craft room storage ideas and home design categories on this site are worth exploring for the next layer of decisions beyond the crafts themselves.