14 Mason Jar Craft Ideas for Every Season
Mason jars have a staying power in craft culture that trends come and go without touching — partly because they’re genuinely useful, partly because glass rewards creativity in a way plastic never quite does.

Light passes through them, paint layers on them differently than other surfaces, and their familiar silhouette works across aesthetics from farmhouse to modern minimal. These ideas cover all four seasons with projects that range from quick afternoon makes to more involved builds, all with specific techniques and material guidance that goes beyond “fill with something pretty.”
1. Spring Flower Propagation Station
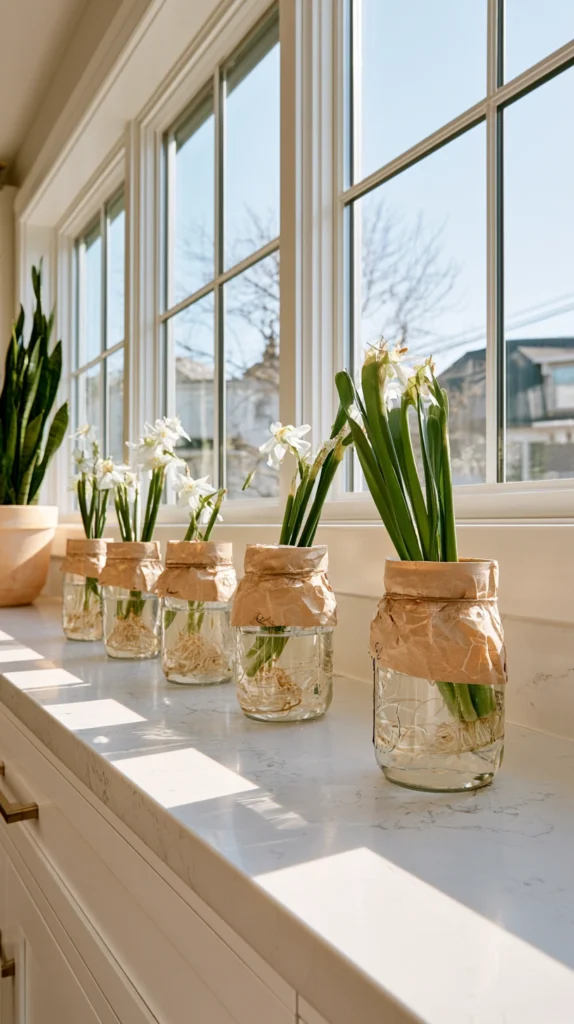
Early spring is when cuttings root fastest, and a cluster of mason jars on a windowsill turns a functional gardening task into one of the best-looking things in a kitchen or sunroom. The clear glass lets you watch root development in real time, which is genuinely satisfying in a way that opaque pots don’t allow.
Use half-pint (8 oz) wide-mouth jars for most herb and flower cuttings — they’re narrow enough to hold a single stem upright without it flopping sideways, and the wide mouth makes changing water easy. For larger cuttings like pothos or philodendron, move up to a pint jar. Fill each jar with clean room-temperature water and change it every two to three days to prevent bacterial growth, which clouds the water and slows rooting.
Wrap the lower half of each jar in kraft paper or twine to block direct light from reaching the water — algae growth accelerates significantly when light hits the water directly. Leave the top half uncovered so you can monitor root development without unwrapping. A strip of washi tape on each jar labeled with the cutting type and the date prevents confusion once you have four or five varieties going simultaneously.
Tip: Add a small piece of activated charcoal to each jar — the kind sold for aquarium use, available at pet stores for around $5 for a large bag. It keeps the water clearer for longer by absorbing the compounds that cause cloudiness and odor, which means less frequent water changes and healthier cuttings.
Budget: $10–$25
2. Summer Citronella Candle Jars
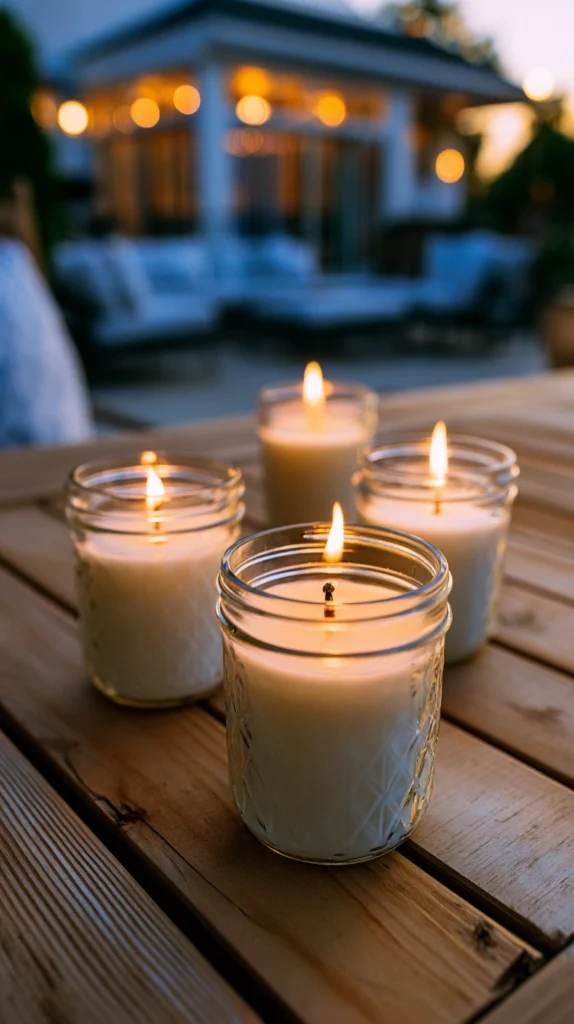
Outdoor dining in summer has exactly one reliable enemy, and a homemade citronella candle in a mason jar is one of the more effective and better-looking responses to it. Unlike store-bought citronella candles in black plastic buckets, a glass jar version fits into an outdoor table setting without looking like pest control equipment.
Use wide-mouth quart jars for outdoor candles — the larger volume holds more wax and extends burn time significantly. For the wax, soy wax flakes are the best choice for beginners: they melt at a lower temperature than paraffin (around 120–125°F), adhere well to glass sides, and hold fragrance effectively. You’ll need approximately 1 oz of wax per fluid ounce of jar volume — a quart jar holds 32 oz of liquid, so plan for roughly 28–30 oz of wax per candle accounting for the wick and airspace.
Citronella essential oil is the functional ingredient, and concentration matters. Use 1 oz of citronella essential oil per pound of wax (about 6% fragrance load) for a noticeable but not overwhelming outdoor scent. Pair it with a small amount of lemongrass or eucalyptus essential oil — half the amount of the citronella — to round the scent and improve diffusion range. Use a pre-tabbed cotton wick sized for a 3–3.5-inch diameter jar and center it with a clothespin or wick centering tool laid across the jar mouth while the wax sets.
Tip: Pour the wax at 135°F rather than directly at melting point. Pouring too hot causes the wax to shrink away from the glass sides as it cools, leaving visible gaps. Pouring at 135°F gives a cleaner adhesion and a smoother top surface.
Budget: $20–$45 for 4–6 candles
3. Autumn Leaf Lanterns with Mod Podge Decoupage
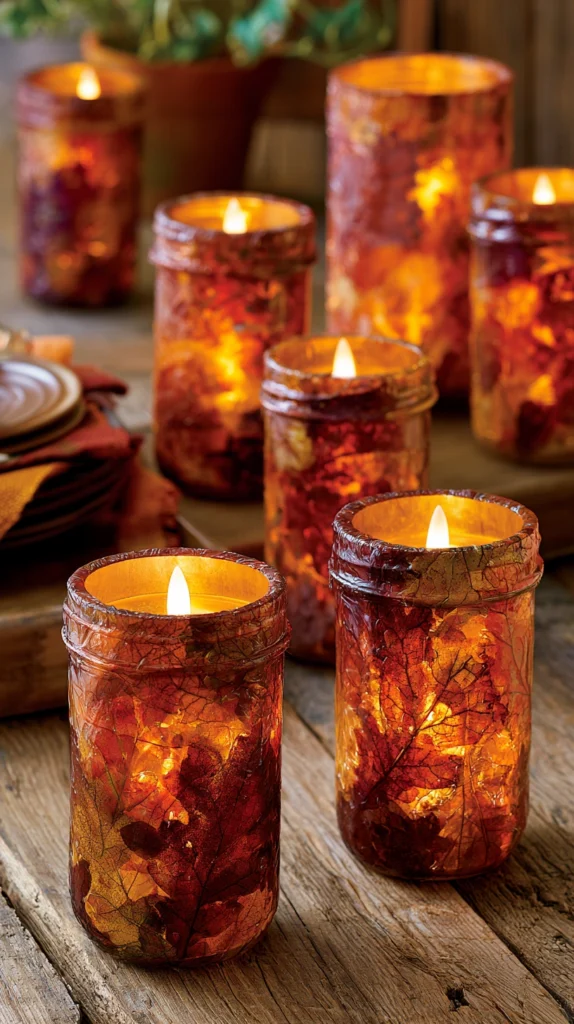
Fall foliage pressed between glass and candlelight is one of the most visually effective seasonal crafts on this list, and it requires almost no skill to execute well. The technique — Mod Podge decoupage — adheres thin materials directly to glass with a clear flexible medium that acts as both glue and sealant.
Collect leaves at peak color and press them flat between two heavy books for 48–72 hours before using them. Partially dried leaves that still have some flexibility adhere far better than fully desiccated ones, which crack and curl away from the glass surface. Choose a mix of sizes — large leaves for visual impact, small ones to fill gaps and overlap edges naturally.
Brush a thin, even coat of Mod Podge Gloss onto a clean dry jar surface. Press each leaf onto the jar while the Mod Podge is still wet, smoothing outward from the center with your finger to remove air bubbles.
Overlap leaves slightly to create a continuous layer. Once the jar is fully covered, apply two to three additional coats of Mod Podge over the top of all the leaves, allowing each coat to dry fully (about 20–30 minutes) before the next. The finished jar will be slightly amber-tinted from the leaves and medium, which enhances rather than competes with a tea light or LED candle placed inside.
Tip: Use Mod Podge Outdoor formula rather than the standard version if these lanterns will be displayed on a porch or patio. The outdoor formula is water-resistant and won’t re-soften with humidity or light rain the way standard Mod Podge does.
Budget: $8–$20
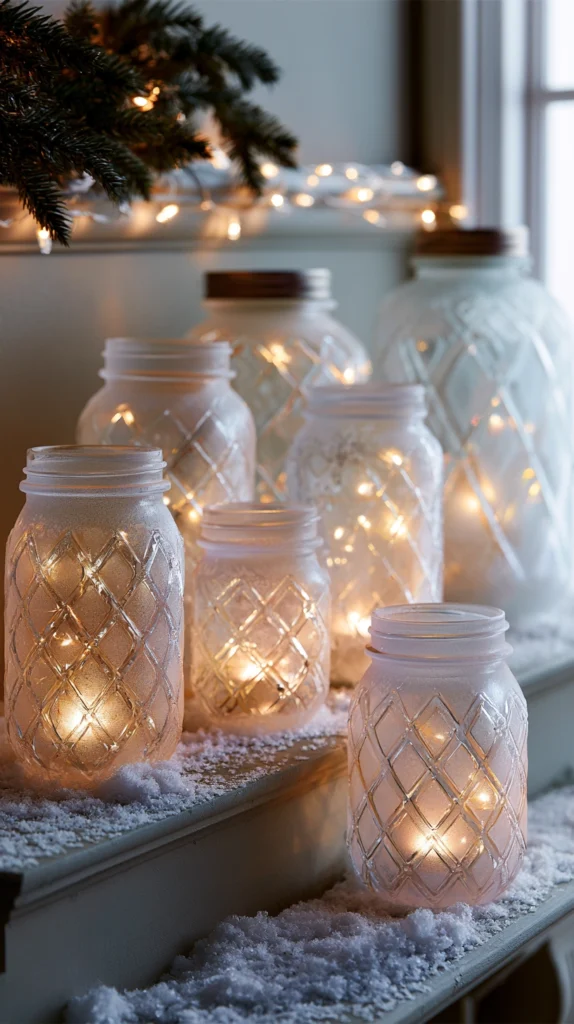
4. Winter Snow Globe Jars
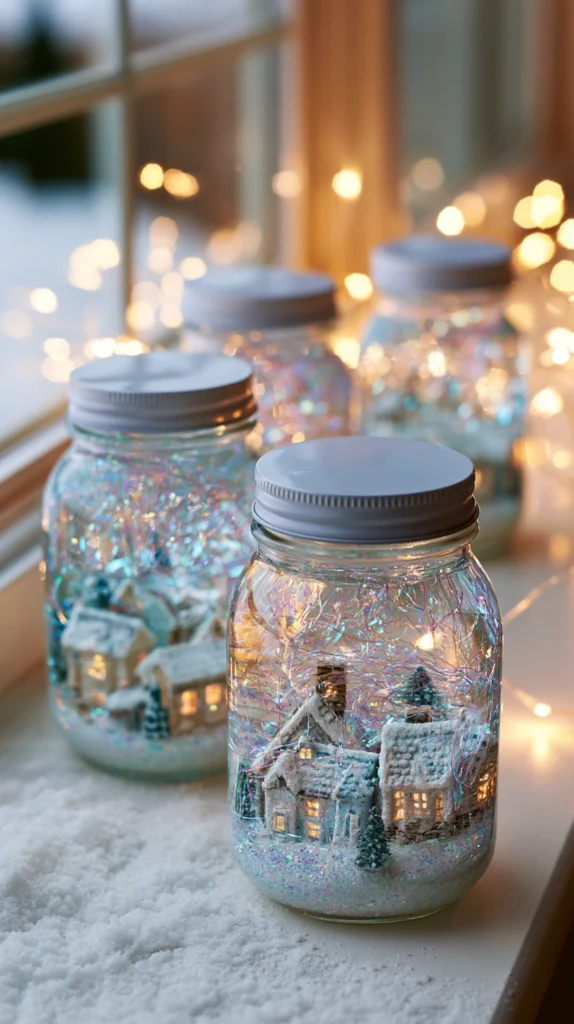
Snow globe mason jars are a perennial winter craft, but most tutorials produce a cloudy, fast-settling result that looks good for about 30 seconds. The difference between a snow globe that works well and one that doesn’t comes down almost entirely to the liquid and the glitter choice.
Use a mixture of distilled water and glycerin — available at most pharmacies for around $4–$6 per bottle — in a ratio of approximately 70% water to 30% glycerin. The glycerin increases the viscosity of the liquid, which slows the fall of the glitter dramatically and extends the “snow” phase from a few seconds to 30–45 seconds. Tap water introduces minerals that cloud the liquid over time; distilled water keeps it clear for months.
For the “snow,” white iridescent glitter in a fine cut (0.008 or finer) settles most slowly and catches light most effectively. Avoid chunky craft glitter, which sinks immediately and piles at the bottom. Figures or miniatures placed inside should be secured to the lid with waterproof epoxy before filling — this is the step most tutorials skip, which results in the figurine floating freely and blocking the view. Use the lid as the base: glue the figure to the inside of the lid, fill the jar with the glycerin mixture and glitter, then screw the lid on tightly.
Tip: Add a small drop of glycerin-safe glue to the threads of the jar before sealing. This prevents the lid from loosening over time as the liquid creates slight pressure changes with temperature shifts. Seal the outside of the lid joint with a ring of clear waterproof silicone for a fully leak-proof result.
Budget: $12–$30 per globe
5. Spring Herb Seed Starter Kits
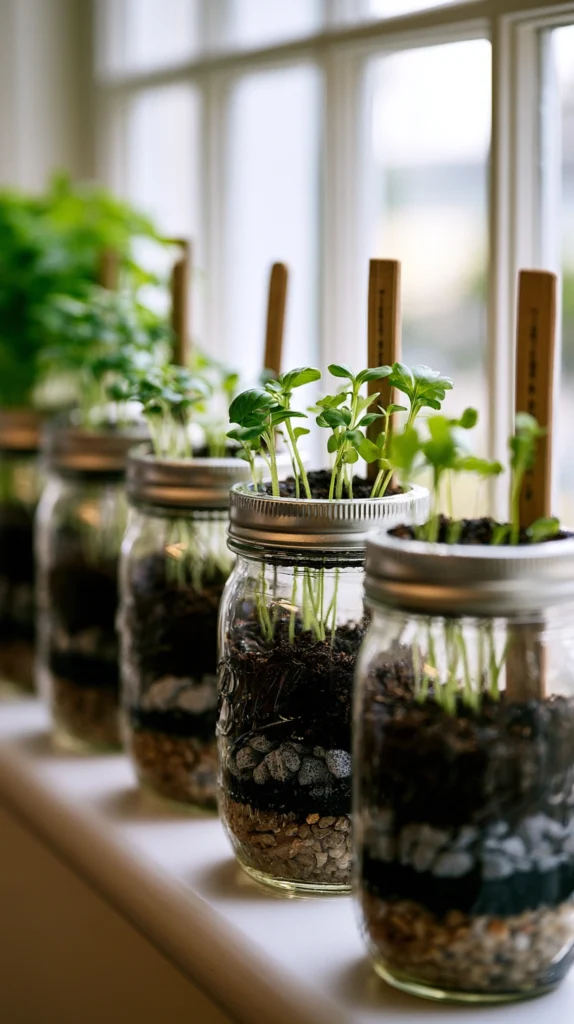
A mason jar seed starter makes a genuinely useful gift and a satisfying kitchen-windowsill project. The visual appeal of seeing soil layers, emerging roots, and young seedlings through glass keeps the project engaging in a way that standard plastic seed trays don’t.
Layer the jar with intention: start with 1 inch of pea gravel or coarse sand at the bottom for drainage, add a thin layer of activated charcoal above that (the same aquarium charcoal from idea one), then fill with a quality seed-starting mix to within 1.5 inches of the rim. This layering approach manages water retention in a container without drainage holes — the charcoal prevents the standing water in the gravel layer from going stagnant and developing odor or root rot.
Herbs that work best in jar form are ones with relatively compact root systems: basil, chives, cilantro, and parsley all perform well through at least the seedling and young plant stage. Mint grows vigorously but will outgrow a jar quickly — start it in a jar and plan to transfer it outside within 6–8 weeks. Label each jar with a popsicle stick tucked into the soil rather than writing on the glass, which allows reuse of the jar and the label simultaneously.
Tip: Cover the top of the jar loosely with plastic wrap during germination to maintain humidity — most herb seeds germinate best when the soil surface doesn’t dry out between waterings. Remove the wrap as soon as the first seedlings emerge to prevent mold development on the soil surface.
Budget: $10–$30 for a set of 4
6. Summer Firefly Night Light Jars
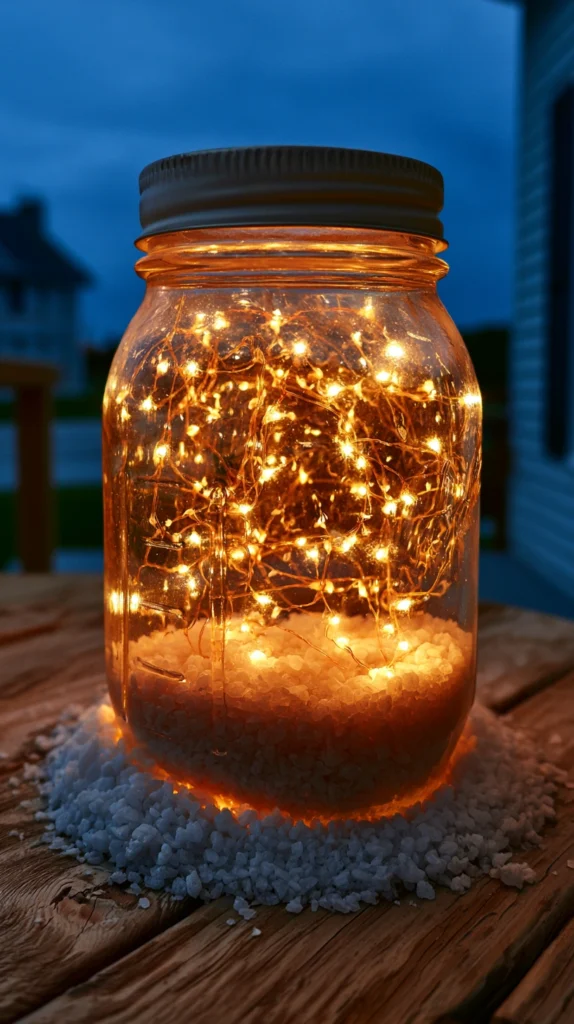
The firefly jar is a classic summer camp aesthetic that translates beautifully to a porch light, a child’s nightlight, or a centerpiece for an outdoor evening gathering. The modern version uses battery-operated fairy lights rather than actual insects, which keeps the jar glowing reliably all night.
Use a quart-size jar and fill the bottom with a loose layer of white quartz sand or white aquarium gravel — approximately 1 inch deep. This base reflects light upward and prevents the battery pack from sitting visibly at the bottom of the jar. Coil a warm-white micro LED fairy light strand (30–50 lights on a thin copper wire) loosely inside the jar above the sand layer. Copper wire strands are critical here: thicker plastic-coated wire presses against the glass and is visible from outside. Copper wire is thin enough to be nearly invisible through the glass.
Route the battery pack (usually requires 2 AA batteries) out through the jar mouth or over the rim — most copper fairy light strands have a battery pack at the end of a thin lead wire that can sit outside the jar while the lights remain inside. Secure the wire at the jar rim with a small binder clip or tuck it under the lid. For a cleaner look, drill a small hole through the lid using a 1/4-inch metal drill bit and route the wire through it, which allows the lid to close fully while the pack sits underneath.
Tip: Warm white LEDs in the 2200K–2700K range produce the amber glow that most closely mimics actual fireflies. Avoid cool white, which looks sterile rather than magical in this context.
Budget: $8–$20 per jar
7. Autumn Spiced Potpourri Jars
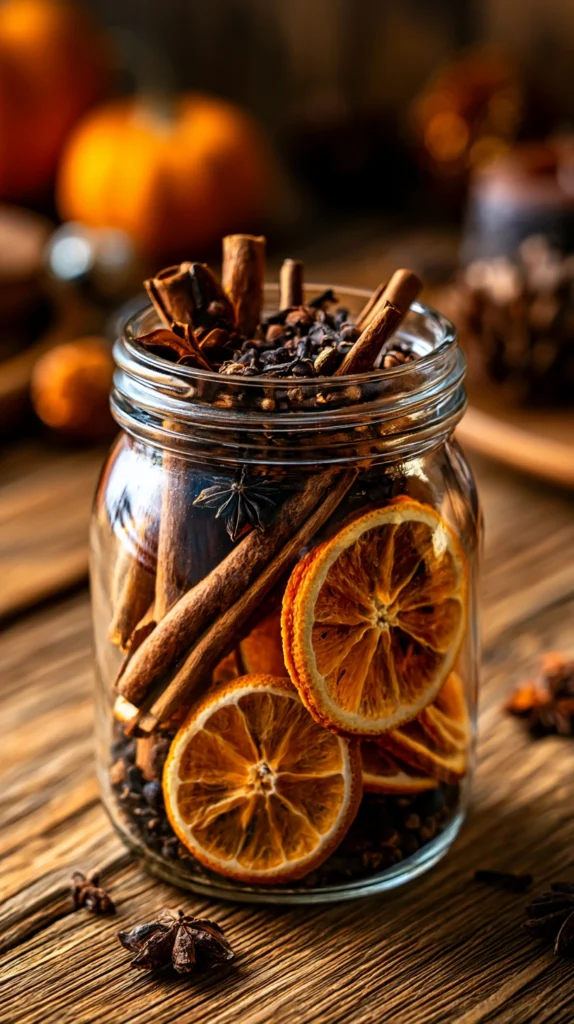
A mason jar filled with seasonal spices and dried botanicals works as both a visual display and a subtle room scent — one that doesn’t overpower a space the way candles or plug-ins can. The key is balancing aromatic elements with visually interesting ones so the jar looks composed rather than like a pile of spice rack overflow.
Dried orange slices are the visual anchor of most autumn potpourri jars. Slice navel oranges approximately 1/4-inch thick, place on a parchment-lined baking sheet, and dry at 200°F for 4–5 hours, flipping once halfway through. They’ll lose most of their moisture and deepen in color to a rich amber. Supplement with whole cinnamon sticks (cut or broken to fit the jar width), whole cloves, star anise, and dried rosemary or bay leaves for variation in texture and form.
Layer these elements loosely in a wide-mouth quart jar rather than packing them tightly — visible layers create more visual interest than a compressed jumble. Add 5–8 drops of cinnamon or clove essential oil to a small cotton ball tucked into the center of the jar to amplify the natural scent of the dried materials. Refresh the oil every 2–3 weeks as the scent fades.
Tip: Place a small square of cheesecloth over the jar mouth before adding the lid ring — this allows the scent to escape continuously without fully opening the jar, and it gives the jar a finished, intentional look rather than the appearance of a storage container.
Budget: $10–$25
8. Winter Frosted Lantern Jars
Frosted glass has a quality that clear glass doesn’t — it diffuses light rather than transmitting it directly, creating a soft luminous glow when a candle or LED is placed inside. Creating a frosted effect on a mason jar requires only one specialty product and produces a result that looks genuinely professional.
Rust-Oleum Frosted Glass Spray or Krylon Frosted Glass Finish are the two most reliable products for this application. Both are available at hardware and craft stores for $6–$10 per can, and a single can covers 6–8 jars. Apply in thin, even passes from about 10 inches away — going too close causes the spray to pool, which creates drips and uneven coverage. Two to three thin passes produce better results than one heavy one.
For a more decorative effect, apply tape or contact paper in geometric shapes — triangles, horizontal bands, diamonds — before spraying, then remove while the frosting is still slightly tacky. This leaves clear glass windows within a frosted field, which creates a lantern that shows the candle flame directly in some areas and diffuses it in others. A tea light or LED tea light inside produces enough light to be effective without requiring a deep jar.
Tip: Warm the jars slightly with a hair dryer on low heat before spraying in cold weather. Frosted glass spray adheres poorly below 50°F and can produce a grainy, uneven texture. Room temperature or slightly warm glass gives a smooth, even frosted surface.
Budget: $10–$25 for 6–8 jars
9. Spring Watercolor Painted Vases
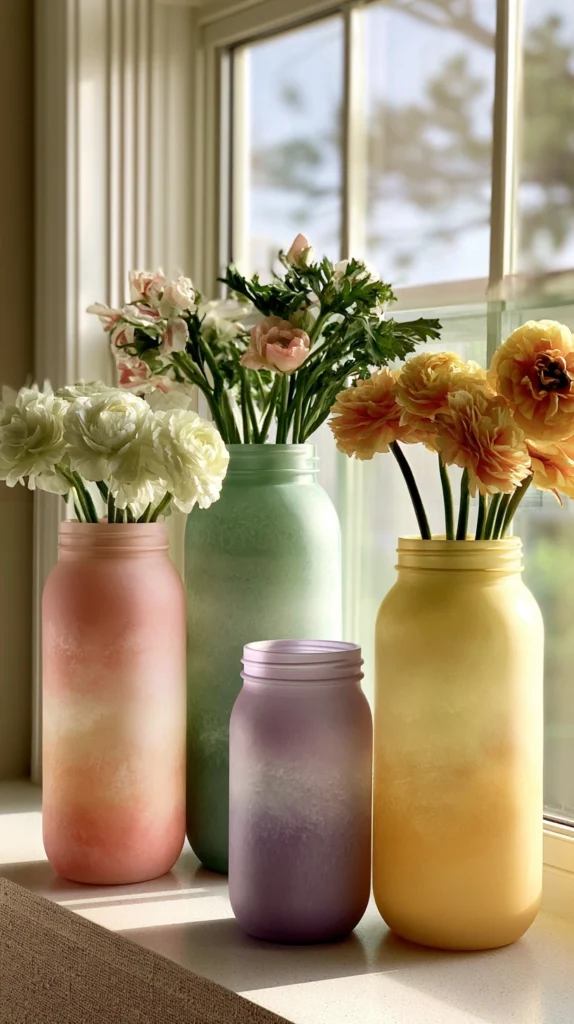
Paint applied to the inside of a mason jar produces a watercolor effect that can’t be replicated on the outside — the glass surface softens and diffuses the paint slightly, giving it a translucent, luminous quality. These make excellent spring vases for fresh or dried flowers and work equally well as standalone decorative objects on a shelf or windowsill.
Use acrylic craft paint thinned with water to about the consistency of heavy cream. Pour a small amount — 2–3 tablespoons — into the jar, then tilt and rotate the jar slowly to coat the interior surface completely. Pour out any excess, then set the jar upside down on a folded paper towel for 30 minutes to allow remaining excess to drain. Place upright to finish drying. The result is a thin, uneven layer of color on the interior glass that reads as watercolor rather than opaque paint.
For a gradient or ombre effect, apply a second color while the first is still slightly tacky — where the two meet they’ll blend naturally. Spring palettes in soft pink, sage green, lavender, and pale yellow work particularly well with this technique. Avoid dark or saturated colors, which cover too much of the glass and lose the translucent quality that makes this technique distinctive.
Tip: Cure the finished jars in an oven at 250°F for 30 minutes after the paint dries completely. This heat-sets the acrylic and makes it significantly more durable for handling — uncured interior painted jars can crack or peel when they contact water from fresh flowers.
Budget: $8–$20 for 4–6 jars
10. Summer Outdoor Tiki Torch Jar
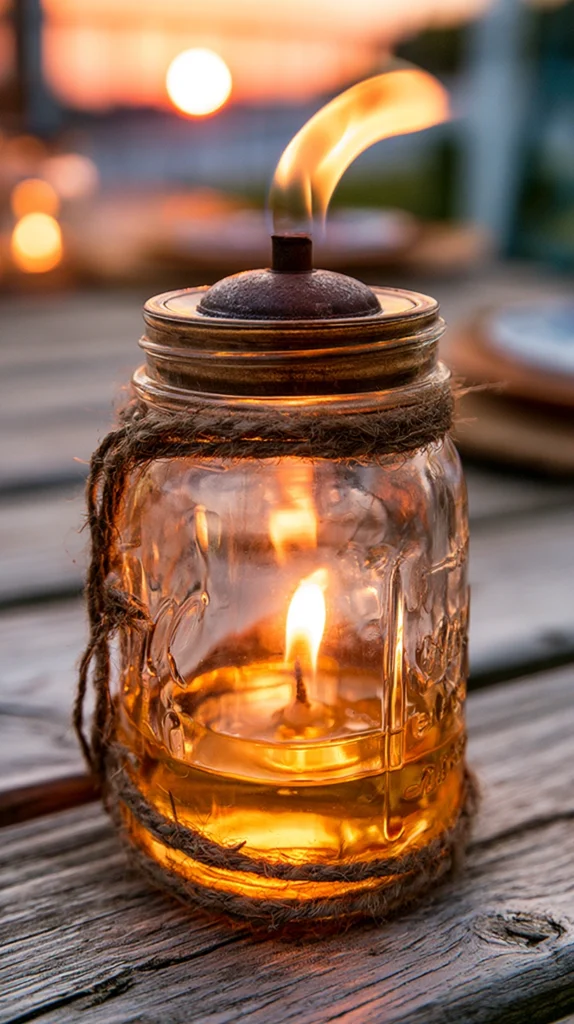
A mason jar tiki torch uses the same principle as a traditional tiki torch — a wick drawing citronella lamp oil from a reservoir — in a form that looks significantly better on an outdoor table and doesn’t require driving bamboo stakes into the ground.
Purchase tiki torch replacement wick kits, which include a metal wick holder designed to fit into a standard jar mouth (wide-mouth and regular-mouth versions are available separately). Fill the jar approximately two-thirds full with citronella lamp oil — not essential oil, which is too thin and volatile for an open flame. The metal wick holder sits in the jar mouth and positions the cotton wick so the tip extends about 1/2 inch above the holder opening.
Allow the wick to absorb oil for at least 15 minutes before lighting. A dry wick will burn through immediately without drawing fuel. Trim the wick to 1/4 inch before each use — a longer wick produces excess soot and a wavering flame rather than a clean steady burn. These jar torches burn for approximately 6–8 hours per fill on a standard quart jar.
Tip: Wrap the lower half of the jar in a strip of galvanized wire mesh or metal screen for a more industrial outdoor aesthetic and an added layer of heat protection. Lamp oil burns cooler than candle wax, but the glass can still become warm with extended use.
Budget: $15–$35 for a set of 4
11. Autumn Painted Pumpkin Jars
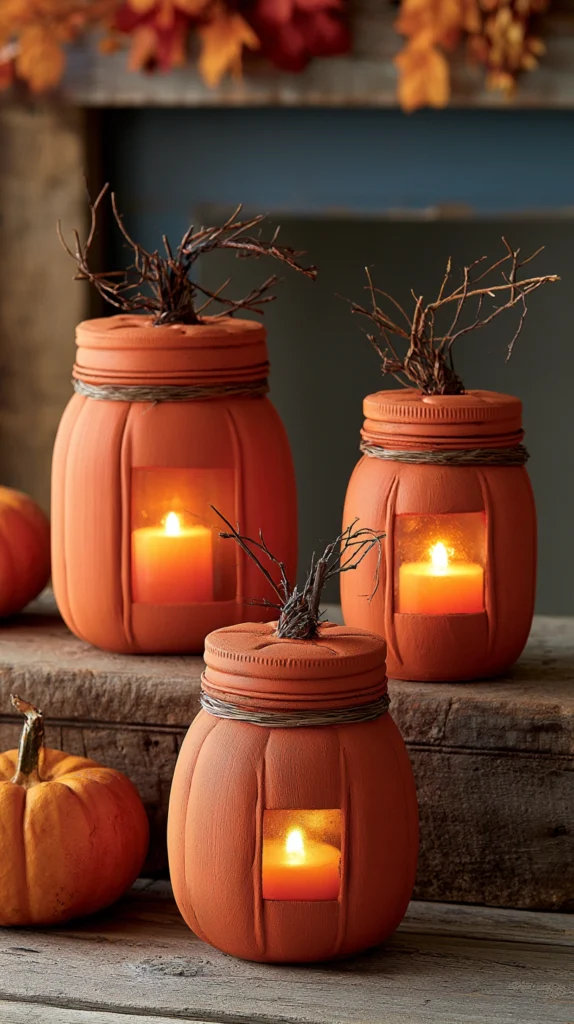
Transforming mason jars into miniature pumpkins is a more versatile autumn decoration than actual pumpkins — they don’t rot, they can hold a candle or LED light from inside, and they work on surfaces where a real pumpkin would be too heavy or too large.
Use orange spray paint for the base coat — two thin passes on the outside of the jar, allowing full drying between coats. Once dry, add vertical lines with a thin brown paint pen or a small brush and brown acrylic paint to simulate pumpkin ribs. These lines don’t need to be perfectly even — slight variation reads as natural rather than sloppy. The number of lines depends on jar size: a half-pint jar looks right with 4–5 rib lines, a quart jar with 6–8.
For the stem, hot-glue a short section of twig — approximately 1–1.5 inches long — to the center of the lid. Sand the cut ends of the twig smooth before gluing to prevent splinters and improve adhesion. Add a small loop of twisted wire or a few dried leaves from the potpourri project around the base of the twig for a finished appearance. A tea light or battery LED candle inside glows warmly through the orange paint and rib lines.
Tip: Use matte orange spray paint rather than gloss or satin — matte reads as more natural and pumpkin-like, while gloss looks more like painted ceramic and loses the gourd quality you’re creating.
Budget: $10–$25 for 4–6 pumpkin jars
12. Winter Advent Calendar Jar Set
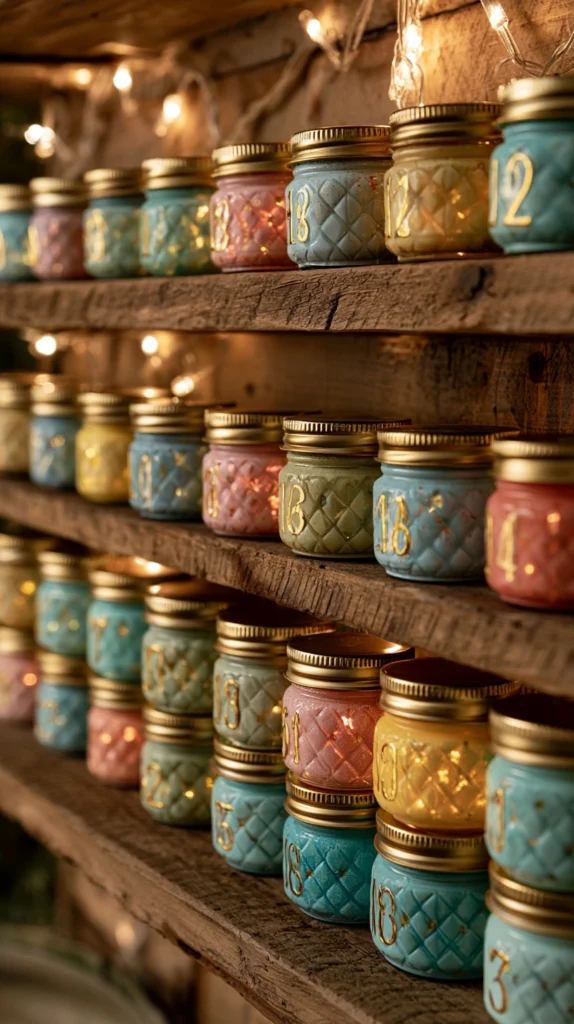
A set of 24 small mason jars used as an advent calendar replaces paper calendars and flimsy cardboard boxes with something reusable across multiple years. Each jar holds a small treat, a note, a tiny ornament, or a gift card, and the set displayed together as a group is a substantial seasonal decoration in its own right.
Use 4 oz quilted crystal jelly jars — these are the smallest standard mason jar size, and their faceted surface catches light and looks decorative without any additional treatment. Number each jar with paint pens in a contrasting color — gold or white on clear glass both read well from a distance — or use small number stickers sealed with a coat of Mod Podge. Display them in a wooden crate, on a tiered cake stand, in a vintage letterpress tray, or simply arranged in rows on a mantelpiece or shelf.
Fill each jar with contents appropriate to who will be opening them. For children: a small candy, a joke written on paper, a sticker, or a small toy. For adults: a coffee pod, a piece of good chocolate, a folded recipe, or a small packet of specialty tea. The ritual of the calendar — opening one jar per day — matters more than the contents, which allows flexibility in filling without pressure to find 24 significant gifts.
Tip: Store the empty jars nested inside each other in a zip-top bag or small box between seasons. The lids nest separately. A full set of 24 jars stores in roughly the same volume as a shoebox, which makes them practical to keep year after year unlike disposable advent calendars.
Budget: $15–$40 for the jars, variable for contents
13. Spring Terrarium Jars
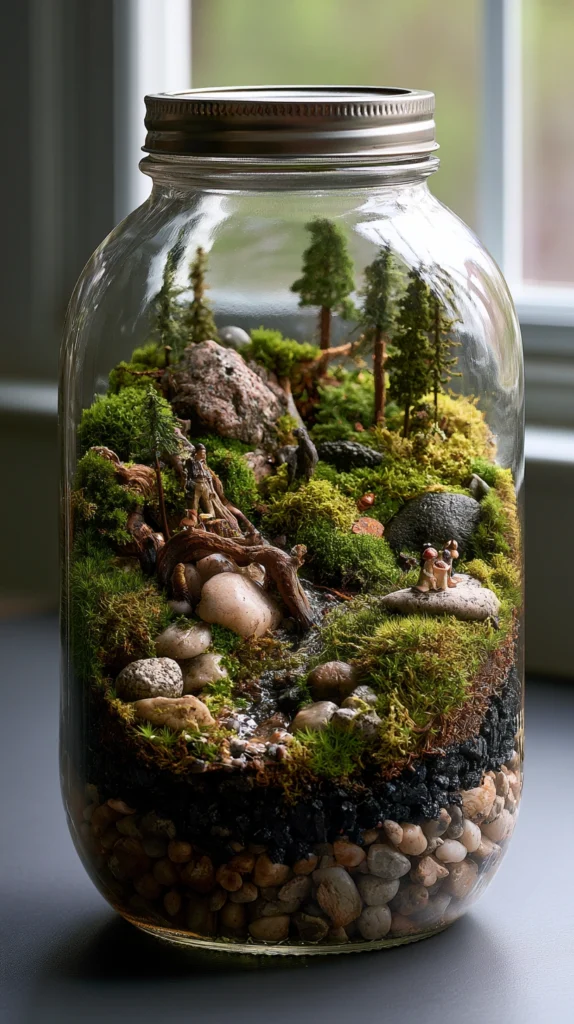
A terrarium in a wide-mouth quart or half-gallon mason jar creates a self-contained miniature landscape that requires very little maintenance and looks striking on a shelf, a desk, or a windowsill. Spring is the best time to build one because plant material is abundantly available at garden centers and the plants themselves establish fastest in spring temperatures.
Layer the base with the same drainage approach from the seed starter project: 1 inch of pea gravel, a thin layer of activated charcoal, then a 2–3 inch layer of potting mix suited to the plants you’re using. For a closed or semi-closed terrarium, select moisture-loving plants: ferns, moss, nerve plants (Fittonia), and miniature peperomia all thrive in the humid microclimate a jar creates. For an open terrarium, use succulents and cacti with a well-draining cactus mix as the soil layer.
Position the largest plant first, then fill around it with smaller plants and moss. Use a long spoon or chopstick to press plants into the soil without crushing them against the glass sides. Decorative elements — small stones, a tiny figurine, a piece of driftwood — can be placed with a chopstick and adjusted until the composition looks balanced. For a closed terrarium, add a small amount of water (2–3 tablespoons) and seal the lid — the ecosystem becomes self-sustaining through the water cycle within the jar.
Tip: Avoid placing terrariums in direct sunlight. The glass amplifies heat significantly, and direct sun through a glass jar will cook the plants inside within hours. Bright indirect light produces the best long-term result for nearly all terrarium plants.
Budget: $15–$45
14. Winter Gilded Gold Leaf Mason Jar Vases
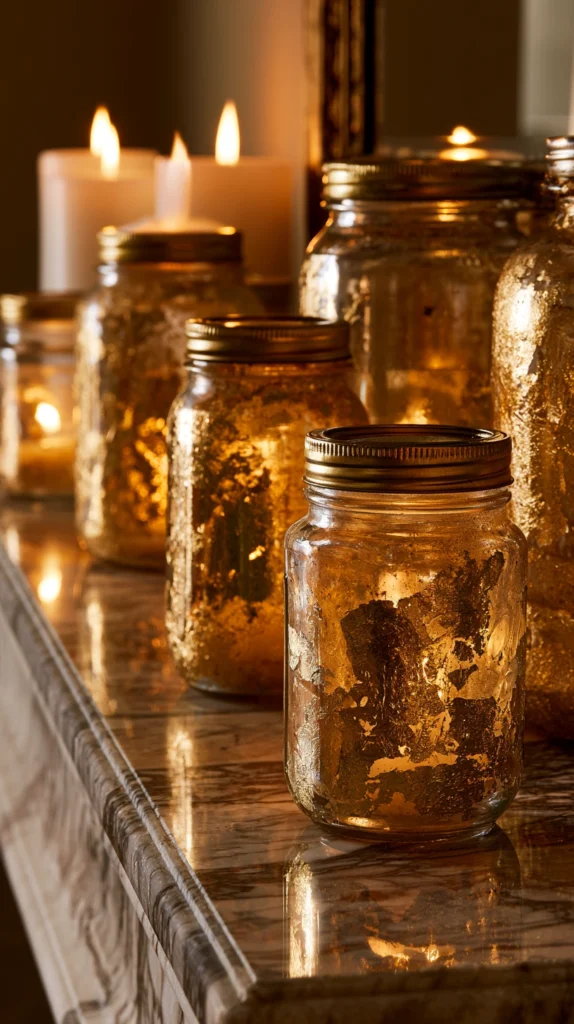
Gold leaf applied to glass has a richness that gold paint simply can’t replicate — the actual metallic leaf catches light with a depth and variation that paint renders flat. Winter is the natural season for this technique because the result pairs directly with candlelight, holiday greenery, and the warm-toned interiors of the colder months.
Composition gold leaf (an alloy that mimics the look of genuine 24-karat leaf at a fraction of the cost) is available in booklets of 25 sheets for $8–$15 and is the appropriate choice for craft use. Apply gold leaf sizing — a thin adhesive medium — to specific areas of the outer jar surface using a small brush. Coverage can be full, partial, geometric, or abstract. Allow the sizing to reach the “tacky” stage, approximately 30–45 minutes after application, before laying the gold leaf.
Press sheets of gold leaf gently onto the sized areas using a dry soft brush or your fingertip. The leaf will adhere wherever sizing was applied and break away cleanly at the edges. Once the entire sized area is covered, brush away excess leaf with the same soft brush — the unbuffed leaf breaks off cleanly. Apply a thin coat of clear varnish over the gilded areas to seal and protect the leaf from tarnishing or rubbing off with handling.
Tip: Intentional imperfection produces better results than trying to achieve seamless coverage. Areas where the leaf hasn’t fully adhered — leaving small gaps of clear glass showing through — create an aged, antique quality that looks far more sophisticated than perfectly uniform coverage.
Budget: $15–$35 for 4–6 jars
Final Thoughts
The common thread across all fourteen of these projects is that mason jars reward attention to the details that most tutorials skip: the right liquid ratios, the correct paint temperatures, the specific glitter weight, the drainage layers. A mason jar craft that looks homemade in a dismissive sense is almost always one where these underlying details were glossed over. The same project executed with the specific technique produces something that looks deliberate and considered.
Work through these seasonally rather than all at once — the projects that align with actual seasonal needs, materials, and light conditions will feel more connected to time and place than ones built out of context. A citronella candle jar made in early June and used through August carries a different quality than one made in December from a tutorial.