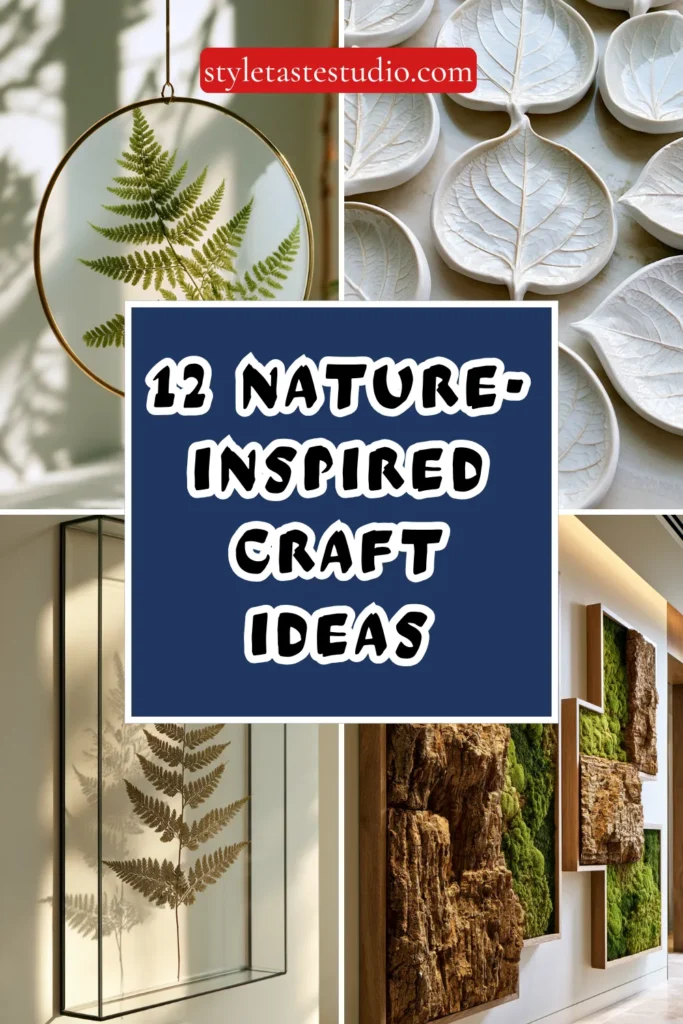
12 Nature-Inspired Craft Ideas Using Found Materials
Bringing the outdoors inside is a timeless design philosophy, but when it comes to crafting with found natural materials, it’s easy to accidentally cross the line into “summer camp” territory. Twigs, stones, and dried leaves can look cluttered or chaotic if they aren’t handled with intention.
The secret to making nature-inspired crafts feel sophisticated, modern, and elevated lies in the juxtaposition of organic textures with clean lines, high-quality secondary materials, and structural constraints. When done right, these projects add an irreplaceable, grounded texture to your home. These 12 ideas focus on specific techniques, pairings, and preservation methods to turn raw, found materials into refined decor.
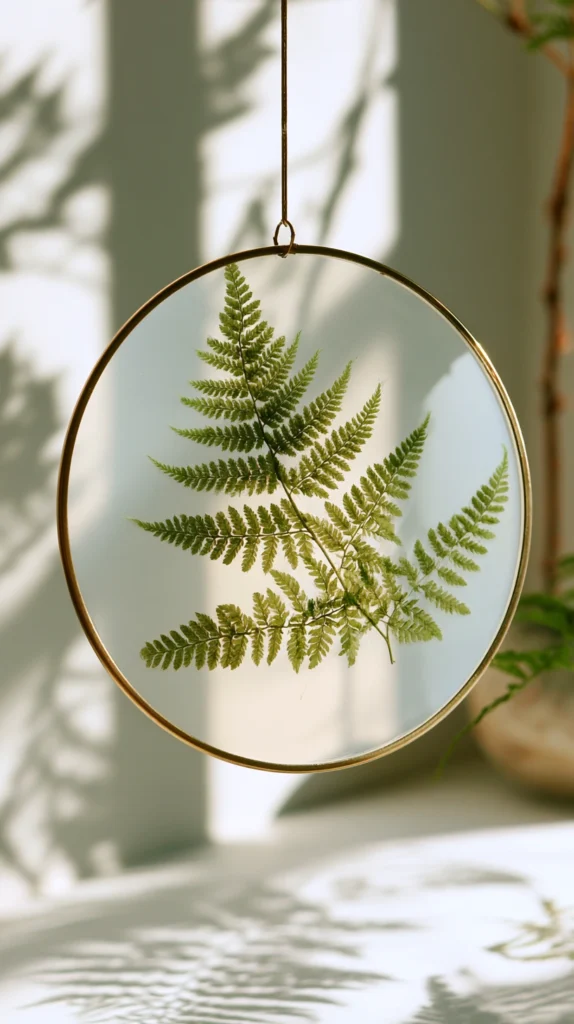
1. Pressed Botanical Floating Glass Frames
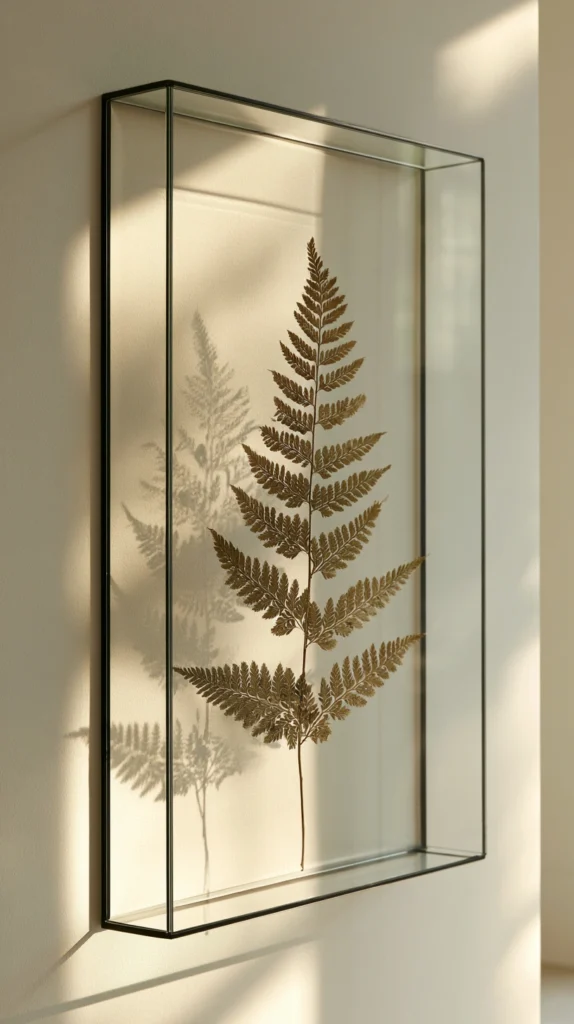
The instinct with dried flowers and leaves is often to paste them into a scrapbook or onto heavy paper, which can quickly look dated. Placing pressed botanicals inside double-pane glass floating frames, however, turns them into architectural art. The negative space around the plant allows your wall color to show through, instantly making the specimen look like a high-end museum installation.
Look for structurally interesting found flora: fern fronds, wild clover, gingko leaves, or Queen Anne’s lace. Press them between the pages of a heavy book lined with parchment paper for at least two weeks to remove all moisture. For frames, brands like Target’s Project 62 or West Elm offer clean, brass or black metal floating frames that provide the perfect modern contrast to the organic shapes inside.
When arranging, less is more. A single, perfectly preserved fern frond centered in an $8 \times 10$-inch frame has far more visual impact than a crowded collage of multiple plants.
Tip: To prevent the botanical from sliding down inside the floating glass over time, place a microscopic dot of clear archival glue (like Lineco Neutral pH Adhesive) on the back of the thickest part of the stem before closing the glass panes.
Budget: $15–$40 per frame
2. Smooth River Stone Cabinet Knobs
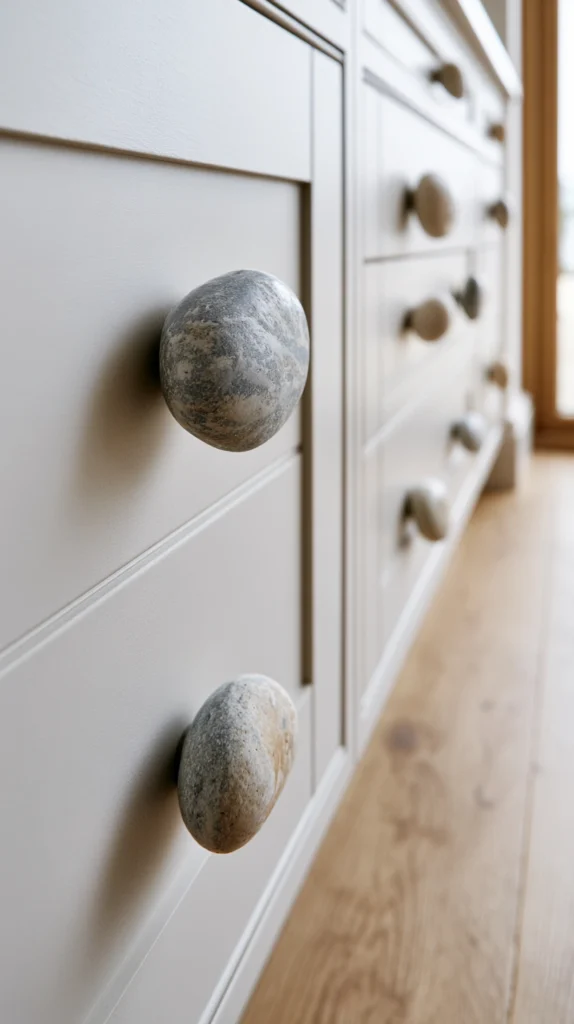
Turning found stones into functional hardware is one of the most effective ways to introduce a grounding, tactile element into a bathroom or kitchen. The key is sourcing the right stones: you want flat, ultra-smooth, river-washed or ocean-washed stones that are roughly 1.5 to 2 inches in diameter—large enough to grasp comfortably but small enough to look proportional on a cabinet door.
To turn them into hardware, you will need metric hanger bolts (or standard cabinet knob bases) and a heavy-duty two-part epoxy, such as Gorilla Epoxy or J-B Weld. Thoroughly scrub the stones with dish soap and water to remove any dirt or algae, then wipe them down with rubbing alcohol. Mix the epoxy, apply a generous amount to the flat base of the hardware thread, and press it firmly against the flattest side of the stone. Let it cure completely for 24 hours before installing.
This project works beautifully on simple, white shaker-style cabinet doors or rustic wood dressers, giving the furniture an immediate custom, artisanal upgrade.
Tip: Use a level or tape measure to ensure the hanger bolts are perfectly perpendicular to the back of the stone while the epoxy cures. If the bolt is crooked, the stone will sit awkwardly at an angle against your cabinet face.
Budget: $10–$25 for a set of 4–6 knobs
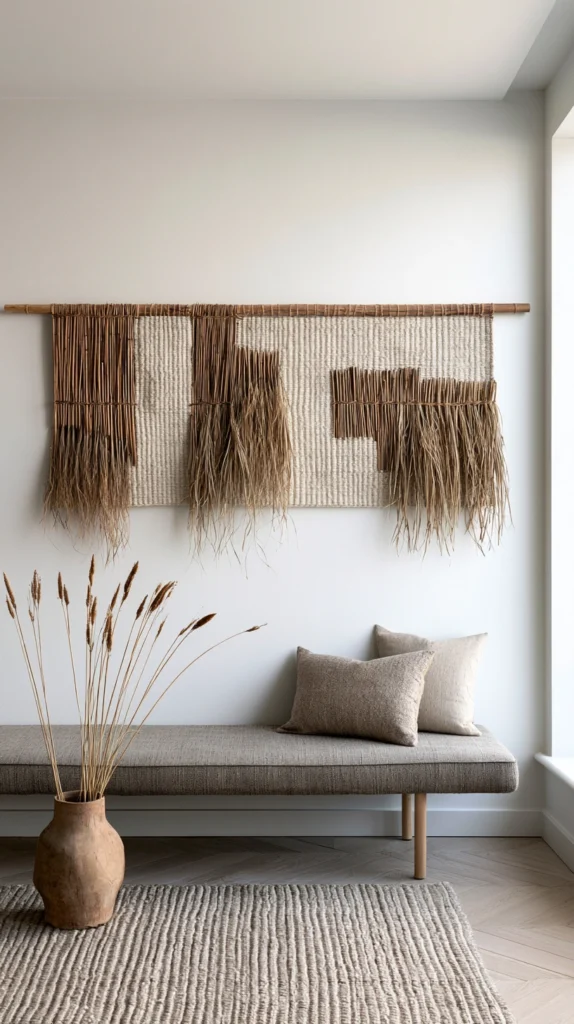
3. Minimalist Driftwood Wall Hangings with Cotton Cord
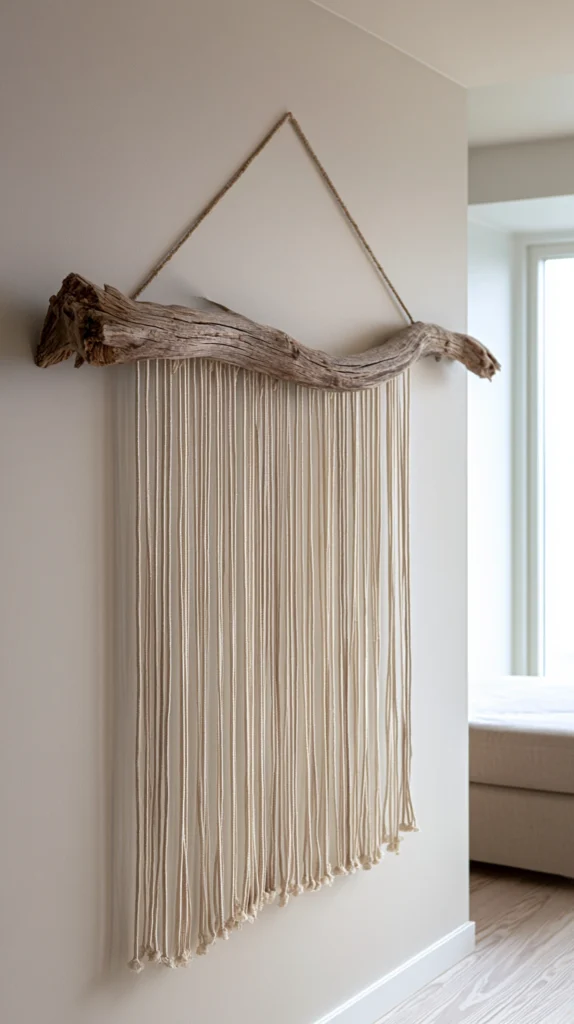
Driftwood has a beautiful, naturally weathered texture and a soft gray-beige color palette that fits perfectly into minimalist design. Instead of using it for clichéd coastal signs, use a single, structurally striking piece of driftwood as the anchor for a modern textile wall hanging.
Source a sturdy piece of driftwood between 18 and 30 inches long. Clean it by brushing off loose sand and baking it in an oven at 95°C (200°F) for an hour to kill any microscopic pests. Once cooled, use high-quality, single-strand cotton macrame cord (brands like BOCHAO or GANXXET offer gorgeous muted, earthy tones) to create a minimalist fringe hanging.
You don’t need complex knots; a series of simple lark’s head knots spaced evenly across the branch creates a clean, vertical waterfall effect that highlights the natural curve of the wood.
Tip: Comb through single-strand cotton cord with a fine-tooth pet brush or fine comb after hanging to create a perfectly smooth, brushed-fringe texture that contrasts beautifully with the rough bark or smooth grain of the driftwood.
Budget: $12–$30
4. Pressed Leaf Silhouette Clay Trinket Dishes
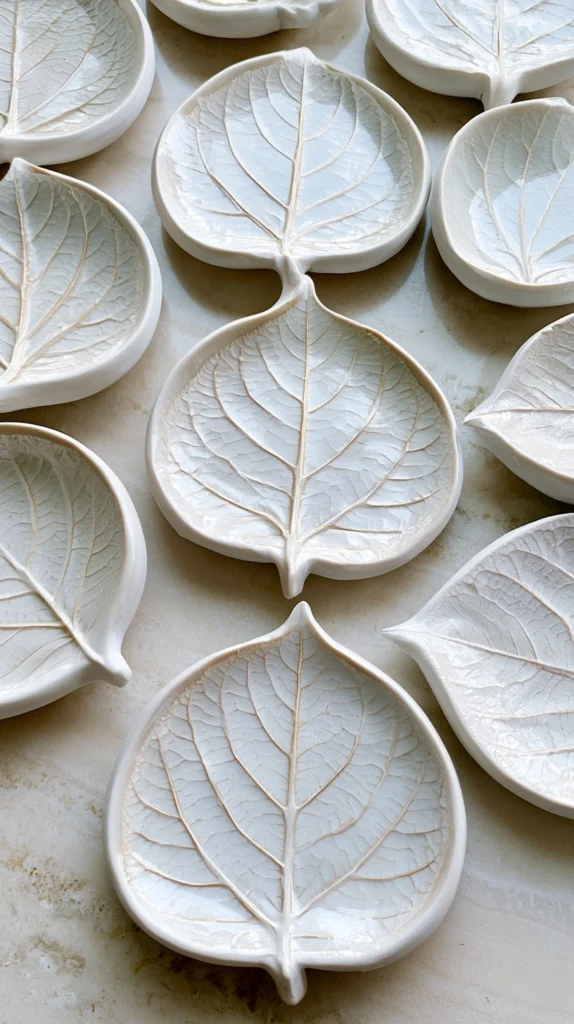
Air-dry clay is incredibly versatile, but it can look chalky and unrefined if left unfinished. By using deeply veined, found leaves—such as monstera, oak, maple, or fig leaves—as a natural stamp, you can create elegant, organic trinket dishes for jewelry or keys.
Roll out a high-quality white air-dry clay (like DAS Air-Dry Clay) to a consistent 1/4-inch thickness. Place your freshly collected leaf vein-side down onto the clay and use a rolling pin to firmly press it into the surface, transferring the detailed texture. Use a craft knife to cut around the perimeter of the leaf shape. Lift the clay cutout and gently place it inside a shallow kitchen bowl lined with plastic wrap so it dries in a curved, functional dish shape.
Once dry (usually 24–48 hours), sand the edges smooth with fine-grit sandpaper. Seal the dish with a high-gloss liquid glaze like Mod Podge Triple Thick or a thin coat of clear resin to give it a ceramic-like finish.
Tip: To make the structural veins of the leaf pop, water down a tiny amount of brown or charcoal acrylic paint and brush it over the dried clay, immediately wiping the surface with a damp paper towel. The pigment will stay trapped inside the deep leaf veins while leaving the flat surfaces clean.
Budget: $10–$25
5. Architectural Twig and Branch Picture Frames
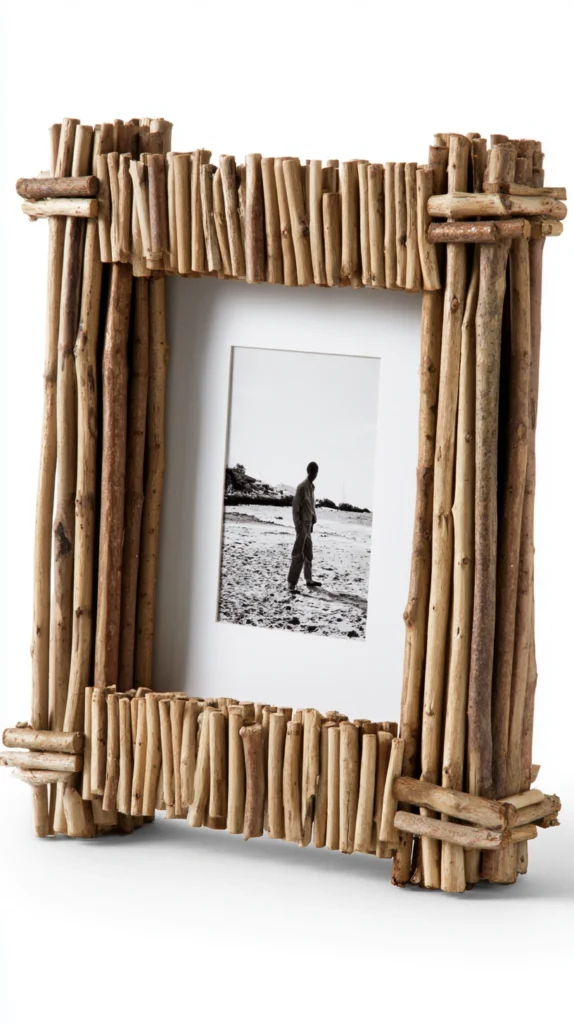
Building a picture frame out of twigs can easily cross into looking messy if the twigs are haphazardly glued together. The architectural approach requires straight, uniform twigs collected from the same species of tree (birch, willow, or dogwood work exceptionally well) so the color and texture remain cohesive.
Start with a cheap, flat-faced wooden frame as your base (the IKEA YLLEVAD or simple unfinished pine frames from craft stores are perfect). Cut your twigs to matching lengths using sharp hand pruners, ensuring clean, straight cuts. Using hot glue or wood glue, align the twigs perfectly parallel to one another along the frame’s edges, completely covering the underlying wood structure.
The resulting frame has a dense, ribbed texture that feels highly deliberate and structured, resembling high-end mountain lodge or organic modern design.
Tip: For a seamless finish at the corners, use a miter box to cut the twigs at a precise 45-degree angle. This extra bit of geometry elevates the craft from a quick DIY to a professional-looking piece of decor.
Budget: $5–$20
6. Acorn Cap and Wool Felt Garland
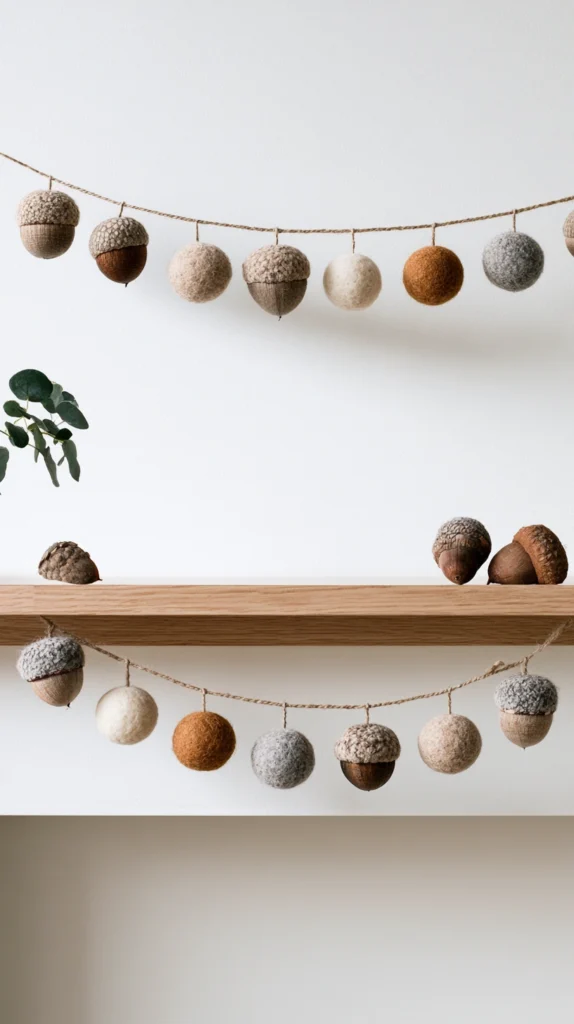
Acorn caps offer a beautiful, woody texture and an immaculate dome shape that pairs incredibly well with the soft, matte texture of wool felt. A minimalist garland made from these materials adds a cozy, natural warmth to a mantle, bookshelf, or window frame.
Collect intact acorn caps and soak them in warm, soapy water to remove dirt. Bake them on a baking sheet at 120°C (250°F) for 20 minutes to dry them thoroughly and ensure they are pest-free. Purchase 100% wool felt balls (roughly 2cm in size) in neutral tones like cream, oatmeal, olive, or mustard. Using a hot glue gun, apply a small bead of glue to the inside of the acorn cap and press a wool felt ball firmly inside.
String the completed acorn beads onto a length of natural hemp twine or embroidery floss using a wide-eyed tapestry needle pushed directly through the wool felt balls.
Tip: Space the acorns about 2 to 3 inches apart on the twine and tie a small, simple knot on either side of each wool ball. This keeps them securely in place so they don’t slide into a clump when the garland is draped.
Budget: $10–$30
7. Pressed Fern Sun Catchers with Transparent Contact Paper
Sun catchers are a brilliant way to utilize the translucency of delicate natural materials. Ferns and wild grasses are ideal for this because their intricate, silhouettes look striking when back-lit by direct sunlight.
Cut two matching shapes (circles, squares, or arches) out of clear, matte-finish self-adhesive contact paper or laminating sheets. Peel the backing off the first piece and carefully lay down your fully pressed, dried ferns and botanicals. Once you are satisfied with the arrangement, carefully overlay the second piece of contact paper from one edge to the other, smoothing out air bubbles with a plastic scraper or credit card as you go.
To give the sun catcher structural integrity and a clean border, sandwich the edges inside a minimalist wooden embroidery hoop or frame it with metallic copper tape (often used in stained glass work). Hang it in a window using clear monofilament fishing line.
Tip: If any stubborn air bubbles get trapped around the thick stems of the plants, use a fine sewing pin to prick a tiny hole in the contact paper, then press the air out toward the hole with your thumb.
Budget: $8–$20
8. Deep-Shell Soy Wax Candles
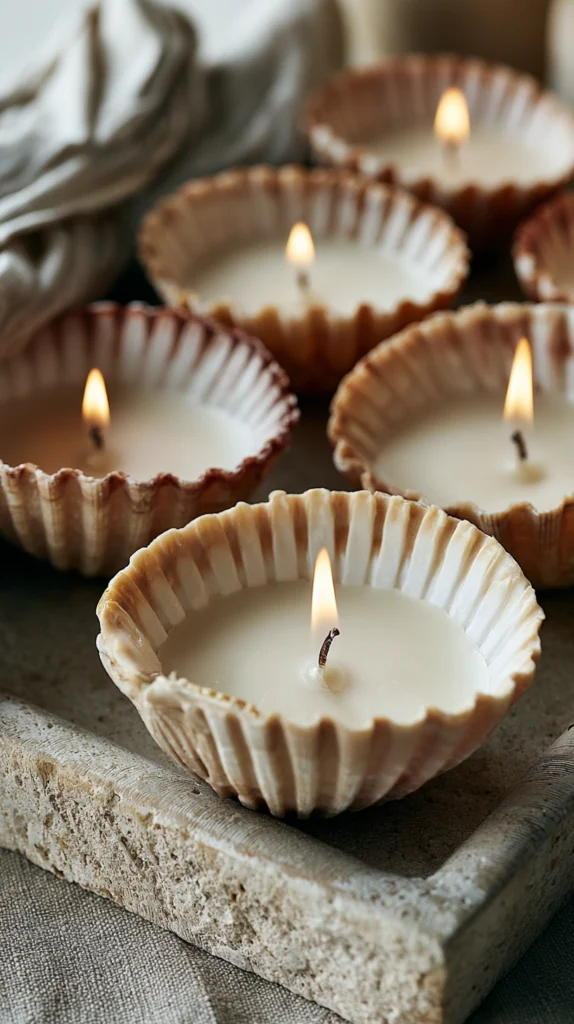
If you live near the coast, large, deep seashells like scallop shells, whelk shells, or thick clam shells make exquisite, natural vessels for hand-poured soy candles. They bring an effortless, organic luxury to a coffee table or bathroom vanity.
Thoroughly clean the shells by boiling them in water with a dash of bleach for 10 minutes to eliminate any ocean odors, then let them dry completely. You will need soy wax flakes (such as Freedom Soy Wax), pre-tabbed cotton candle wicks, and your choice of essential oils. Melt the wax in a double boiler. While it melts, use a drop of hot glue to secure the metal tab of the wick to the deepest point inside the shell.
Carefully pour the melted wax into the shell, keeping the wick centered using a clothes-pin resting across the edges of the shell. Let the wax cool completely at room temperature until solid and opaque.
Tip: Because seashells rarely have perfectly flat bottoms, prop them up in a bed of sand or on top of crumpled aluminum foil while pouring the wax. This keeps them perfectly level so the hot wax doesn’t spill over the shallow edges.
Budget: $15–$35 for wax and wicks
9. Monochromatic Botanical Plaster Casts
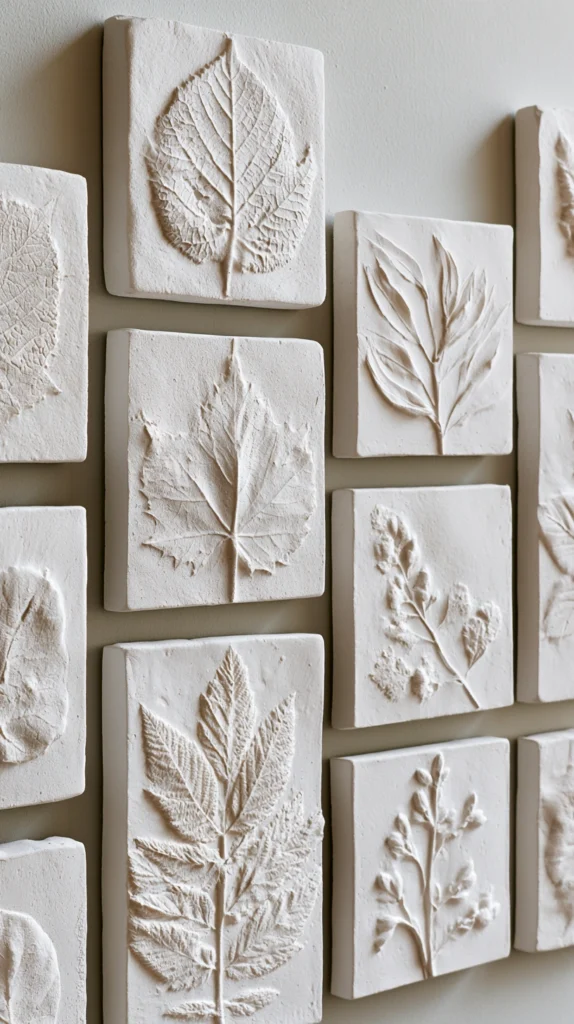
Plaster casting captures the absolute finest textures of nature—down to the microscopic veins of a leaf or the delicate hairs of a flower stem—and turns them into a rigid, sculptural tile that looks like hand-carved stone.
To create a cast, roll out a flat slab of non-drying modeling clay (like plasticine) to about 1 inch thick. Press your found botanical specimens firmly into the clay to create a deep, crisp imprint, then carefully remove the plants. Build a temporary cardboard or plastic collar around the clay slab to act as a dam. Mix standard Plaster of Paris according to the package instructions and slowly pour it over the clay mold.
Let the plaster cure for approximately one hour. Once hard and warm to the touch, peel away the modeling clay to reveal a raised, three-dimensional plaster replica of your natural materials.
Tip: Leave the plaster completely unpainted for a clean, Scandinavian look, or apply a very light wash of matte white chalk paint to ensure the tile has a uniform, chalky texture across both the cast and the background.
Budget: $12–$25
10. Pressed Petal and Leaf Resin Coasters
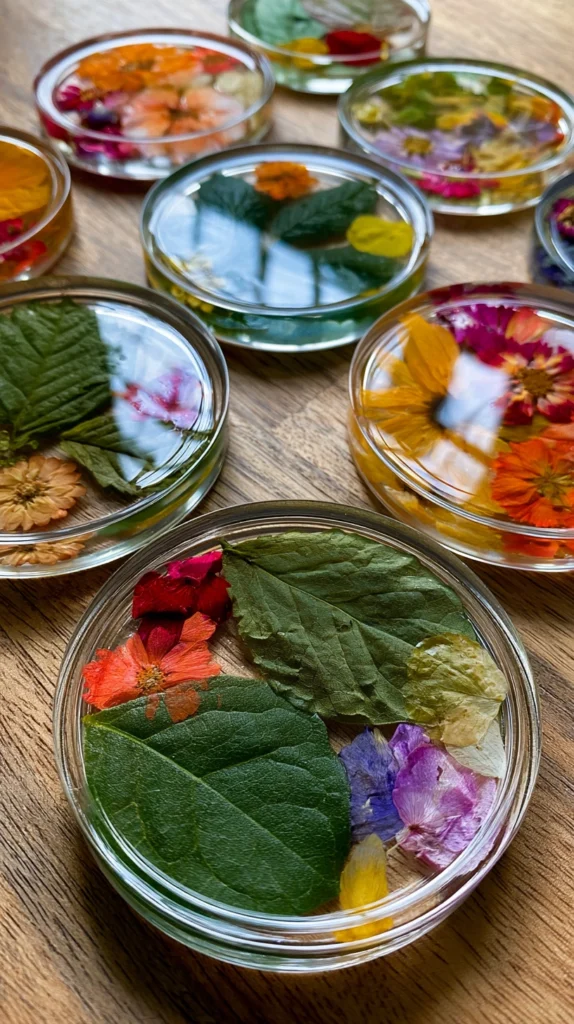
Clear casting resin allows you to preserve fragile items like autumn leaves, colorful flower petals, or small clover patches in a durable, glass-like medium that can withstand daily use as functional drink coasters.
You will need a crystal-clear, UV-resistant two-part epoxy resin (such as ArtResin or EnviroTex Lite) and round or hexagonal silicone coaster molds. Mix the resin precisely according to the manufacturer’s instructions. Pour a thin base layer of resin into the mold, then use tweezers to place your completely dry, pressed petals into the fluid. Let this initial layer gel for a few hours so the plants don’t float to the top.
Pour a final top layer of clear resin over the plants to fill the mold completely. Pop any surface bubbles that arise by gently passing a long-reach lighter or heat gun over the surface before leaving it to cure for 24–48 hours.
Tip: The botanicals must be 100% dry before entering the resin. Any residual moisture inside a fresh leaf or petal will react chemically with the resin, causing the plant to turn an unattractive brown or rot inside the cured plastic over time.
Budget: $25–$50
11. Minimalist Grass and Reed Wall Weavings
Common roadside grasses, reeds, and dried palm fronds possess a linear structural beauty that is often overlooked. Weaving these rigid, natural elements through a simple vertical thread warp creates a stunning, architectural wall hanging full of delicate texture.
You can construct a basic loom using a sturdy piece of scrap cardboard. Cut notches spaced 1/4-inch apart along the top and bottom edges of the cardboard and string it with neutral cotton warp thread. Instead of using traditional yarn for the horizontal weft, slide your collected dried reeds, long pine needles, or stiff grasses over and under the vertical threads.
Once the weaving is full, cut the warp threads off the back of the cardboard and tie them securely to a straight wooden dowel or a clean branch for hanging. The resulting textile is highly geometric yet entirely organic.
Tip: Harvest grasses and reeds while they are still slightly green and flexible, then weave them immediately. They will dry and harden directly into the shape of your weaving without snapping or crumbling during the process.
Budget: $5–$15
12. Geometric Bark and Preserved Moss Wall Panels

Moss walls have skyrocketed in popularity in modern interior design because they introduce vibrant, organic color without requiring light or water. You can create a high-end version of this by framing a balanced composition of found tree bark and preserved mosses.
Source interesting pieces of fallen tree bark (birch, oak, or deeply ridged pine) and clean them thoroughly. Buy a variety pack of preserved mosses—such as mood moss, reindeer moss, and sheet moss—which have been treated with glycerin so they stay soft and vividly colored forever. Use a deep shadowbox frame or a clean wooden panel as your canvas.
Using a hot glue gun, arrange the heavy bark pieces first to establish your structural lines, then pack the gaps densely with the different textures and shades of moss. The contrast between the rough, dark bark and the soft, vibrant green moss creates a captivating, living-art effect.
Tip: Pack the moss together as tightly as possible. If you glue it down too sparsely, the wood backing will show through, making the project look thin and unfinished rather than lush and abundant.
Budget: $20–$55
Final Thoughts
Crafting with found materials is an exercise in editing. Nature provides an overwhelming abundance of color and shape, but the projects that successfully make the leap from “craft project” to “home decor” are the ones where the maker imposes restraint.
Focus on highlighting one or two textures at a time, rely on high-quality structural elements like glass, brass, and clean wood to frame your finds, and always take the time to properly clean and preserve your materials. When you treat found objects with the same respect you would give store-bought components, the results are consistently stunning.