13 DIY Farmhouse Craft Ideas for Charming Home Decor
Farmhouse craft projects earn their place when they’re built from materials that belong to the aesthetic — raw wood, galvanized metal, aged iron, cotton muslin, beeswax, worn linen — rather than assembled from craft store kits designed to approximate the look without the substance.
The difference between a farmhouse room that feels genuinely lived-in and one that feels like a staged set is almost always material honesty. A sign made from actual reclaimed barn board reads differently from one cut from MDF and is distressed with sandpaper, even when they’re photographed side by side.

The projects below move through wall treatments, surface accessories, lighting, and textiles with specific techniques, measurements, and sourcing for each. Some take an afternoon. A few take a weekend. All of them require more deliberate attention than the average craft tutorial suggests, and that investment is exactly what makes the finished result look like it belongs rather than arrived.
1. Reclaimed Wood Shiplap Sign with Hand-Lettered Verse
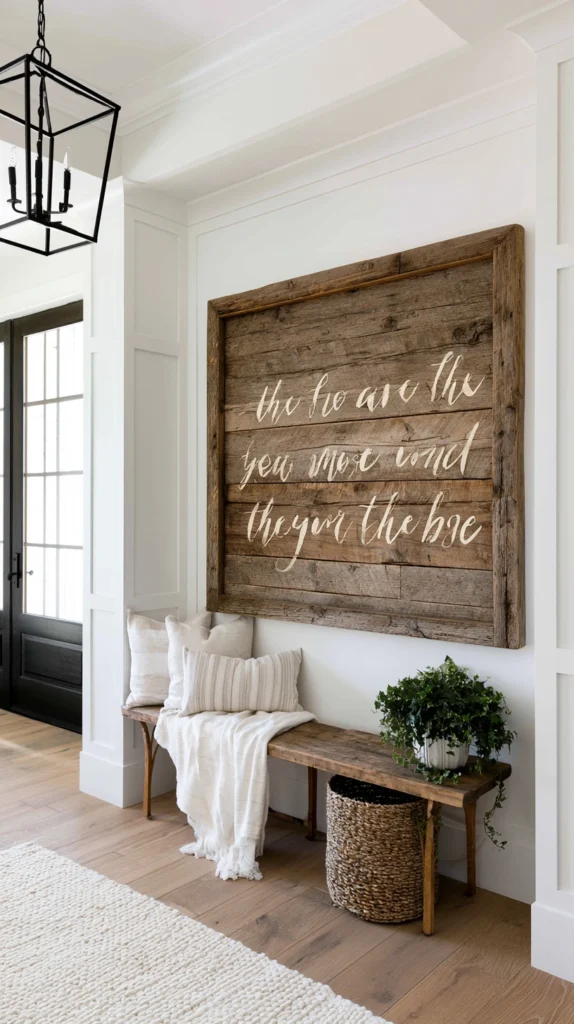
A hand-lettered wood sign made from genuine reclaimed lumber is the farmhouse craft project that gets the most wrong in the most tutorials — rough lettering on smooth pine stained dark brown, passed off as aged barn wood. The version that actually works starts with the right board and ends with lettering that looks calligraphed rather than painted freehand.
Source genuine reclaimed wood from a local salvage yard, Habitat for Humanity ReStore, or an old fence or pallet that has actually weathered outdoors for years.
The difference is visible immediately — genuine aged wood has gray oxidation in the grain, nail holes, checking cracks, and color variation that no staining process fully replicates. For a standard 18×24-inch sign, you need two to three boards of 1×6 or 1×8 reclaimed pine cut to length and joined on the back with two perpendicular 1×2 cleats screwed across the seams. Use construction adhesive between boards before screwing the cleats — the combination of glue and mechanical fastening prevents the boards from separating as humidity fluctuates.
For lettering, print your chosen phrase at full size using a word processor or Canva, then transfer it to the wood using chalk transfer paper — place the chalk paper chalk-side down on the wood, lay the printed phrase on top, and trace the letters firmly with a ballpoint pen. The chalk outline left on the wood is then painted over with a small artist’s brush using chalk paint in off-white or cream. Two thin coats of chalk paint produce a cleaner edge than one heavy coat. Once dry, sand lightly with 220-grit paper over the lettering to create gentle wear at the edges — this reads as aged rather than freshly painted.
Finish the board surface with a single coat of clear matte wax applied with a soft cloth and buffed lightly. The wax deepens the wood grain without adding sheen and protects the painted lettering from humidity.
Tip: Choose phrases of 10 words or fewer for a sign in this size range. Longer phrases require smaller lettering that loses legibility from a distance and looks crowded against the natural character of the wood grain.
Budget: $18–$55
2. Galvanized Metal Pipe Floating Shelf with Reclaimed Wood
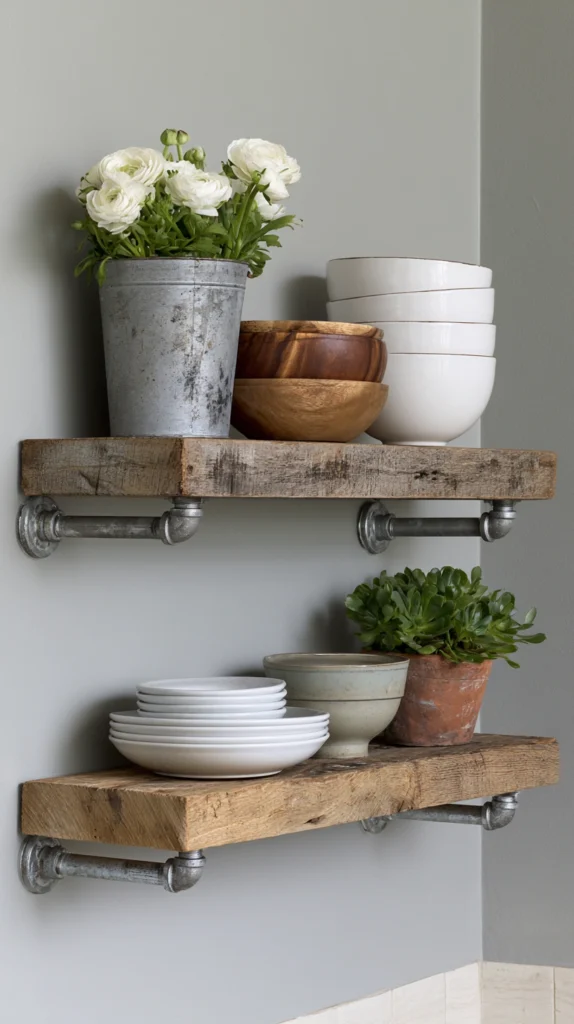
A floating shelf built from galvanized pipe brackets and a reclaimed wood plank is one of the most structurally honest farmhouse projects available — it looks exactly like what it is, which is what makes it work. The combination of industrial metal and aged wood is the material pairing that defines modern farmhouse style more than any other.
For a single shelf 36 inches long, you need one reclaimed 1×8 board cut to length, two galvanized pipe flanges (3/4-inch floor flanges, available at any hardware store for $4 to $6 each), two matching 3/4-inch pipe nipples at 6-inch length for the wall standoff, and four 3/4-inch pipe elbows pointing upward to support the shelf front edge. The assembly creates a simple L-bracket in pipe — flange screwed to wall, nipple projecting outward horizontally, elbow turning upward, and the board resting in the upward-facing elbow cups.
Mount flanges into wall studs — a shelf of this type will carry real load, and drywall anchors alone will pull free under books or kitchen equipment. Locate studs with a stud finder and position the flanges accordingly, even if that means adjusting the shelf position slightly from your original plan. Use 2.5-inch wood screws through the flange holes into the stud for solid purchase.
Sand the reclaimed board to 120 grit — enough to remove splinters without erasing the surface character. Apply two coats of raw linseed oil rather than stain or polyurethane. Raw linseed oil deepens the natural color and grain without adding any film or sheen, and it continues to cure over weeks, gradually hardening the surface. Allow 48 hours between coats and 72 hours after the final coat before placing anything on the shelf.
Tip: Buy pipe components from a plumbing supply house rather than a big-box home store. The same galvanized flanges and nipples cost 30 to 50% less at a plumbing supplier and are available in a wider range of lengths that may fit your specific wall configuration better.
Budget: $35–$75
3. Cotton Muslin Flour Sack Wreath with Dried Botanicals

A wreath made from knotted strips of cotton muslin or genuine flour sack fabric — supplemented with dried lavender, eucalyptus, or cotton stems — is the farmhouse wreath alternative to the grapevine-and-burlap versions that have been in every craft store for 20 years. The cotton version is softer, more dimensional, and pairs directly with the linen-and-grain-sack textile palette that defines the aesthetic.
Start with a 14-inch wire wreath frame — the multi-ring versions with four concentric rings give you more attachment points than the single-ring type and produce a fuller finished wreath. Cut cotton muslin or flour sack fabric into strips 1.5 inches wide and 8 inches long. You need approximately 150 to 180 strips for a full 14-inch wreath. Tie each strip to the wire frame with a simple lark’s head knot, pulling snug and pushing adjacent knots tightly together as you work. Fill all four rings of the frame completely before evaluating fullness — gaps are easier to fill before the botanical elements are added.
For the botanical accent, bundle five to seven stems of dried lavender with a 6-inch length of linen twine, tie with a simple bow, and wire the bundle to the wreath at the 10 o’clock position — slightly off-center reads as more natural than a centered placement. Supplement with two or three dried cotton stems or a small cluster of dried chamomile if available. The botanical accent should occupy roughly one-quarter of the wreath face, leaving the fabric texture as the dominant visual element.
Genuine flour sack fabric from restaurant supply stores or fabric shops has a slightly coarser weave than quilting muslin and produces better texture in the finished wreath. Avoid polyester muslin — it doesn’t knot with the same tactile quality and the synthetic sheen undermines the farmhouse material palette.
Tip: Lightly mist the finished wreath with water and allow to air dry before hanging. The moisture relaxes the fabric strips and allows them to settle into their final position, which produces a more even, full appearance than a dry-hung wreath that takes weeks to settle on its own.
Budget: $22–$50
4. Mason Jar Herb Garden with Mounted Pipe Rail
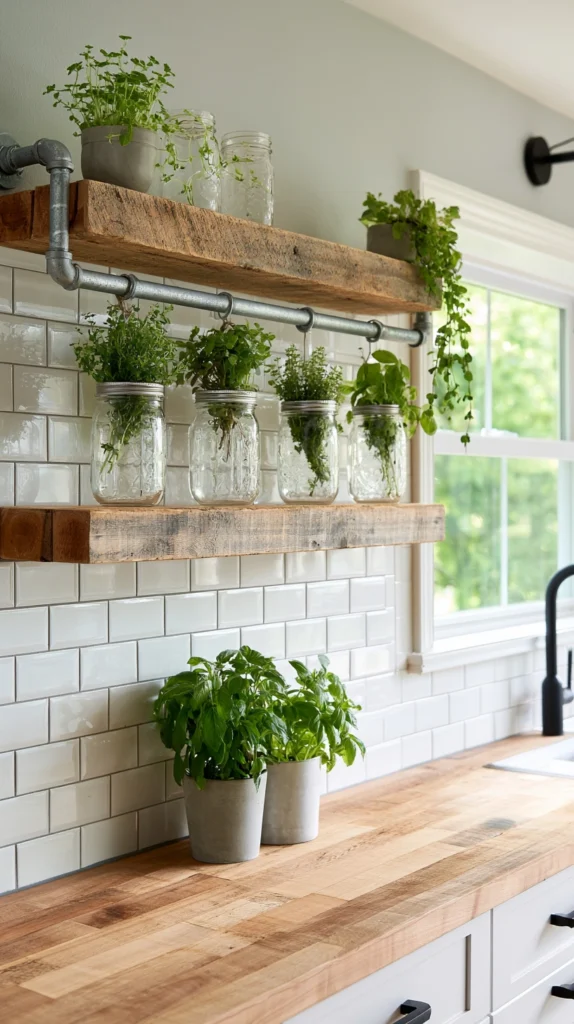
A mounted herb garden using mason jars secured to a galvanized pipe rail is a farmhouse kitchen project that is simultaneously decorative and functional — fresh herbs growing in the kitchen serve a daily cooking purpose, which means every element earns its visual place rather than simply occupying wall space.
The mounting system uses a single 3/4-inch galvanized pipe cut to 30 inches, threaded at both ends, with two pipe flanges screwing onto each end and mounting into the wall. The pipe sits 3 to 4 inches off the wall surface — enough clearance to wrap adjustable hose clamps around mason jars and the pipe simultaneously. Use 2-inch stainless hose clamps ($1 to $2 each at hardware stores) rather than the decorative pipe clamps sold at craft stores, which are not designed for the weight of a soil-filled jar. Three quart-sized mason jars fit comfortably on a 30-inch rail with appropriate spacing.
Fill jars with a well-draining potting mix — add 20% perlite to standard potting soil to improve drainage in a container with no drainage hole. For herbs, choose varieties suited to indoor kitchen conditions: basil, chives, mint, and parsley all perform well in moderate indirect light. Avoid rosemary and thyme for this application — both require more light and drier conditions than a kitchen window typically provides.
Drill a small drainage hole in the side of each mason jar near the base using a 1/4-inch masonry bit — not the bottom, where drainage would run down the wall, but the side at the lowest point when the jar is in its horizontal-angled position on the clamp. Angle the clamp slightly so the jar tilts upward at the mouth — this prevents soil from compressing against the lid ring and allows better water distribution.
Tip: Label each jar with a small kraft paper tag tied around the lid ring with linen twine rather than writing directly on the glass. Chalk marker labels on glass smear within days of water contact regardless of what sealing product is applied over them.
Budget: $35–$70
5. Grain Sack Pillow Covers with Stenciled Stripes
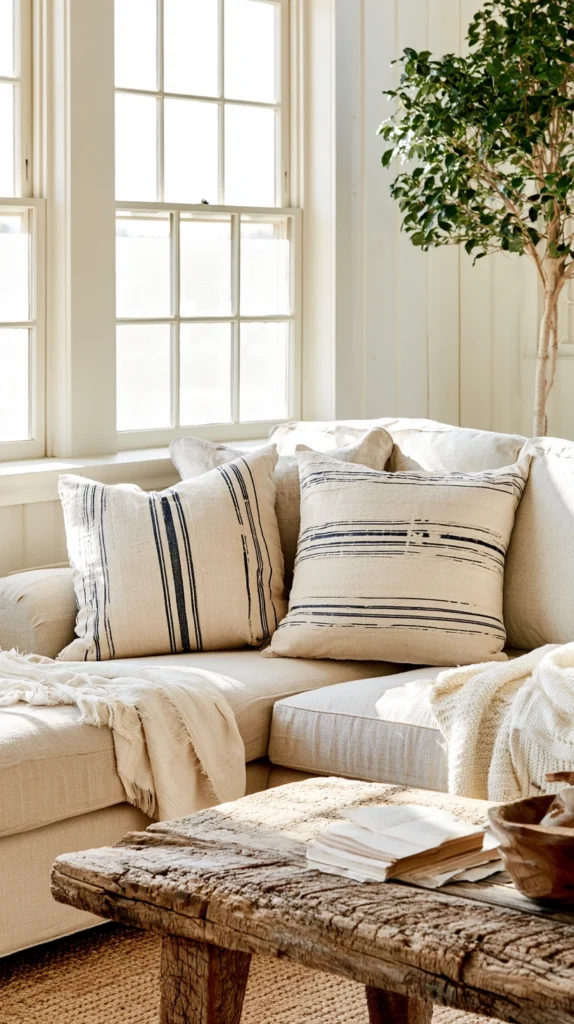
Genuine grain sack fabric — the heavy linen-cotton blend with woven stripes in navy, red, or gray that was used throughout European farmhouses for grain storage — makes the most authentic farmhouse pillow cover available, and it’s significantly less expensive when sourced as yardage than when purchased as a pre-made pillow. The stenciled number or text element that appears on original grain sacks adds the graphic quality that distinguishes this from a plain striped pillow.
Genuine European grain sack fabric is available by the yard from Etsy sellers importing directly from France, Hungary, and Germany at $15 to $28 per yard. One yard produces two 18×18-inch pillow covers cut back-to-back across the width. For an American alternative, Fabric.com and online linen retailers carry reproduction grain sack fabric at $8 to $14 per yard in the traditional stripe patterns.
Cut covers with a 1/2-inch seam allowance on all sides. Construct with an envelope back closure rather than a zipper — cut the back panel as two overlapping pieces, each 18×12 inches, hemmed along the overlap edge. The envelope closure sits on the back of the finished pillow and requires no zipper hardware. Sew right sides together on three sides, turn through the envelope opening, press, and insert a 20×20-inch pillow form into the 18×18-inch cover — the 2-inch size difference produces the firm, slightly overstuffed look that photographs well and holds its shape.
For the stenciled element, cut a simple two or three-digit number stencil from a sheet of acetate using a craft knife, or purchase pre-cut number stencils from a craft store. Position it on the stripe area of the pillow face and apply black fabric paint with a stencil brush using a stippling motion — no dragging, which bleeds under the stencil edge. Two light coats dry faster and produce a cleaner edge than one heavy application. Heat-set with an iron after 24 hours to make the paint permanent through washing.
Tip: Wash grain sack fabric before cutting and sewing. Genuine linen-cotton blends can shrink 5 to 8% in the first wash — pre-washing eliminates shrinkage from the finished pillow and softens the fabric to its characteristic worn quality.
Budget: $25–$65
6. Beeswax Taper Candles Rolled from Foundation Sheet
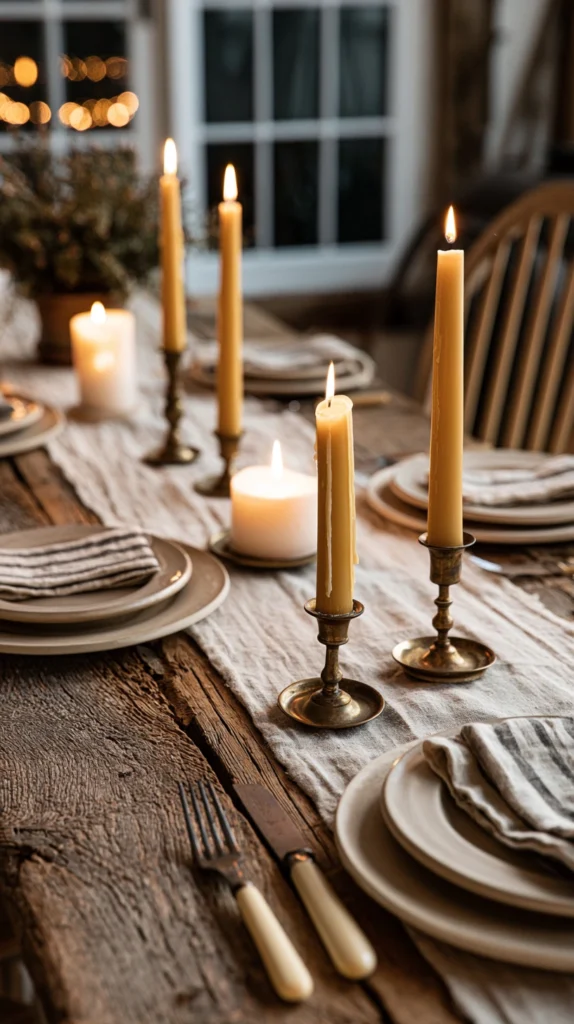
Hand-rolled beeswax taper candles made from honeycomb foundation sheets are the farmhouse candle project that requires no melting, no double boiler, no thermometer, and no special equipment beyond a warm room. They also smell exactly as a farmhouse candle should — natural beeswax has a faint honey scent that no artificial fragrance oil accurately replicates.
Beeswax foundation sheets are available from beekeeping supply stores and on Amazon in natural golden yellow and bleached white at $12 to $20 for a pack of ten 8×16-inch sheets. Each sheet produces one taper candle approximately 8 inches tall and 3/4 inch in diameter when rolled at room temperature. The sheets must be warm enough to roll without cracking — below 65°F, the wax becomes brittle. In a cold room, warm each sheet with a hair dryer on low for 20 to 30 seconds before rolling.
Place a wick — square-braided cotton wick in 2/0 size is appropriate for this diameter — along one short edge of the sheet, leaving 1/2 inch of wick extending beyond the top. Fold the wax sheet edge over the wick and press firmly to embed it, then roll slowly and evenly toward the opposite short edge, maintaining consistent pressure to produce an even cylinder without gaps between layers. Press the final edge firmly against the candle body — the wax bonds to itself without any adhesive.
For a pair of matched tapers, roll two sheets simultaneously from the same pack to ensure color consistency. Natural beeswax sheets vary slightly in color from pack to pack, and two candles from different production batches will have a visible color difference in candlelight.
Trim the wick to 1/4 inch before first burn. Beeswax burns more slowly and at a higher temperature than paraffin — a properly rolled beeswax taper burns approximately one hour per inch of height, meaning an 8-inch taper provides roughly eight hours of burn time.
Tip: Store rolled beeswax tapers wrapped in parchment paper rather than plastic wrap. Plastic wrap adheres to beeswax in warm conditions and pulls the surface texture when removed, damaging the honeycomb pattern that makes these candles visually distinctive.
Budget: $14–$35 for four tapers
7. Vintage Window Frame Turned Decorative Wall Piece
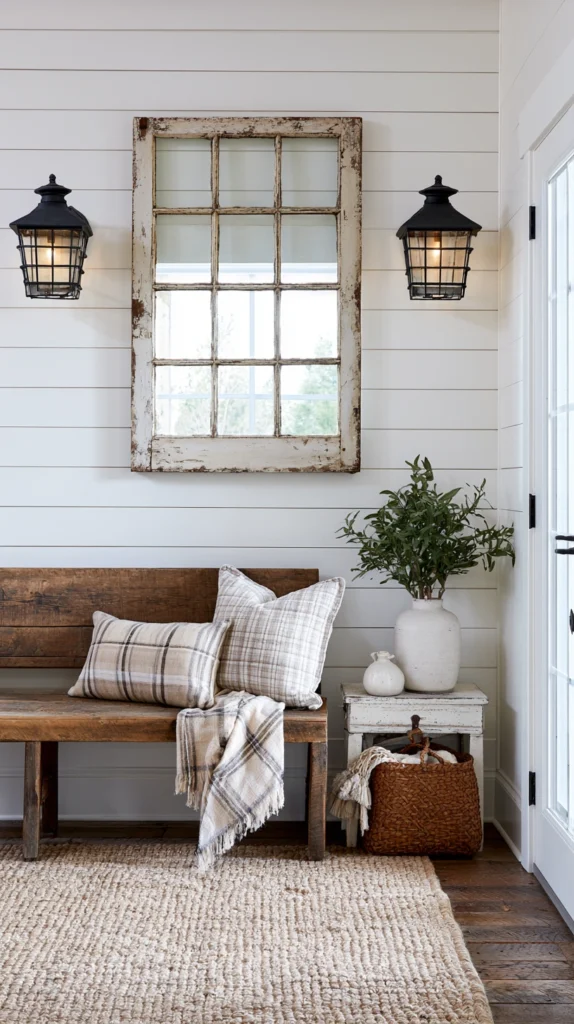
An old wooden window frame — single or double hung, with original glass or with glass removed — mounted on a wall as a decorative frame around a chalk-painted message board, a mirror arrangement, or simply as an architectural fragment creates exactly the kind of salvaged authenticity that farmhouse style depends on for its character.
Source old window frames from architectural salvage stores, Habitat for Humanity ReStores, estate sales, or demolition sites where old houses are being gutted. Frames from houses built before 1978 may contain lead paint — test with a lead paint test swab (available at hardware stores for $5 to $8) before sanding or cutting. If lead is present, use the frame as-is without sanding, or have it professionally stripped.
For a frame with intact glass panes, clean the glass with white vinegar and buff dry, then apply a thin coat of chalk paint to the glass surface in a wash — dilute chalk paint 3:1 with water and apply with a wide flat brush in horizontal strokes. The translucent result reads as old, wavy glass rather than painted glass and adds the slightly obscured quality of genuine aged windows. For frame panes without glass, back the opening with chicken wire stretched taut and stapled to the frame back — hang dried lavender bundles, small framed photos, or cotton stem sprigs from the wire with small S-hooks.
Sand the wood frame with 80-grit paper, then 150-grit, removing any loose paint while preserving the worn areas around the rails and stiles where original paint has naturally abraded. Apply one coat of dark wax or a 50/50 mixture of brown paint and water in a thin wash, wiping it into the grain and immediately removing the excess with a dry cloth. The color settles into recessed areas and grain lines, producing an aged effect without obscuring the existing paint character.
Mount with two heavy-duty picture hanging strips rated for the frame weight, or with two D-ring brackets screwed into the frame’s structural rails and hung on nails set into wall studs.
Tip: Frames with original wavy glass are significantly more valuable architecturally than frames with replacement flat glass — wavy glass is identifiable by the slight distortion visible when viewed at an angle. If a salvage frame has its original glass intact, leave it in place rather than removing it.
Budget: $20–$65
8. Stamped Linen Tea Towel Set with Botanical Motifs
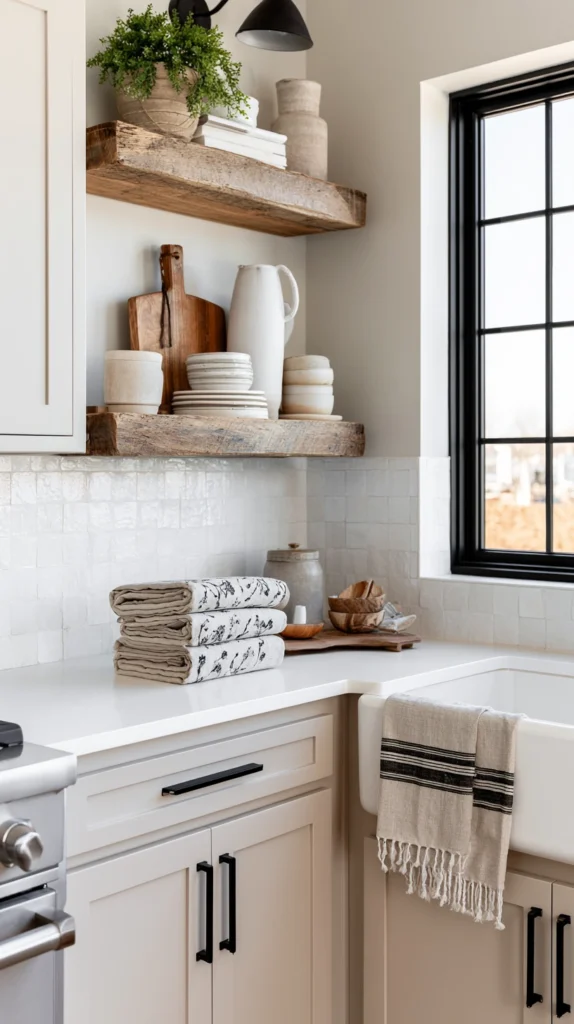
Hand-stamped linen tea towels using botanical stamps — leaves, herbs, wheat stems, or simple geometric forms — are a farmhouse textile project that produces genuinely usable kitchen objects rather than decorative ones that can’t be touched. Made properly, they launder well and improve with use, which is the textile quality that farmhouse style values most.
Use 100% linen fabric rather than linen-cotton blend for tea towels — pure linen has better absorbency, becomes softer with each wash, and has the characteristic drape and texture that defines the farmhouse kitchen aesthetic. Fabric Wholesale Direct and Rawganique both sell pure linen yardage at $6 to $12 per yard in natural, undyed tones. Cut towels to 18×28 inches and hem all four edges with a 1/2-inch double-fold hem, mitered at the corners for a flat, professional finish. Press all hems before stitching — unpressed linen hems shift under the presser foot and produce uneven finished edges.
For stamping, carve your own stamps from a soft carving block (Speedball Speedy-Carve at $5 to $8 per block) using linoleum cutting tools. A sprig of lavender, a single wheat stalk, or an herb leaf requires only the two most basic linoleum cutting tools — the V-gouge for fine lines and the U-gouge for clearing background areas. Transfer the design to the carving block with a pencil transfer, then carve away the negative space, leaving the design surface raised.
Use textile ink rather than fabric paint for stamping — textile ink produces a crisper impression, flows more consistently from stamp to fabric, and remains flexible after curing so it doesn’t crack when the towel is folded. Speedball fabric ink is the standard recommendation at $7 to $10 per jar. Apply ink to the stamp with a small foam brayer rather than a brush — brayer application produces even ink coverage without the ridges and drips that brush application introduces. Test the stamp on a scrap of the same linen fabric before applying to the finished towel.
Tip: Stamp five towels from the same ink loading for slightly different impression densities — the heaviest impression will be the first and the most ghosted will be the last. A set with naturally varying impression depths reads as hand-printed; a set of identical impressions reads as commercially produced.
Budget: $28–$60 for a set of six
9. Whitewashed Terracotta Pot Arrangement with Herb Labels
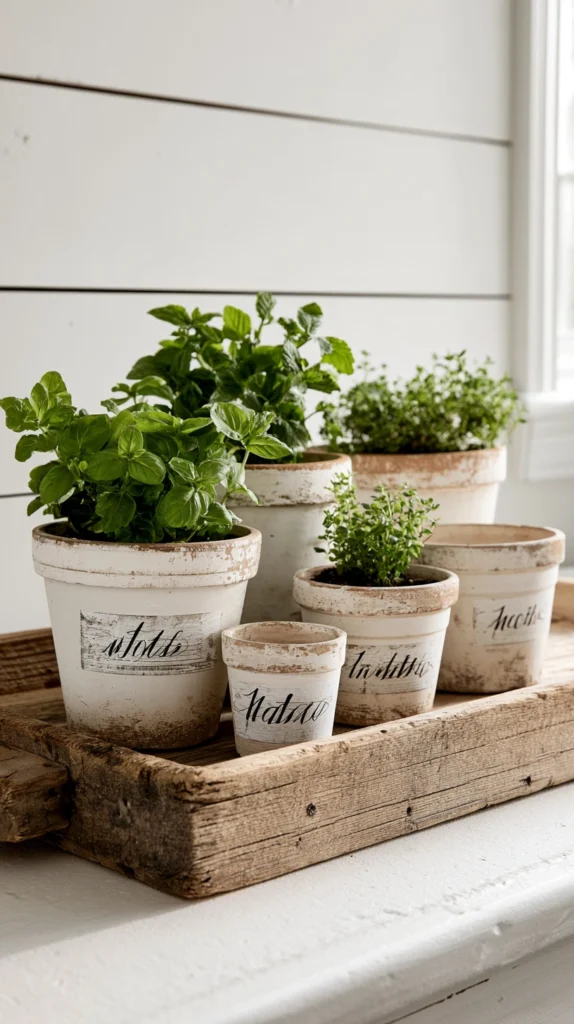
A grouping of whitewashed terracotta pots in graduated sizes — planted with herbs or simple greenery and labeled with hand-written terra cotta markers or tied kraft paper tags — is the farmhouse surface arrangement that costs almost nothing and looks most like it was assembled over time rather than installed in an afternoon.
Whitewashing terracotta requires more technique than most tutorials describe. Mix white latex paint with water at a 1:1 ratio. Apply to a dry, unsealed terracotta pot with a chip brush using short scrubbing strokes rather than smooth painting strokes — the scrubbing motion works the diluted paint into the porous surface and produces the uneven, slightly absorbed quality that distinguishes whitewashing from painting. Wipe immediately with a barely damp cloth to remove excess and reveal the terracotta tone beneath. The result should read as faded and chalky, with the original terracotta color visible through the white in the thicker areas of the pot wall.
Allow to dry completely — at least four hours, ideally overnight — before planting. Unsealed whitewash in contact with moist soil reactivates and produces white streaks on the pot exterior that look like water damage rather than intentional aging. Seal the finished whitewash with a matte exterior sealer spray before potting.
For a grouping of three pots in 4-inch, 6-inch, and 8-inch diameters, place on a weathered wood tray or a piece of reclaimed board cut to fit. The tray consolidates the grouping visually and makes relocation practical. Elevate the back pot on an upturned small pot or a wood block hidden behind the front pots — staggering the heights creates depth that a flat arrangement on the same level doesn’t produce.
Label pots with small pieces of terra cotta broken from a damaged pot, written on with a white paint marker, or use kraft paper tags tied to the pot rim with linen twine with the herb name in pencil.
Tip: Terracotta is frost-sensitive and will crack if left outdoors in freezing temperatures when the soil inside is wet. For outdoor farmhouse porch arrangements, plant in plastic nursery pots that fit inside the terracotta and lift the plastic inserts indoors before the first frost.
Budget: $15–$40
10. Tobacco Basket Wall Display with Dried Botanicals
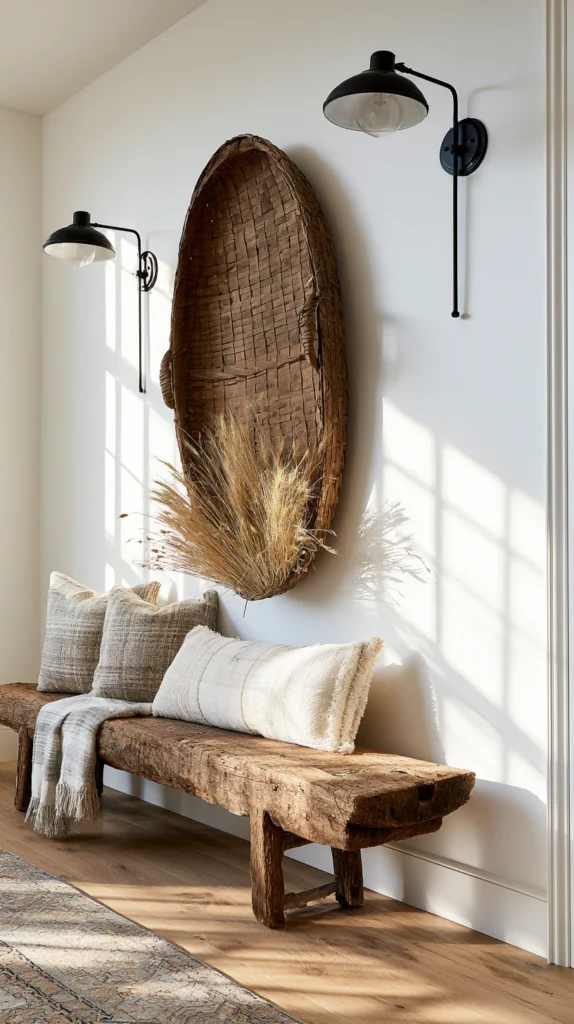
A tobacco basket — the large, flat, open-weave baskets originally used to dry tobacco leaves on American farms — is the farmhouse wall piece that appears in virtually every authentically styled farmhouse interior, and for good reason. The scale is right for a large wall, the material is genuinely agricultural, and the open weave reads as both rustic and refined in a way that solid baskets don’t.
Genuine vintage tobacco baskets are available at antique stores and flea markets in tobacco-growing regions of the American Southeast, typically at $25 to $65 depending on condition and size. They run 24 to 36 inches in diameter in most cases. Reproduction tobacco baskets are widely available on Amazon and at World Market at $30 to $55 and are structurally identical to originals for decorative use, though they lack the patina and character of genuine aged examples.
Mount directly to the wall using two picture hanging strips rated for the basket weight, or thread wire through the weave at the 10 and 2 o’clock positions and hang on two nails set into a stud. Two mounting points prevent the basket from swinging and tilting.
For the botanical supplement, gather a bundle of dried cotton stems, dried wheat stalks, or dried pampas grass, tie with linen twine, and tuck through the basket weave at the bottom third of the face. The placement in the lower third rather than the center keeps the botanical element grounded and gives the upper weave area room to read as open texture rather than frame for the botanicals. Secure the bundle by threading the twine through three or four weave intersections before tying off at the back.
Tip: Hang the tobacco basket 6 to 8 inches above a console table, bench, or dresser rather than in isolation on a blank wall. Anchoring it visually to a piece of furniture below prevents it from appearing to float and creates a composed vignette rather than a single decorative element on an otherwise empty wall.
Budget: $35–$80
11. Farmhouse Ladder Blanket Display from Sapling Branches
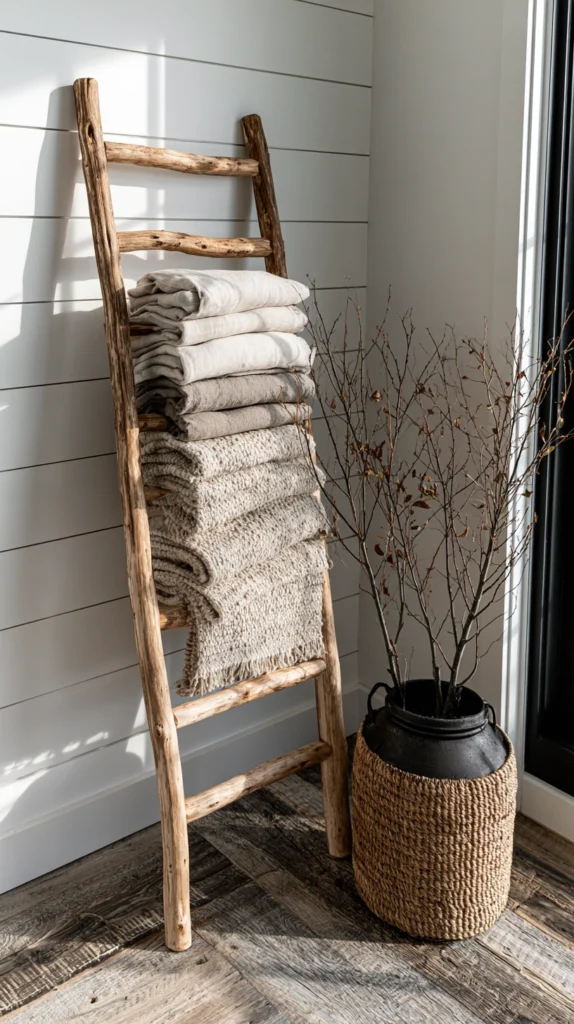
A blanket display ladder made from straight sapling branches — rather than purchased lumber — produces the raw, structural quality that distinguishes genuinely handmade farmhouse pieces from craft store approximations. The saplings provide a consistent rustic character that no amount of sanding or distressing applied to smooth-cut lumber replicates.
Source straight branches from fallen or pruned trees — ash, maple, and oak saplings all work well and are commonly available after storm cleanup or from a tree service that will often give material away. Cut two upright poles at 60 inches and four to five rungs at 18 to 20 inches. Bark can be left on for a more rustic character or removed with a drawknife for a cleaner appearance — removing bark also significantly reduces the risk of insect activity in seasoned wood brought indoors.
Allow cut branches to dry for a minimum of four weeks in a dry, ventilated space before assembly. Green wood shrinks as it dries and will loosen any joints made before drying. Test dryness by checking for radial cracks at the cut ends — a small amount of end checking indicates the wood has lost enough moisture to be stable.
Join rungs to uprights with a 1/4-inch dowel screw driven through a pilot hole drilled at a slight downward angle — the angle creates a mechanical joint that gravity tightens rather than loosens when weight is applied. Reinforce each joint with a wrap of natural jute twine in an X-pattern over the junction, secured with a square knot and a drop of wood glue at the knot. The wrapped joint is both structural and decorative.
Lean the finished ladder against a wall at a 15-degree angle — more vertical and it tips forward, more angled and it takes excessive floor space. Drape wool blankets over each rung, folded once lengthwise so the pattern shows along the hanging edge.
Tip: Place felt furniture pads on the back of both uprights where they contact the wall, and rubber furniture cups under the feet. This prevents wall marks from the upper contact points and floor scratching from the feet, and significantly improves the stability of the lean.
Budget: $12–$35
12. Hand-Dipped Beeswax Tallow Soap
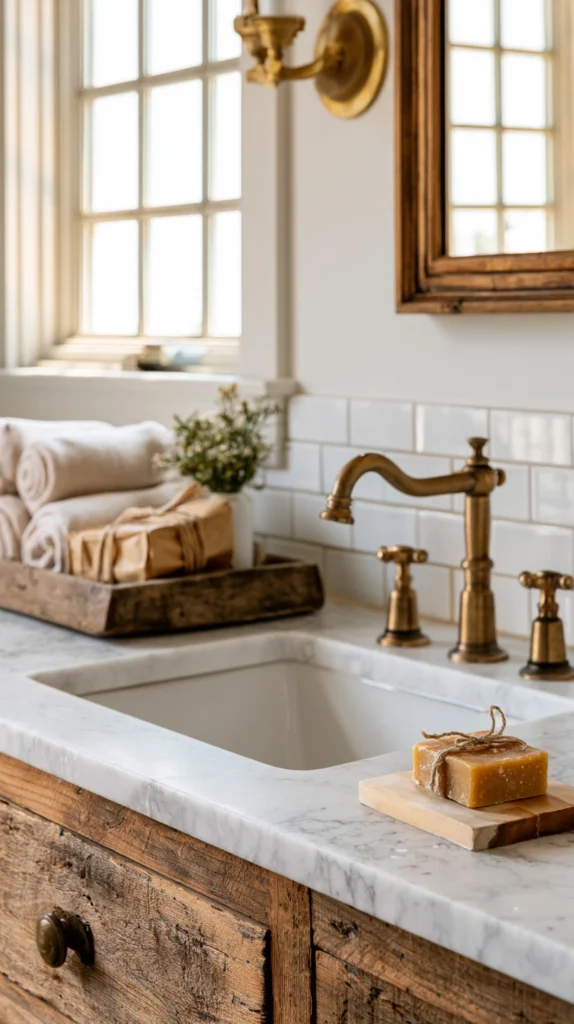
Farmhouse soap made from rendered beef tallow and beeswax — the combination used in American homestead soap-making for two centuries — produces a bar with harder texture, longer life, and better lather than most commercial soaps, and the process itself is genuinely connected to the agricultural material logic of the aesthetic rather than simply decorative.
For a basic batch producing eight bars, you need 24 oz rendered beef tallow (available from a butcher or rendered at home from beef fat), 3.2 oz lye (sodium hydroxide), 8.6 oz distilled water, and 1 oz beeswax for hardness. Safety is non-negotiable when working with lye — it causes severe burns on contact. Wear nitrile gloves, eye protection, and long sleeves throughout. Mix lye into cold water (never water into lye) in a heat-safe container, stirring until dissolved. The mixture heats dramatically — allow to cool to 100 to 110°F before using.
Melt tallow and beeswax together to 100 to 110°F in a separate container. Combine lye water and tallow mixture, stirring continuously until the mixture reaches trace — the point where drizzled soap leaves a visible trail on the surface, similar to thin pudding consistency. This takes 5 to 20 minutes of continuous stirring or 2 to 5 minutes with an immersion blender.
Pour into a wooden mold lined with parchment paper and insulate with a towel for 24 hours. Unmold and cut into bars after 24 to 48 hours — tallow soap is firm enough to cut cleanly at this stage. Cure the bars on a rack with air circulation for four to six weeks before use. Curing completes the saponification process and hardens the bar to its final texture.
For farmhouse presentation, wrap cured bars in kraft paper tied with linen twine and a small sprig of dried lavender tucked under the knot. Set in a shallow crate or a wooden tray on the bathroom counter or beside the kitchen sink.
Tip: Use a lye calculator — SoapCalc or Brambleberry’s online calculator — to verify the lye quantity for your specific fat combination before making any batch. Lye amounts are calculated precisely by fat type and weight. Using an incorrect lye quantity produces either caustic uncured soap or greasy unsaponified bars.
Budget: $25–$55 for eight bars
13. Build the Whole Room Around One Authentic Material
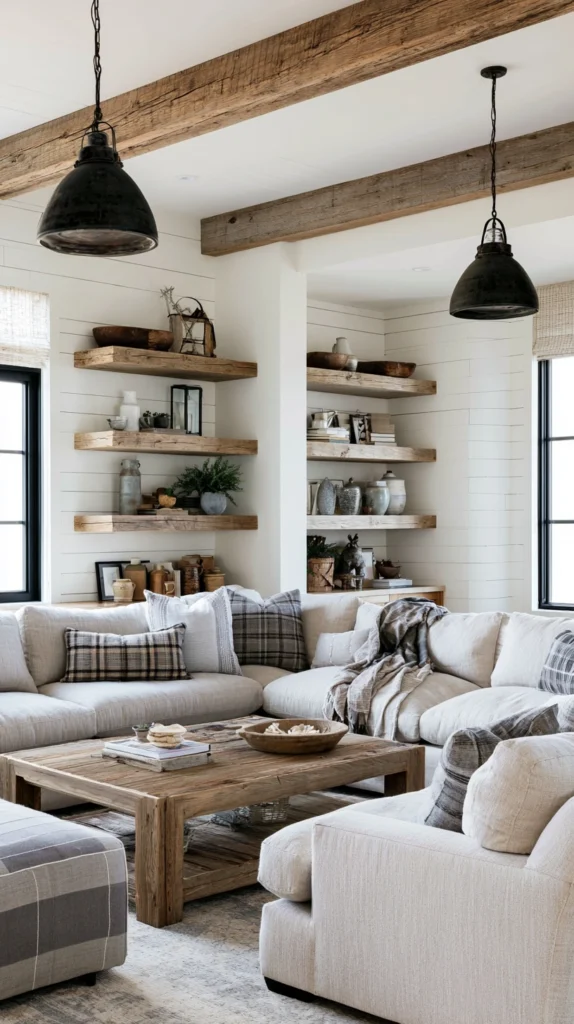
Every farmhouse craft project in this list works better when it’s part of a room that has made one primary material commitment — reclaimed wood, or natural linen, or aged iron — and uses that material as the thread connecting individual pieces into a coherent whole. A room with a reclaimed wood sign, galvanized pipe shelf, tobacco basket, and wooden blanket ladder reads as a considered space. The same room with those pieces plus a mass-produced galvanized metal letter set, a vinyl chalkboard wall decal, and three different unrelated accent colors reads as assembled from trend pieces rather than built from a design logic.
The discipline that makes farmhouse style work is the same one that made the original farmhouses it references work — using what was available locally and consistently, without variety for its own sake. In a modern context that translates to choosing one wood tone and using it throughout rather than mixing dark walnut with light pine with painted white wood, choosing one metal finish — galvanized, aged iron, or brass — and applying it consistently to every hardware and lighting element, and limiting textile colors to the grain sack palette: natural, cream, black, navy, and red used sparingly.
When evaluating a new craft project or purchase for the space, the question isn’t whether it looks farmhouse in isolation. It’s whether it uses the same material language as what’s already there. Projects that answer yes add to the room. Projects that answer no, however charming on their own, dilute it.
Tip: Photograph the room regularly as pieces are added and evaluate the photographs rather than the space in person. The camera reveals visual inconsistencies that are easy to overlook when you’re physically surrounded by the space — the same perspective a designer sees immediately on entering.
Budget: $0 — this is an editing discipline, not a purchase
Final Thoughts
The farmhouse crafts that last are the ones made from materials that already have a history — reclaimed lumber that was something else before, beeswax from an actual hive, linen that gets softer with every wash, terracotta that weathers naturally over seasons on a windowsill.
These materials age into the aesthetic rather than aging out of it. The craft store versions made from MDF, synthetic burlap, and plastic rope painted to look like something real begin to look wrong within a year because they have nowhere to go except toward deterioration.
Start with the project that addresses the surface with the most visual impact in the space you’re working with — usually a wall piece or the primary textile. Build the material palette from that starting point outward. The rooms that feel genuinely farmhouse aren’t the ones with the most projects in them. They’re the ones where every piece could plausibly have always been there.