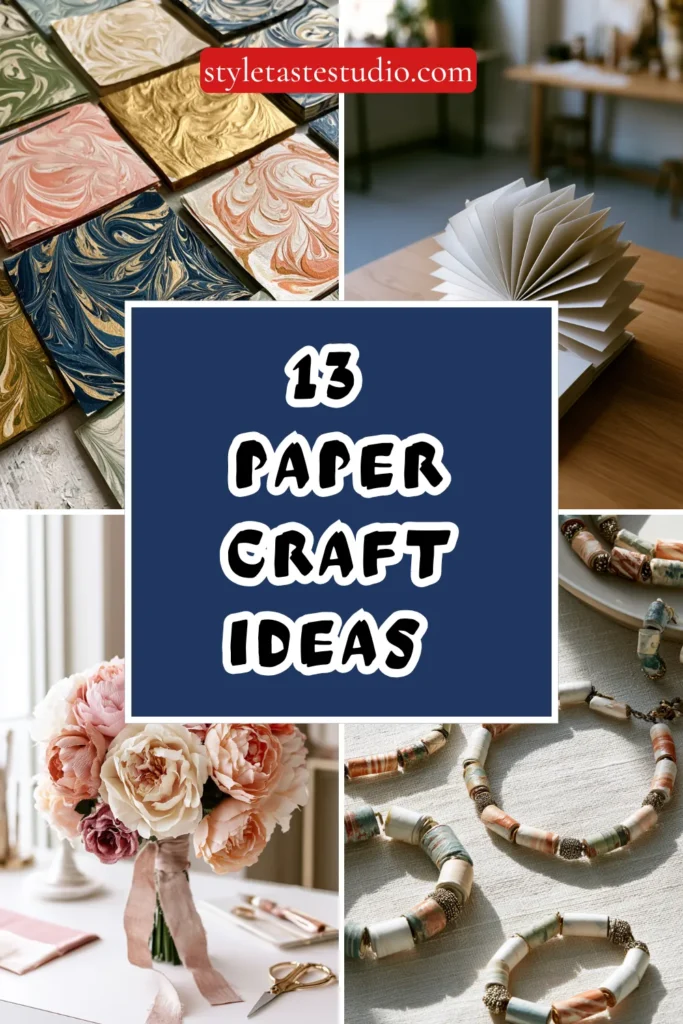
13 Paper Craft Ideas That Are Fun and Easy to Make
Paper is the most democratic craft material there is — it’s in every home already, it costs almost nothing to supplement, and the skill ceiling is low enough that a first attempt produces something genuinely satisfying.
The challenge with paper crafts isn’t access or expense, it’s that most tutorials treat “easy” as an excuse to skip the details that separate a project that works from one that buckles, tears, or looks nothing like the example photo. These ideas include the specific paper weights, folding techniques, adhesive choices, and finishing steps that make each project actually succeed.
1. Paper Flower Bouquet
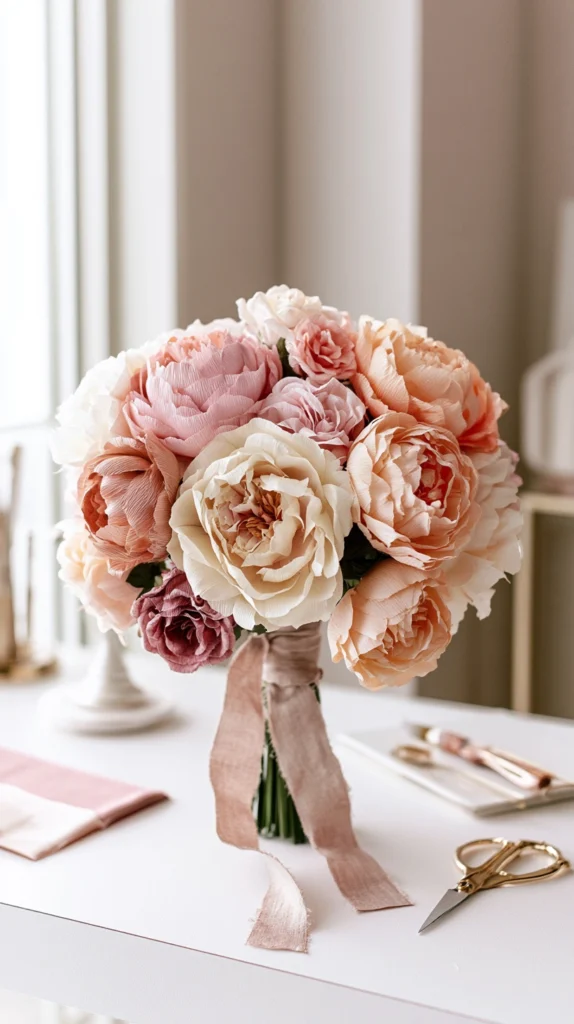
Paper flowers have a permanence that real ones don’t, and when made well they read as decorative objects rather than craft projects. The distinction almost always comes down to paper choice — copy paper produces stiff, unconvincing petals, while crepe paper or tissue paper moves and curls in a way that much more closely approximates the real thing.
Italian crepe paper in 90–180 gram weight is the standard for professional-looking paper flowers. The heavier the weight, the more control you have over stretching and shaping — 180g crepe holds a petal curve without springing back, while 60g tissue paper tears too easily under tension to be shaped reliably. Cut petals freehand or from a template, then stretch the center of each petal gently between both thumbs to create a natural cup shape. Cup the petal away from you rather than toward you so the stretch opens outward the way a real petal does.
Assemble petals around a center of tightly coiled paper or a styrofoam ball, securing with floral wire and wrapping the stem in green floral tape stretched slightly as you wrap — the stretch activates the adhesive in the tape and produces a smooth, professional finish. Group three to five completed flowers together with varying stem lengths, bind the stems with twine or ribbon, and trim the bottoms to a consistent length.
Tip: Lightly mist finished crepe paper flowers with water and reshape the petals while damp — the paper relaxes and re-dries in whatever position you hold it, which lets you adjust the bloom shape after assembly rather than being locked into your first attempt.
Budget: $8–$20
2. Origami Crane Mobile
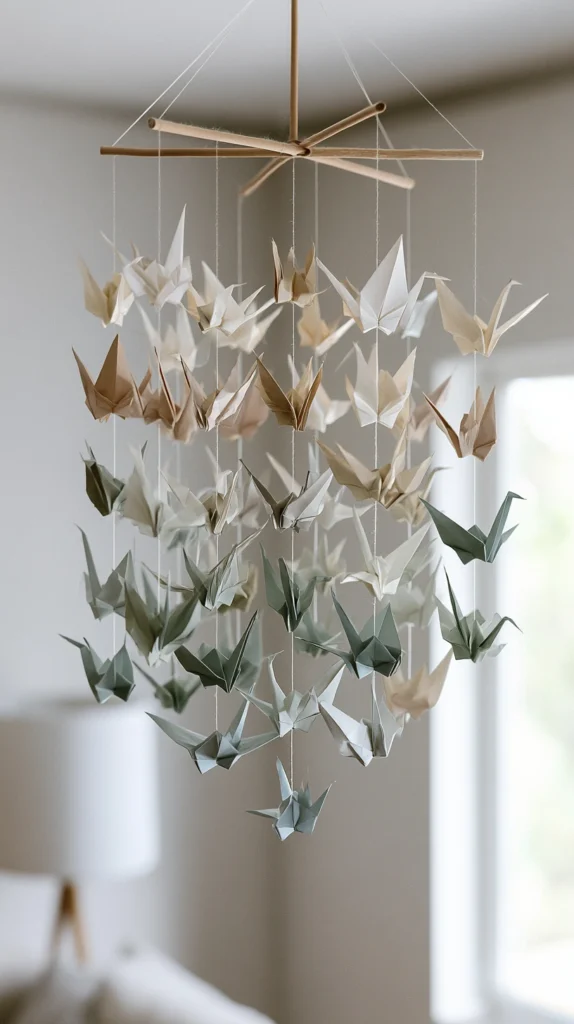
A mobile of origami cranes has been a standard nursery and bedroom decoration for decades, and it holds up because the form is genuinely elegant — the crane silhouette is distinctive from every angle and catches light differently as it rotates. Making one that hangs well, however, requires attention to a few mechanical details most tutorials don’t cover.
Use 6-inch square origami paper for standard cranes — kami paper in a range of colors is sold in packs of 100 for $6–$12 and is the correct weight for clean folds without bulk at the points. Thicker paper produces cranes with blunt tails and beaks; printer paper, while foldable, is too heavy for the final inflation step where you blow through the body to open the crane’s wings and it produces a lopsided result. Work on a firm, clean, flat surface — soft surfaces like towels or carpeted floors prevent crisp folds.
To build the mobile, cut a length of 1/8-inch wooden dowel into three sections: one 16 inches and two 10 inches. Tie cranes to monofilament fishing line at varying lengths — between 3 and 12 inches — for the most dynamic visual result. Attach the shorter dowels to the ends of the longer one and balance by sliding the attachment points along the dowel until the arms hang level. This balancing step takes patience but is the difference between a mobile that hangs cleanly and one that perpetually tips to one side.
Tip: Make your cranes in batches of the same color family rather than fully random — a mobile with too many colors reads as chaotic rather than playful. Three to four coordinated colors with varying shades creates depth without visual noise.
Budget: $8–$18
3. Decoupage Photo Frames
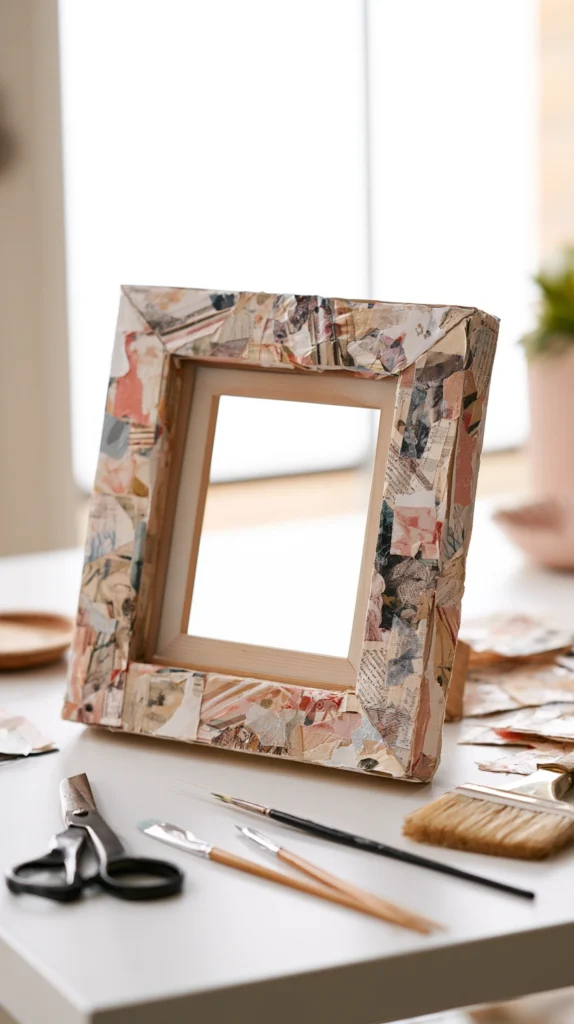
Decoupage transforms a plain wooden or cardboard photo frame into something personal and layered using nothing more than cut paper, Mod Podge, and a brush. The technique is forgiving enough for beginners but rewards patience in the layering process — three thin coats always produce a better result than one thick one.
Source paper from magazines, old books, wrapping paper, or printed digital patterns. Tear rather than cut the paper pieces for most applications — torn edges feather and blend into surrounding pieces during decoupage, while cut edges can leave visible lines that interrupt the surface even after sealing. For geometric or graphic patterns where clean edges are part of the design, cut with small scissors or a craft knife and ruler.
Brush a thin, even coat of Mod Podge Matte onto the frame surface and apply paper pieces while it’s wet, overlapping edges and working out air bubbles with a flat tool or your fingertip from the center outward. Apply additional pieces while continuing to work outward from the center. Once fully covered and dry — allow 20–30 minutes per coat — brush two to three topcoats of Mod Podge over everything to seal. Sand very lightly between the final two coats with 400-grit sandpaper for a smoother finish.
Tip: Avoid using newspaper as your decoupage paper unless you seal it with a clear acrylic spray first — newsprint ink bleeds when it contacts water-based Mod Podge and produces gray streaks that migrate into surrounding pieces over time.
Budget: $5–$15
4. Quilled Paper Art
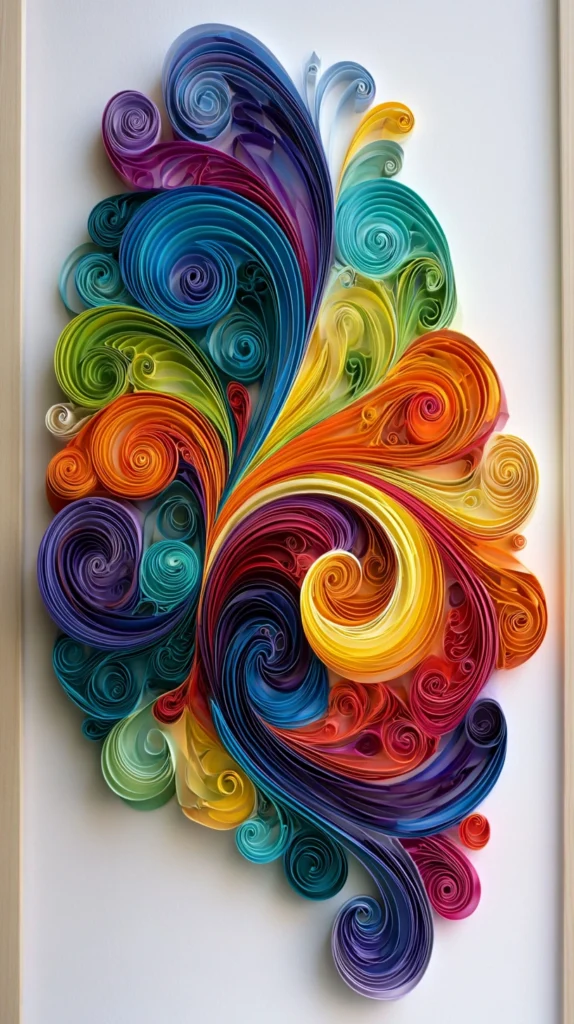
Quilling — the technique of rolling thin strips of paper into coils and shapes and arranging them into designs — produces work that looks far more complex and skilled than it actually is. Most viewers assume quilled pieces require professional training; in practice, the basic coil can be learned in about five minutes and the shapes that follow from it in another twenty.
Use 1/8-inch quilling paper strips in 120mm length — this is the standard width and length sold in quilling kits and is the right proportion for most design scales. You’ll also need a slotted quilling tool ($2–$4) which allows you to roll strips consistently without the variation that finger-rolling introduces. Insert one end of a strip into the slot, roll toward yourself while applying light tension, then slide the coil off and allow it to relax to your desired tightness before gluing the end with a small dot of white craft glue applied with a toothpick.
The five foundational shapes — tight circle, loose circle, teardrop, marquise, and square — are made by pinching the loose coil in different ways after it relaxes. Arrange these shapes on a piece of cardstock within a frame opening, gluing each piece down with minimal white craft glue. Work outward from a center point for organic designs, or from a grid for geometric ones. The most common beginner mistake is using too much glue, which shows through the paper edges.
Tip: Store unglued completed coils in a small open tray as you work rather than gluing each one immediately — having a range of coil sizes and shapes in front of you before committing to placement produces far better compositions than placing and gluing one piece at a time.
Budget: $10–$25
5. Paper Bag Book Covers
A paper bag book cover is a practical project with an aesthetic payoff that goes beyond the utilitarian original — a brown kraft paper bag cover on a hardback book or journal looks intentional and handmade in a way that laminated plastic covers never do. The technique takes about four minutes once you’ve done it once.
Use a standard grocery-size brown kraft paper bag for standard hardcover books. Cut along the bottom seam and one vertical side seam so the bag opens into a single flat sheet. Place the book open and face-down in the center of the paper and cut the sheet so it extends approximately 3 inches beyond each edge of the open book on all sides. Fold the top and bottom edges in so they align with the top and bottom of the book, creasing firmly. Fold the left and right flaps around the front and back covers, tucking them into the fold pockets created by the top and bottom folds.
The decoration step is where the project becomes personal. Draw directly on the kraft paper with fine-tip permanent markers, stamp with ink pads, use watercolor paint (seal with a clear spray after to prevent moisture damage), or collage with cut paper pieces and Mod Podge. Lettering the title on the spine with a brush pen gives it a finished, bookshop quality.
Tip: Apply a coat of clear matte acrylic spray sealant over finished decorated covers that will see regular handling — kraft paper absorbs oils from hands over time and can darken and soften at the most-touched areas without a protective layer.
Budget: $2–$10
6. Paper Weaving Art Panels

Paper weaving produces a textile-like surface from flat sheets of paper — the interlacing of horizontal and vertical strips creates a grid pattern with dimensional texture that photographs well and looks striking in a simple frame. It’s one of the oldest paper crafts and one of the most consistently satisfying for beginners because the result is immediately recognizable and geometric.
Cut a base sheet of cardstock in your primary color into parallel strips approximately 1/2 inch wide, stopping 1/2 inch from one edge so the strips remain connected at the top. This creates a “comb” structure that holds the warp in position during weaving. Cut separate strips in contrasting or complementary colors for the weft — these will be woven horizontally through the fixed vertical strips.
Weave the first horizontal strip under, over, under, over, working across the full width of the base. Push it flush to the connected top edge. Weave the second strip in the opposite pattern — over, under, over, under — and push it tight against the first. Continue alternating until the full length is woven. The tight alternating pattern is what locks the weave in place — loose or inconsistent tension causes strips to shift. Glue the ends of each horizontal strip to the outer vertical strips to secure everything before framing.
Tip: Use a bone folder or butter knife to press each weft strip down firmly after placing it — this tightens the weave and produces a flatter, more even surface than pressing with fingers alone, which tends to create slight buckles at the crossover points.
Budget: $3–$12
7. Paper Lanterns with Geometric Cutouts

A paper lantern with geometric cutouts allows light to escape in patterns — when a tea light or LED is placed inside, the cutout shapes project onto surrounding surfaces and create ambient lighting that feels deliberately designed. The mechanics of the lantern are simple cylinder construction; the detail work is in the cutting.
Use cardstock in the 65–80 lb range — lighter paper buckles when formed into a cylinder and tears at fold lines, while anything heavier than 80 lb is difficult to score and curve cleanly. Cut a rectangle 11 inches tall and 17 inches wide for a standard-size lantern. Plan your cutout design before cutting — mark it lightly in pencil on the reverse side of the paper where pencil marks won’t show. Geometric designs with triangles, diamonds, and hexagons work well because their straight edges cut cleanly with a craft knife.
Cut all interior shapes with a sharp craft knife on a self-healing cutting mat, replacing the blade every 2–3 projects — a dull blade tears rather than cuts and ruins the clean edges that make the cutout effect work. Form the rectangle into a cylinder by overlapping the short ends by approximately 1 inch and securing with double-sided tape. Attach a circular base cut from the same cardstock using small flaps folded outward from the cylinder edge.
Tip: Always use an LED tea light rather than a real candle inside paper lanterns. The heat from a real candle warms the paper significantly, and any lantern with cutouts this close to a flame creates a genuine fire risk. LED tea lights produce the same warm glow at zero heat and can be left on safely for hours.
Budget: $5–$15 for 4–6 lanterns
8. Accordion Book
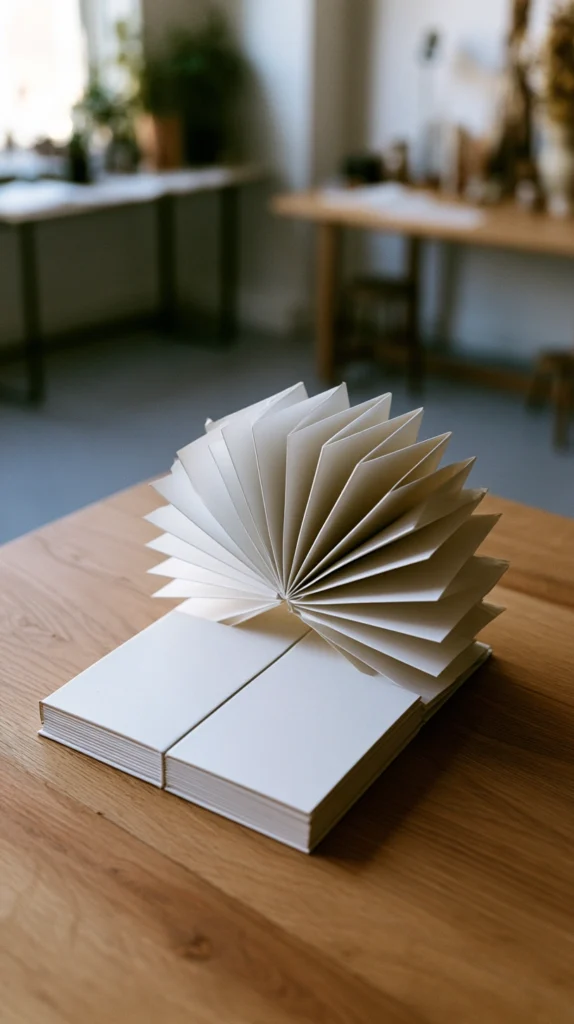
An accordion book — pages connected in a continuous zigzag fold rather than bound at a spine — is one of the most structurally elegant paper projects and also one of the most functional. It can serve as a photo album, a sketchbook, a travel journal, or a gift book, and it opens fully flat for display in a way that standard bound books don’t.
Cut strips of text-weight paper (24 lb printer paper works fine) at a consistent width — 4 inches is a good starting proportion for a hand-sized accordion book. Score and fold each strip at regular intervals of the same width as the paper strip, creating square pages. When one strip is fully folded, attach the next by overlapping the last page of the first strip with the first page of the second and securing with a glue stick, pressing firmly and allowing it to dry under a heavy book. Continue until your book reaches the desired length — 16 to 24 pages is manageable for a first project.
Make covers from heavy cardstock or bookbinding board cut slightly larger than the pages — 1/8 inch on each side is the standard overhang in bookbinding. Attach the first and last pages to the inner faces of the covers with PVA glue rather than a glue stick — PVA dries more flexibly and holds the cover-to-page joint through repeated opening and closing without cracking.
Tip: Lightly score all fold lines with a bone folder against a metal ruler before folding. Scored folds produce a sharp, clean crease in a fraction of the time that unscored paper does, and they prevent the slight tearing that happens at fold lines when paper is forced rather than guided.
Budget: $4–$12
9. Paper Mosaic Portraits or Landscapes
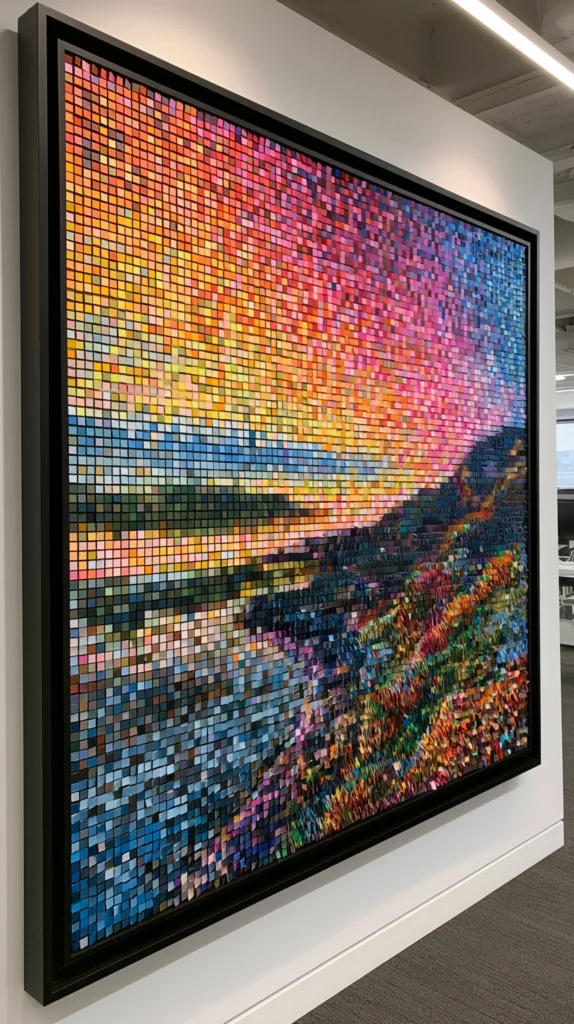
Paper mosaic uses small torn or cut pieces of colored paper arranged in a grid or freeform pattern to build up an image — the same principle as tile mosaic but with paper as the medium. The result has a pixelated quality when viewed up close that resolves into a recognizable image from a normal viewing distance, which gives it an inherently interesting quality that flat drawings don’t have.
Source paper in a wide range of values and hues — the range of lights, mid-tones, and darks matters more than the number of distinct hues. Old magazines, painted paper scraps, colored construction paper, and wrapping paper all work. Sort your torn pieces into light, medium, and dark piles before starting — this allows you to work systematically rather than hunting for the right value mid-project. Pieces should be roughly consistent in size, between 1/4 and 1/2 inch — smaller pieces produce more detail but take significantly longer.
Sketch your composition lightly on a piece of cardstock or illustration board as a guide. Apply pieces with a glue stick or Mod Podge, working section by section. The gaps between pieces — the grout lines in tile mosaic terms — should be consistent and intentional. A visible gap of approximately 1/16 inch between pieces creates a more finished result than randomly variable gaps.
Tip: Work from background to foreground rather than starting with the subject. Establishing the background first means the foreground pieces can overlap the background slightly at edges, which produces a more natural, integrated result than backgrounds that need to fit around a pre-placed subject.
Budget: $5–$15
10. Paper Bead Jewelry
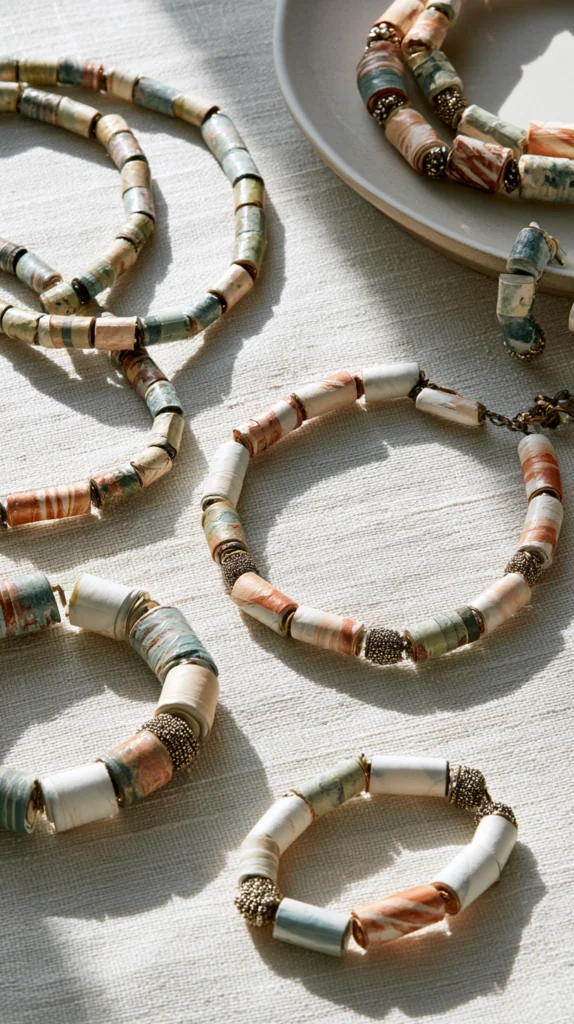
Paper beads are made by rolling long triangular strips of paper around a skewer and sealing them — the result is a smooth, lightweight bead with a natural layered pattern visible at the ends. When sealed well and strung on appropriate cord, the finished jewelry looks considerably more polished than the materials suggest.
Cut long triangular strips from magazine pages, patterned scrapbook paper, or painted paper — the base of the triangle should be approximately 1/2 inch wide and the length should be 10–14 inches for a standard barrel-shaped bead. Apply a thin line of white craft glue along the strip and roll it tightly around a bamboo skewer starting from the wide base, keeping tension even throughout the roll. Slide the finished bead off while the glue is still slightly wet — waiting until fully dry makes removal difficult without tearing.
Once dry, apply two to three coats of Mod Podge Gloss or clear nail polish to each bead, allowing full drying between coats. This sealing step is non-negotiable — unsealed paper beads absorb skin moisture during wear and soften within a day. Sealed beads are water-resistant, hold their shape, and last for years. String finished beads on 0.5mm waxed cord, elastic beading cord, or tigertail wire with seed beads between for spacing.
Tip: Vary your triangle width to create different bead profiles — wide base triangles produce short, fat disc beads while narrow base triangles produce long, slender tube beads. Mixing bead profiles on a single strand creates more visual interest than using only one shape throughout.
Budget: $5–$15
11. Newspaper Seedling Pots
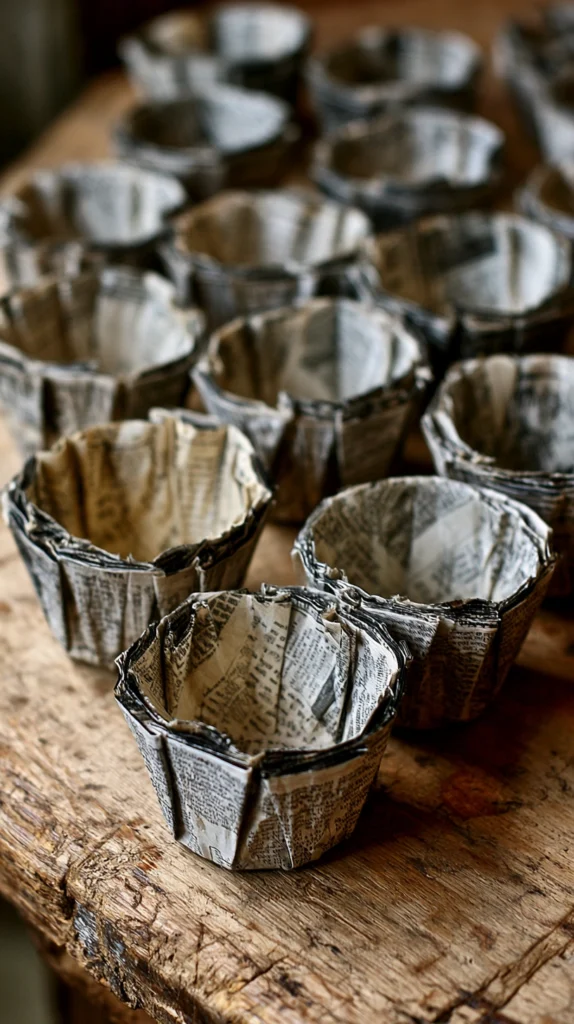
A newspaper seedling pot is genuinely functional rather than decorative — it biodegrades in the ground when you transplant seedlings, which means no root disturbance and no plastic pot to clean and store. The construction takes about 60 seconds per pot once you have the technique.
Fold a standard newspaper page in half lengthwise, then in half again lengthwise, producing a long strip approximately 3 inches wide. Wrap this strip around the bottom third of a small glass jar or can — a standard tomato paste can is the right diameter for a 3-inch seedling pot. Overlap the strip as you wrap, leaving approximately 1.5 inches extending past the bottom of the jar. Fold these extending tabs inward across the bottom of the jar one at a time, each overlapping the previous, to form the pot base. Slide the completed pot off the jar.
Fill immediately with seed-starting mix and plant — unfilled pots lose their shape quickly. The newspaper is strong enough to hold moist soil for the 4–6 weeks most seedlings need before transplanting. When planting out, tear off the base of the pot before placing in the ground to ensure roots can penetrate into surrounding soil — the sides will decompose naturally, but the overlapping base can be slow to break down and may inhibit downward root growth.
Tip: Use black-and-white newspaper sections rather than color-printed sections. Color inks in newsprint use more pigment-dense formulations that decompose more slowly in soil. Black-and-white sections break down within a single growing season under normal soil conditions.
Budget: $0–$5
12. Paper Circuit Cards
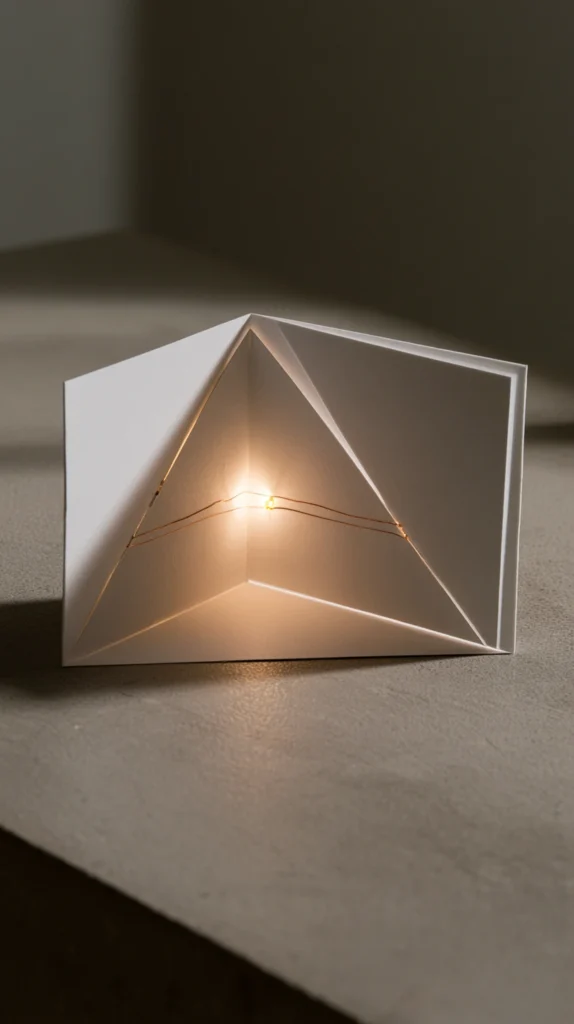
A paper circuit card embeds a working LED light into a greeting card using copper tape as the conductive path and a small coin battery as the power source. The result is a card that lights up when opened or a button is pressed — a genuinely surprising and delightful effect that uses simple electronics accessible to anyone.
The materials required are specific but inexpensive: 3V coin cell battery (CR2032, $1–$2 each), 5mm LED lights in any color ($5–$8 for a pack of 50), copper foil tape with conductive adhesive ($6–$10 for a roll), and a brass brad or binder clip as a switch. The LED has two legs — the longer positive leg connects to the positive side of the battery through one copper tape path, and the shorter negative leg connects to the negative side through a separate path. The two paths must not touch each other or the circuit will short.
Design the card layout on paper before applying any copper tape. Mark where the battery will sit (usually the back of the card), where the LED will emerge (usually through a small hole in the front), and how the copper tape paths will route between them. Apply tape paths first, then place the LED with legs bent flat against the tape, securing with a small piece of additional tape over each leg. Lay the battery in position with its positive face against the positive tape path and hold in place with a binder clip that also contacts the negative path — this creates a simple pressure switch that activates when squeezed.
Tip: Test your circuit before decorating the card. Once copper tape is covered with paper or paint, tracing a failed circuit is difficult and often requires starting over. A 30-second test before decorating saves significant time and materials.
Budget: $10–$20 for multiple cards
13. Paper Marbling with Shaving Cream
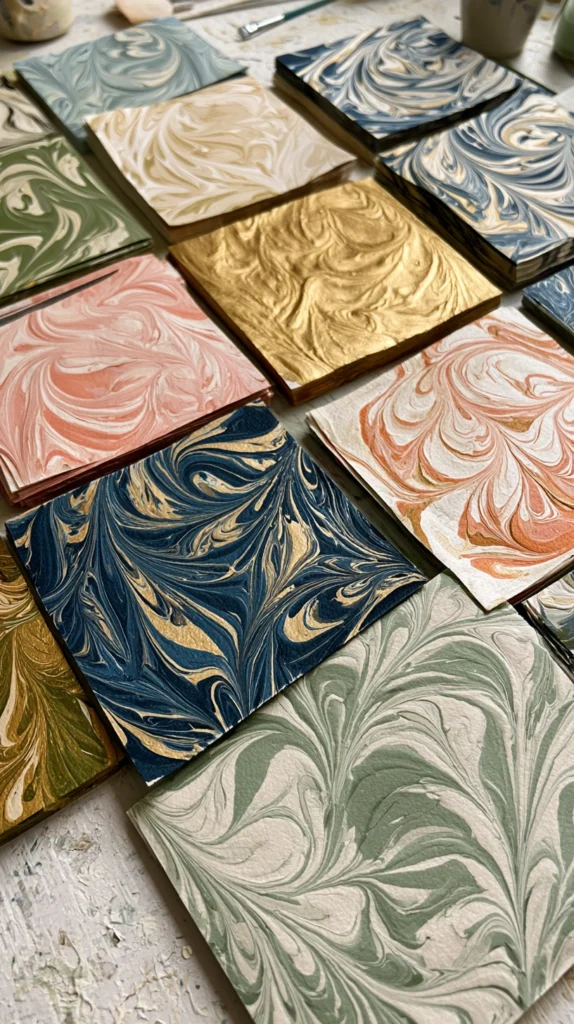
Paper marbling produces a swirling, fluid-looking pattern on paper that looks genuinely complex despite being achievable in about ten minutes with no prior experience. The shaving cream method is the most accessible version of a technique that traditionally uses carrageenan size and requires more setup.
Spread a thin, even layer of plain white foam shaving cream — not gel — into a shallow tray or baking dish slightly larger than the paper you’re marbling. The layer should be approximately 1/2 inch deep and as level as possible. Drop small amounts of acrylic paint or food coloring onto the cream surface — 3 to 5 colors work better than more, which muddy together. Use a toothpick, skewer, or comb to drag through the colors and create swirling patterns. The motion matters: gentle S-curves produce elegant marble patterns, while aggressive stirring blends the colors into brown.
Lay a piece of paper gently face-down onto the cream surface, press lightly to ensure full contact, then lift immediately — don’t slide or drag the paper. Hold the paper over the tray and use a straight edge (a ruler or old gift card) to scrape the cream off in a single pass, revealing the marbled pattern underneath. Set flat to dry. The cream scrapes off and takes excess paint with it; what remains is the transferred pattern absorbed into the paper surface.
Tip: Use paper with a slightly smooth surface for the sharpest pattern transfer — standard copy paper works, but mixed media paper or cardstock produces crisper pattern definition. Heavily textured watercolor paper absorbs the pattern unevenly and blurs the marbled lines.
Budget: $5–$15
Final Thoughts
Paper crafts reward two things above almost everything else: the right material for the project and patience with drying time. Most paper craft failures happen because of one or the other — copy paper used where cardstock was needed, or a project handled before glue or paint fully cured. Neither of these is a skill gap; they’re information gaps that disappear once you know what to look for.
Start with whichever project matches something you actually need — a card that lights up, a pot for seedlings, a lantern for a room that needs more atmosphere. Projects made for a specific purpose almost always get finished and used, while projects made abstractly as “something to craft” tend to stall halfway through. Paper is cheap enough to experiment freely and forgiving enough that a failed first attempt produces a second that’s almost always better.