15 Creative Ceiling Designs That Add Architectural Interest
Most ceilings get painted white and forgotten. That single decision — so common it barely registers as a decision at all — leaves between a quarter and a third of every room’s surface area doing absolutely nothing for the space. It doesn’t add warmth, define the room’s proportions, signal any design intention, or contribute anything to the experience of being in the room.
That’s a significant missed opportunity, because the ceiling influences how a room feels in ways that walls and floors simply can’t replicate. A thoughtfully designed ceiling changes how tall the room seems, how warm it feels, how much of an “inside” quality it has. It introduces depth, texture, and pattern from a position that the eye encounters constantly without being directed to it. And when a ceiling is genuinely designed rather than simply finished, it tells anyone entering the room that the space was thought about — not just assembled.

Not looking for structural treatments? If you want to add drama through paint alone, see our guide to striped ceiling ideas — this article focuses on material, structural, and installation-based ceiling designs.
The fifteen ideas below cover structural treatments, material upgrades, light-based designs, and decorative installations — each suited to different room types, budgets, and skill levels. Several require a contractor; most don’t.
1. The Coffered Ceiling for Classical Depth
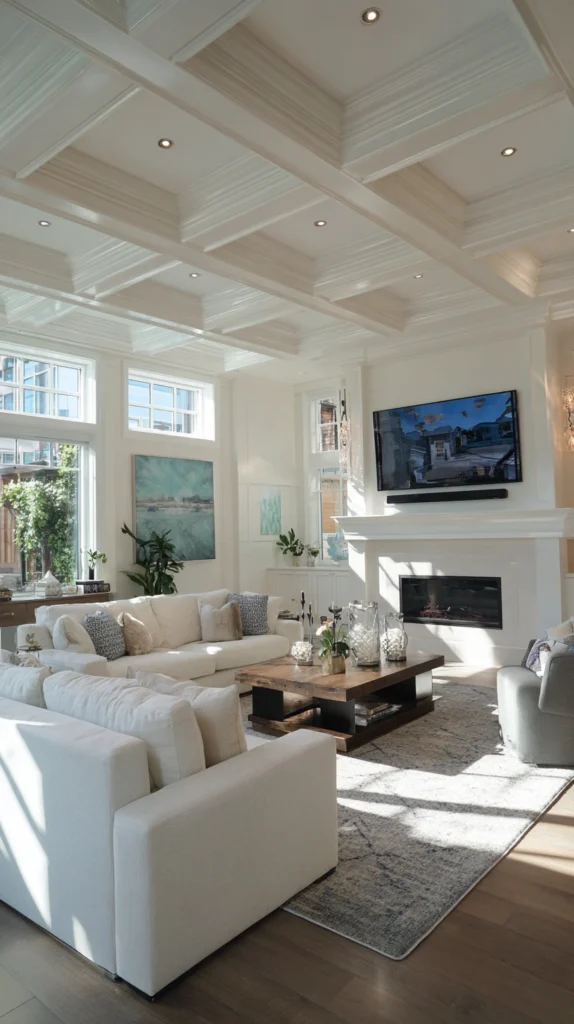
A coffered ceiling — a grid of recessed panels formed by intersecting beams — is one of the most enduring ceiling treatments in architectural history. You’ll find it in ancient Roman buildings, Renaissance palaces, and Georgian townhouses for the same reason it still works in contemporary rooms: it turns a flat, inert overhead surface into a three-dimensional composition that casts shadows and catches light as the day progresses.
What creates the effect: The depth of each coffer — the distance between the beam face and the recessed panel — determines the drama. In a room with a standard 8-foot ceiling, keep coffers shallow (2–3 inches deep) so the grid reads without compressing the space. In rooms with 9-foot or higher ceilings, go 4–6 inches deep for a more emphatic result.
Construction options and costs:
- MDF grid systems — the most accessible option; pre-cut beam profiles glued and nailed to the existing ceiling. A 12×14-foot room typically costs $800–$1,500 in materials plus installation.
- Plaster moldings — appropriate for period homes; more expensive but historically authentic.
- Solid timber — highest cost, highest quality; suits Arts and Crafts, traditional, and high-specification contemporary interiors.
Paint approach: A single color across beams and panels reads as architectural detail. A contrasting color inside the panels (see idea #12 below) turns the coffered grid into a graphic ceiling composition.
Best suited to: Dining rooms, studies, living rooms with 9+ foot ceilings, formal spaces.
2. Exposed Timber Beams for Warmth and Authenticity
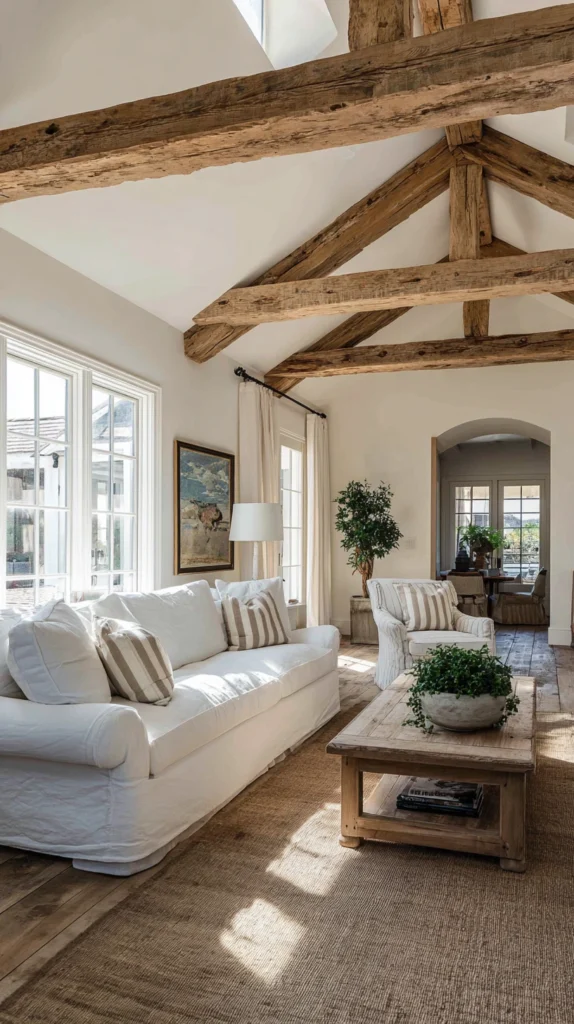
Genuine exposed timber beams — structural members uncovered when later plasterboard is removed — are among the most valuable architectural features a home can have. In farmhouses, barn conversions, cottages, and any building with a timber-framed history, exposed beams transform a room in a way that no applied finish can replicate.
Finishing genuine beams correctly: The most common mistake is over-finishing. A polyurethane lacquer seals the grain and gives the timber a plasticky brightness that reads as fake even when the beams are real. Instead:
- Use a hard wax oil (Osmo Polyx is widely available and reliable) or a simple linseed oil treatment.
- Sand lightly first to remove accumulated grime without destroying the weathered character.
- Let the natural color variation in old timber remain — it’s the grain, the knots, and the variation that make genuine beams beautiful.
Where genuine beams aren’t available: High-quality hollow beam casings in solid timber or polyurethane resin construction can be mounted to existing ceiling joists convincingly, provided the scale is right. Beams that are too thin look like sticks; beams that are too widely spaced look like an afterthought. A structural engineer or experienced carpenter can advise on appropriate sizing.
Best suited to: Kitchens, living rooms, bedrooms in period or vernacular buildings. Works less well in contemporary apartments or rooms with smooth, modern detailing.
3. A Painted Ceiling in a Deeper Tone Than the Walls
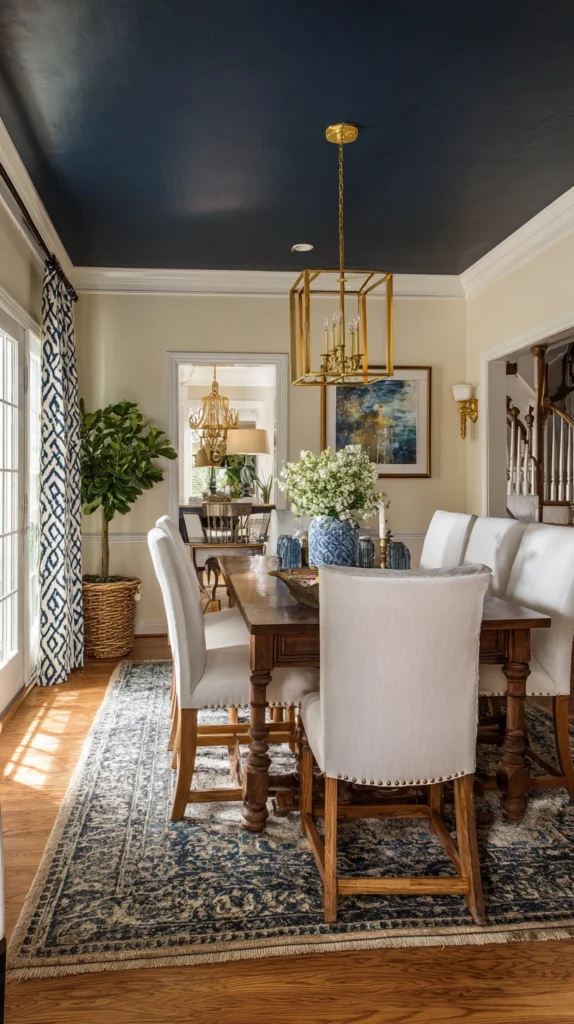
The most accessible ceiling upgrade on this list costs nothing beyond a quart of paint and a roller. Painting the ceiling in a deeper tone than the walls — same color but intensified, or a coordinating deep tone from the same palette — creates a sense of enclosure and intimacy that lowers the apparent ceiling height in the most pleasurable way.
Why this works: Most people assume darker ceilings will make a room feel oppressive. The opposite is usually true. A deep ceiling creates a “lid” on the room that reads as intentional shelter — the same quality that makes a canopied bed or a reading nook feel so appealing. The room feels contained rather than cavernous.
Practical color combinations that work:
- Sage green walls + deep forest green ceiling (Benjamin Moore Salamander, Farrow & Ball Studio Green)
- Warm white walls + soft terracotta ceiling (Farrow & Ball Dead Salmon, Benjamin Moore Peach Sorbet)
- Pale blue walls + deep navy ceiling (Little Greene Hicks’ Blue, Benjamin Moore Hale Navy)
- Warm grey walls + charcoal ceiling (Farrow & Ball Down Pipe, Benjamin Moore Kendall Charcoal)
Finish matters: Use the same finish as your walls (typically eggshell or matte) rather than the traditional flat ceiling paint — it reads more intentional and holds up better to light-catching imperfections.
Best suited to: Any room. Bedrooms and dining rooms benefit most from the cocooning quality. Works even in small rooms where it might seem counterintuitive.
4. Tongue and Groove Timber Paneling Overhead
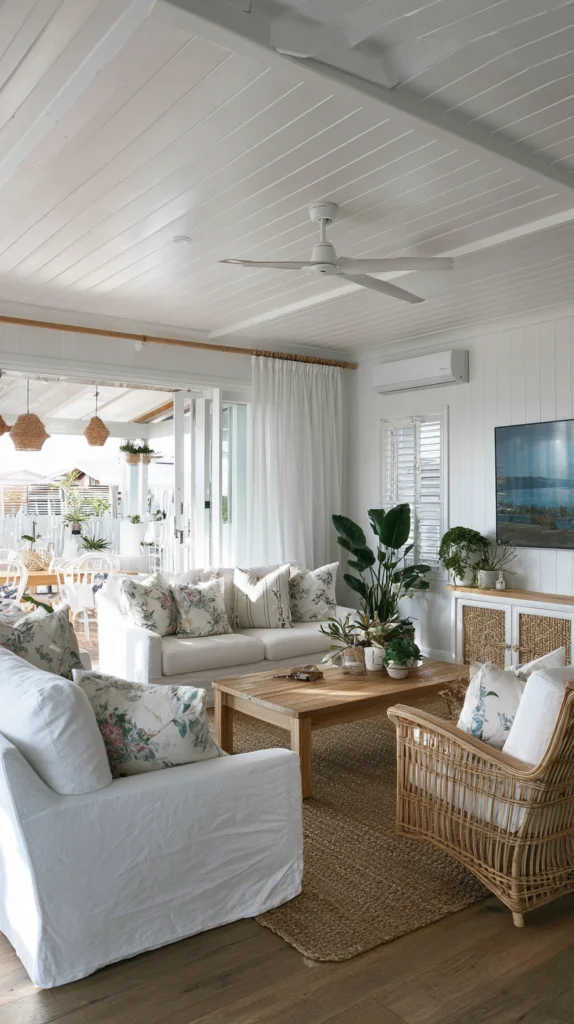
Tongue and groove timber boards installed across the ceiling surface create one of the warmest, most textured overhead treatments available — familiar from coastal cottages, Craftsman bungalows, and screened porches, where this treatment has been a defining design feature for well over a century.
Orientation decisions: Running boards along the room’s long axis makes a narrow room feel slightly longer. Running them across the short axis creates a rhythm that draws the eye across the width. Either works; consistency matters more than direction.
Finish options:
- Natural oiled — brings out the grain; suits traditional and farmhouse interiors
- White-painted — fresh, beach-house quality; bounces light; the most popular contemporary application
- Dark-stained — dramatic; suits studies, media rooms, rooms with dark furniture
- Pale sage or blue-gray — the traditional porch ceiling color (sometimes called “haint blue” in Southern architecture), which works beautifully indoors in relaxed, informal spaces
Installation: Within reach of a confident DIY practitioner. Key steps: install a vapor barrier if the space above is uninsulated, use adhesive plus brad nails for secure fixing, and use a chalk line to keep the first row dead straight — every subsequent row follows from it.
Approximate cost: $3–$8 per square foot in materials; installation adds $4–$8 per square foot if hired out.
Best suited to: Living rooms, bedrooms, porches, beach houses, Craftsman and farmhouse-style homes.
5. A Medallion and Decorative Plasterwork Ceiling
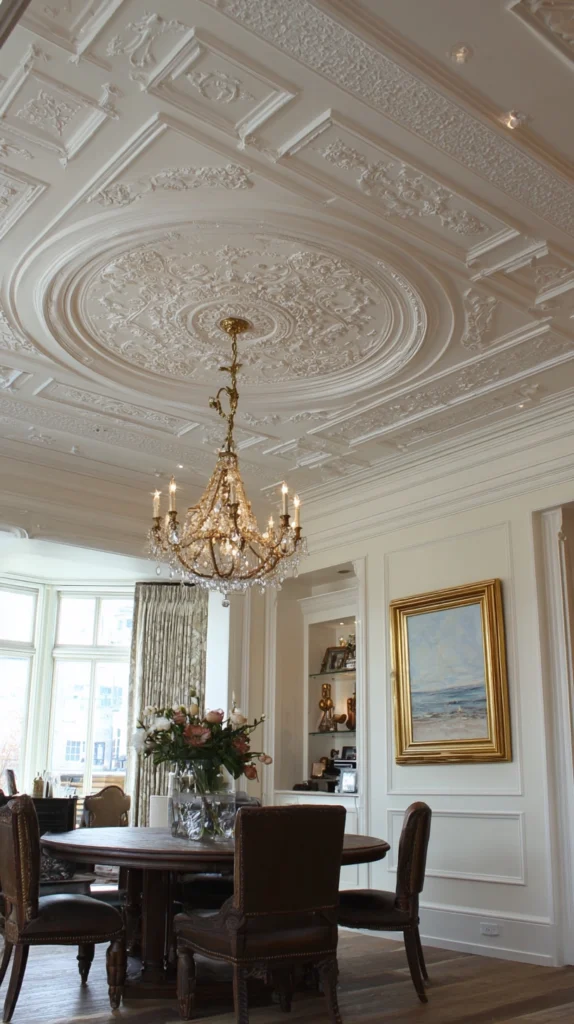
Plaster ceiling decoration — ornate molded centerpieces, cornices, and applied decorative elements — had largely disappeared from residential interiors by the late twentieth century. It’s now coming back, partly as a genuine appreciation for craft tradition and partly as a reaction against decades of stripped-back minimalism.
Starting point: A ceiling medallion (also called a ceiling rose) surrounding the central light fitting is the most accessible entry point. Quality reproductions in polyurethane or plaster are available from architectural salvage suppliers and online retailers in diameters from 12 to 36 inches, priced from $40 to $300 depending on size and material.
Building a complete scheme:
- Add a picture rail at the wall-ceiling junction (typically 12–16 inches below the ceiling line)
- Add a simple cove or ogee cornice at the ceiling’s perimeter
- Center the medallion on a chandelier or decorative pendant, not a recessed downlight
Paint approach: Painting the medallion the same color as the ceiling produces a subtle, tonal effect. Painting it white against a colored ceiling gives maximum definition and makes the plasterwork read as a distinct decorative layer.
Best suited to: Period homes (Victorian, Edwardian, Georgian), formal living and dining rooms, bedrooms seeking a romantic or traditional character.
6. A Stretched Fabric or Tensile Ceiling
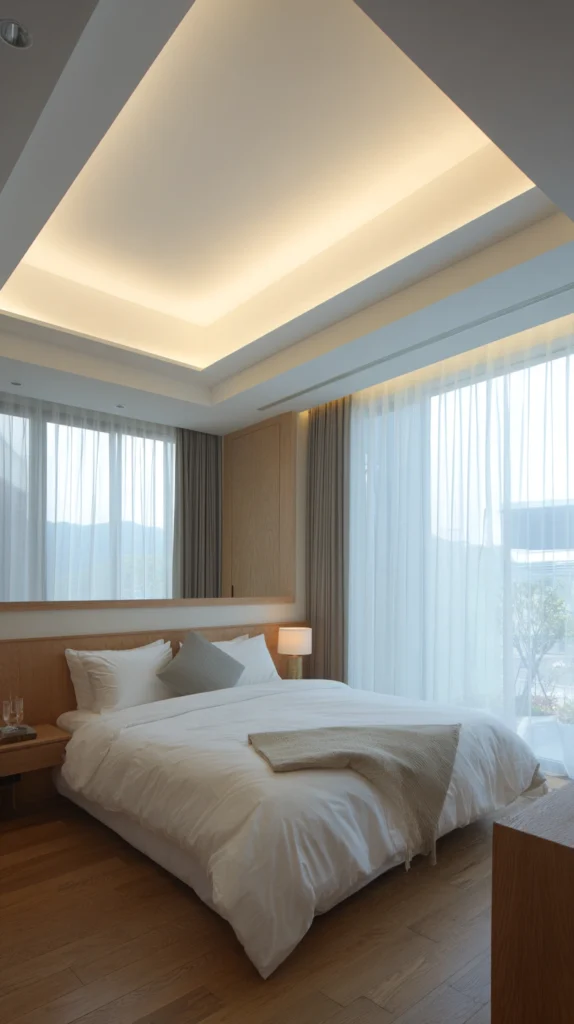
A stretched fabric ceiling — a translucent or opaque membrane tensioned across the ceiling plane and supported on a perimeter track — is one of the most dramatic contemporary ceiling treatments available. Backlit with LED panels, it creates a glowing, luminous overhead surface that has no precedent in traditional domestic architecture.
Two distinct effects:
- Backlit translucent membrane: Creates the impression of a uniform glowing sky overhead — a quality of light that is evenly diffused, shadow-free, and deeply calming. Particularly effective in rooms with poor natural light or difficult ceiling geometry.
- Opaque decorative membrane: Used to conceal damaged or visually complicated ceilings while adding a textile softness that painted surfaces can’t achieve. Available in fabric, leather-look, and printed finishes.
Practical notes:
- LED strip lighting for backlighting costs $15–$30 per linear meter; the perimeter track system typically adds $25–$50 per square meter installed.
- DIY-installable systems are available (brands like Clipso have residential kits), but most installations benefit from professional tensioning for a perfectly flat result.
- Fire rating: specify a Class 1 fire-rated fabric for residential use — this is non-negotiable and most reputable suppliers offer it as standard.
Best suited to: Home cinemas, basement conversions, bathrooms with difficult geometry, contemporary living spaces.
7. A Tray Ceiling with Accent Lighting
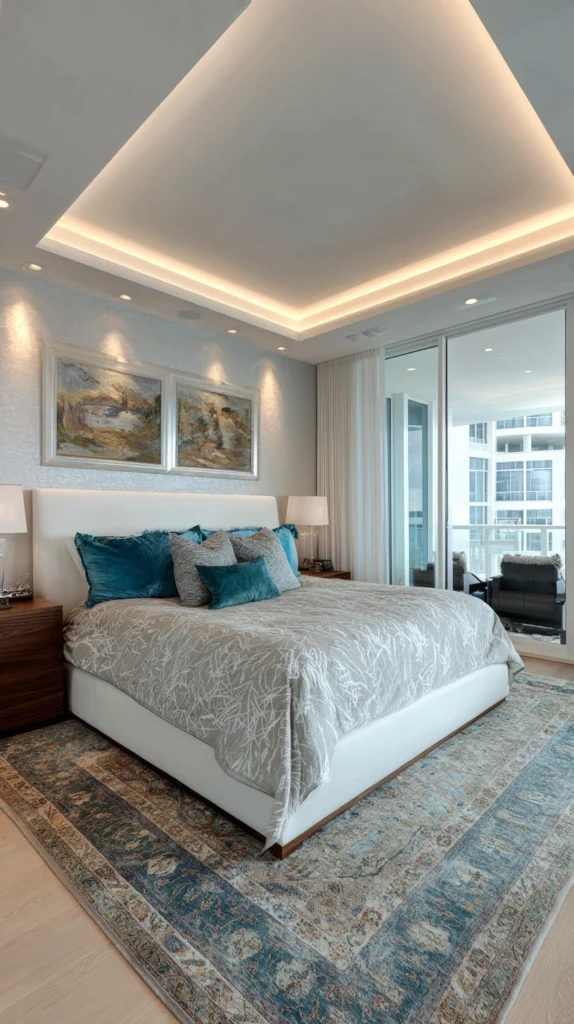
A tray ceiling — where the central section is raised above the surrounding perimeter — creates an architectural step that makes standard ceiling heights feel more generous without any actual structural increase. The perimeter-to-center step is where the design opportunity lives.
The lighting detail that makes it work: An LED strip mounted inside the step, directed upward into the raised section, creates cove lighting — warm, indirect illumination that defines the geometry and provides some of the most flattering ambient light possible in a domestic room. This single addition transforms a tray ceiling from an architectural feature into a complete lighting design.
LED specification for cove lighting:
- Use a warm white LED strip (2700K–3000K) rather than cool white, which reads clinical in residential spaces
- A dimmer is essential — the effect at 20% brightness for evening use is completely different from the same strip at full output
- Recessed LED profiles (aluminum channels with a diffuser) produce a smoother line than exposed LED tape
Color options: Paint the raised central section the same color as the perimeter for a monochromatic effect, or use a lighter or contrasting shade in the raised section to exaggerate the sense of height.
Best suited to: Master bedrooms, dining rooms, living rooms. Particularly effective in rooms where recessed downlighting would feel too clinical.
8. A Geometric Wallpaper or Stenciled Pattern
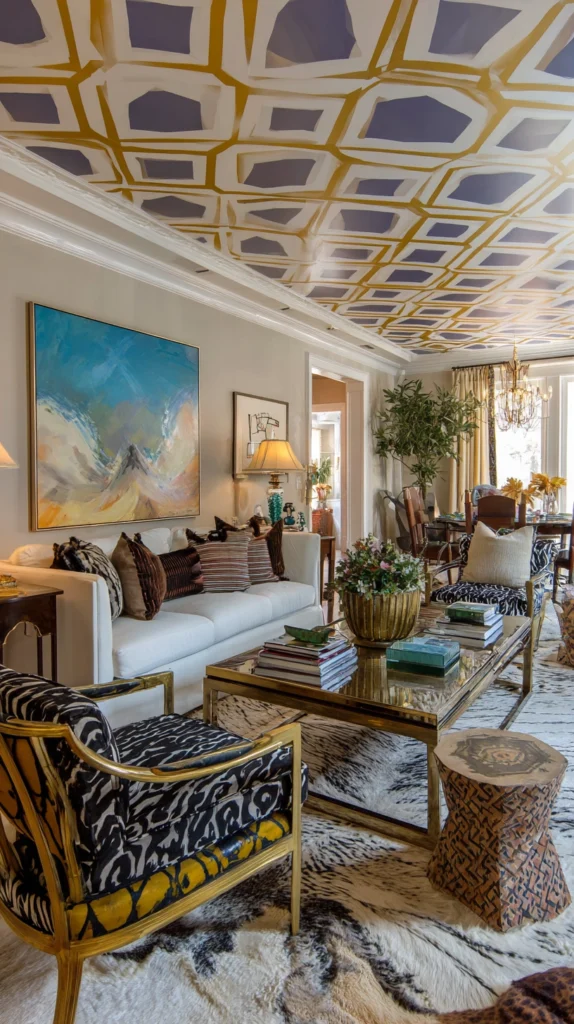
This is a significant departure from the paint stripe techniques covered in our striped ceiling article — where wallpaper here is used not for its stripe but for its large-scale geometric pattern, repeat motif, or texture, creating a visual impact when viewed from below that the same paper on a wall cannot replicate.
Why ceiling wallpaper works differently: The unusual orientation of viewing a ceiling pattern from below, combined with the overhead scale, gives even a simple geometric repeat a monumentality it can’t achieve on a wall. A diamond grid, an oversized ogee, a botanical repeat — all read as architectural statement from below.
Paper selection:
- Choose a straight-match pattern rather than a drop match — straight matches are significantly easier to align across a horizontal ceiling surface
- Pre-pasted papers simplify installation considerably; for unpasted options use a heavy-duty ceiling adhesive rated for overhead application
- Avoid very small repeats (under 4 inches) on ceilings — they read as texture from floor level, not pattern
- Cost: quality geometric wallpaper runs $40–$120 per roll; a standard 12×12-foot ceiling requires 4–6 rolls
Installation tip: Work with a partner. Have one person holding the paper against the ceiling while the other smoothes and positions. A papering table at ceiling height, not a stepladder, makes this manageable.
Best suited to: Powder rooms, dining rooms, bedrooms, any room where you want a bold overhead statement without structural work.
9. A Living Green Ceiling Installation
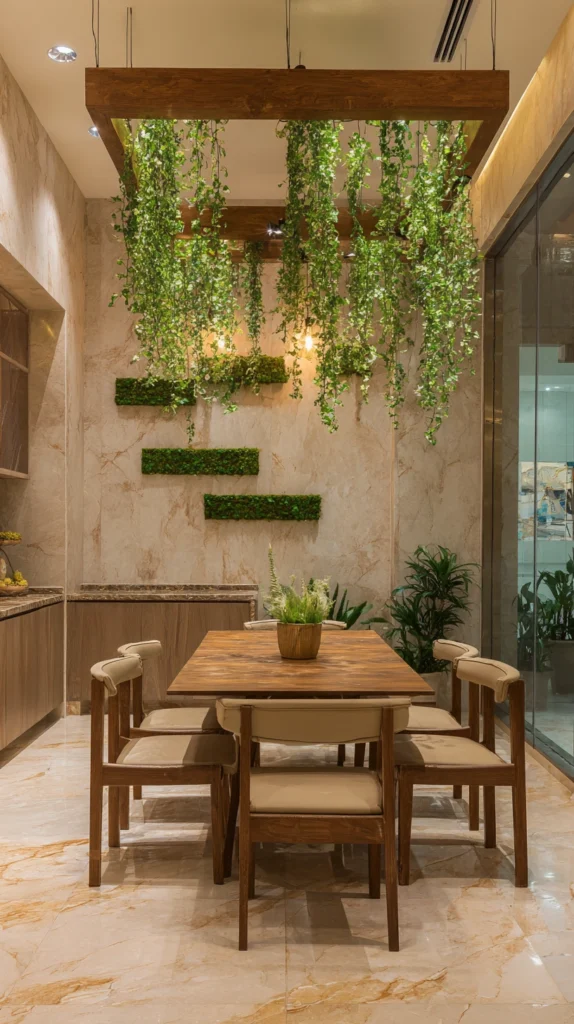
Bringing plant material overhead — in a living or preserved installation — creates an interior experience genuinely unlike anything else on this list. A ceiling covered in moss, ferns, or trailing botanical material changes the acoustic quality of the room, its smell, its visual character, and the way occupants feel in it in ways that are difficult to achieve through any other single design decision.
Two approaches with very different maintenance requirements:
Preserved moss (recommended for most homes):
- Sheet moss, bun moss, and reindeer moss are preserved with glycerin — they retain color and texture without irrigation, soil, or light supplementation
- Maintenance requirement: essentially zero, beyond occasional light dusting
- Lifespan: 5–10 years before color begins to fade
- Cost: $15–$40 per square foot installed; a feature panel rather than a full ceiling (say, 4×6 feet) is a manageable starting budget
- Suppliers: Verde Profilo, Moss Acres, and numerous Etsy sellers offer preserved moss panels ready to install
Living plant installation:
- Requires a suspended framework (metal or timber grid) plus irrigation, grow lights if natural light is insufficient, and regular maintenance
- Best suited to spaces with very good natural light and a commitment to ongoing care
- More appropriate for commercial or hospitality interiors than standard residential rooms
Best suited to: Living rooms, home offices, meditation or yoga spaces, any room where calm and biophilic connection are design priorities.
10. Acoustic Ceiling Tiles with Design Intent
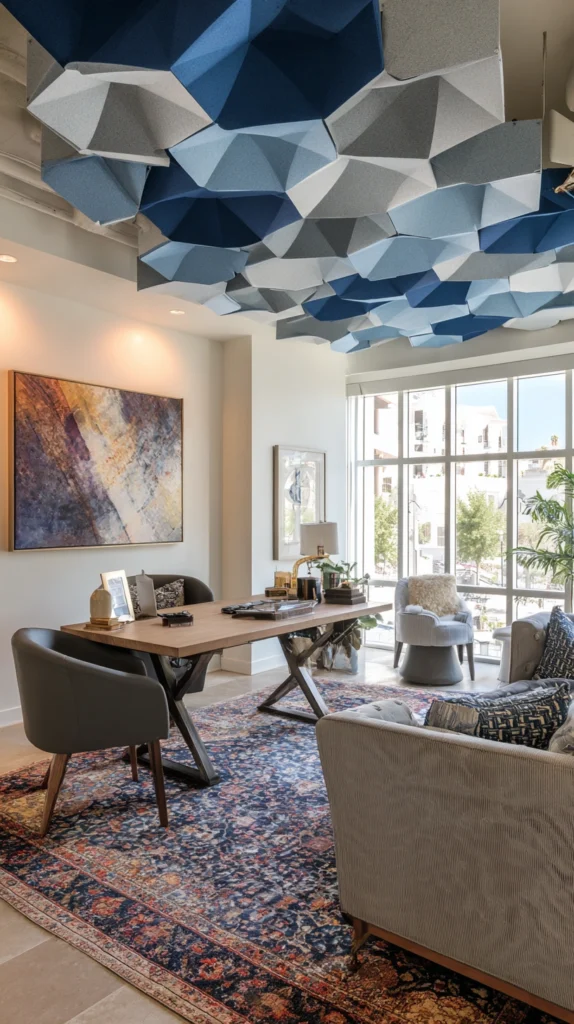
Acoustic ceiling panels are strongly associated with offices and conference rooms — institutional white tiles in a suspended grid, chosen for function and ignored aesthetically. The contemporary acoustic tile market has changed this significantly, and it’s now possible to address room acoustics and ceiling design simultaneously.
Why acoustics matter in residential spaces: Hard floors, plaster walls, and minimal soft furnishings create rooms with long reverberation times — speech becomes harder to understand, music sounds muddy, and the room feels louder and more fatiguing than it should. A ceiling treatment that absorbs mid-to-high frequency sound addresses this directly.
Design-forward options:
- Hexagonal fabric panels in custom colors, arranged in a geometric cluster pattern against a painted ceiling, with deliberate gaps between tiles
- Cloud panels — large-format acoustic panels suspended below the ceiling on adjustable wire hangers at varying heights, creating a sculptural installation
- Acoustic timber slat panels — slatted wood over an acoustic backing, available in oak, walnut, and painted MDF; combines the warmth of timber with genuine acoustic performance
Performance guidance: Aim to cover 15–25% of the ceiling area with acoustic material for a noticeable improvement in a typical living room or dining room. Full coverage is neither necessary nor always aesthetically desirable.
Cost range: DIY fabric panels: $30–$80 per panel. Professional acoustic cloud installations: $500–$2,000 depending on size and specification.
Best suited to: Open-plan living areas, dining rooms, home studios, media rooms, any room with hard floors and poor acoustic quality.
11. A Mirrored Ceiling Panel for Light Amplification
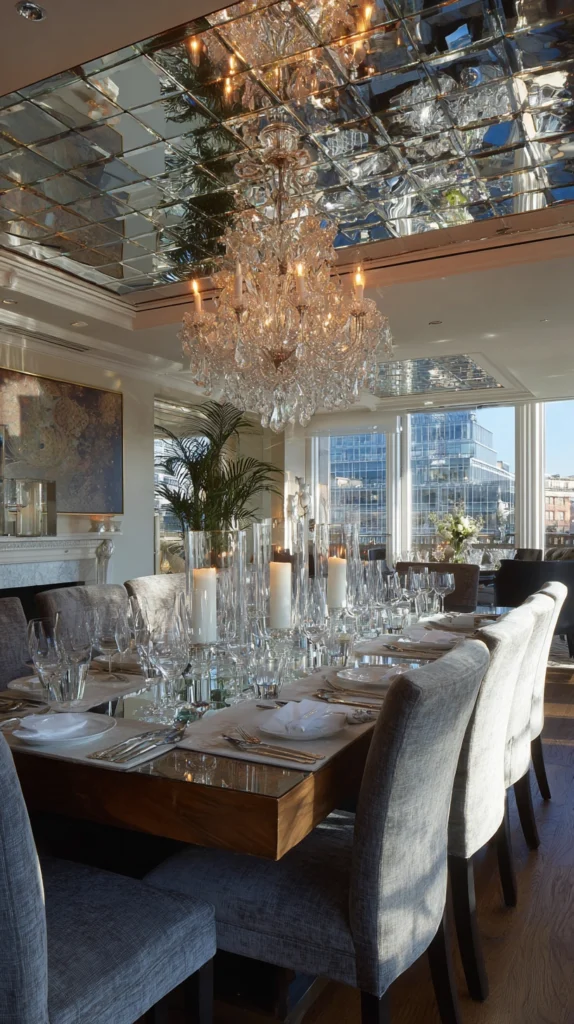
A mirrored ceiling — a single large panel, a series of tiles, or an antique mirror arrangement — does more to transform the spatial experience of a small or dark room than almost any other single intervention, because it reflects the room’s contents and its light sources upward, substantially amplifying both the apparent height and the luminosity of the space.
Where it works best:
- Small bathrooms: A full mirrored ceiling makes the room feel twice its actual height and distributes window light with exceptional efficiency. The effect in a narrow bathroom (say, 5×8 feet) is genuinely dramatic.
- Above a dining table: A mirrored panel reflects the table setting and pendant light, creating a doubled light source that illuminates the dining scene from above and below simultaneously.
- In a bedroom alcove or dressing room: Creates a sense of generous space in a constrained area.
Antique vs. new mirror: New mirror has a hard, clear reflectivity that can feel glaring at full ceiling scale. Antique mirror — with its slight tarnish, foxing, and depth variation — creates a ceiling treatment of considerably more warmth and beauty. Antique mirror panels are widely available from glass suppliers and architectural salvage dealers, typically at $15–$35 per square foot.
Installation: Mirror should be fixed with mirror adhesive and mechanical fixings (mirror screws or clips) — adhesive alone is not sufficient for a ceiling application.
Best suited to: Bathrooms, dining rooms, bedroom dressing areas, compact urban apartments.
12. A Coffered Grid in a Contrasting Color
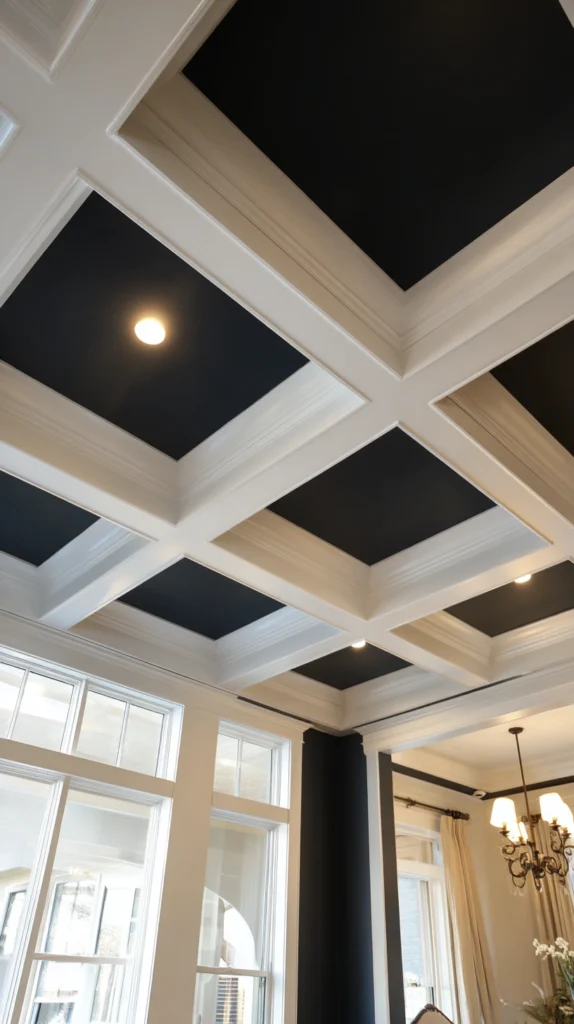
This is a variation on idea #1 that deserves its own entry because the design result is so different. Where a single-color coffered ceiling reads as architectural detail, a coffered ceiling with deliberate color contrast between beam faces and panel surfaces reads as graphic overhead art.
The contrast effect: The difference in color makes the geometry of the coffer immediately and clearly readable from below, and the color within the panels — particularly a saturated or deep tone — creates the impression of looking up into a series of beautifully colored recesses with genuine spatial depth.
Color combinations that work:
- White beam grid + navy panel (classic, high-contrast, works in traditional and contemporary rooms)
- Dark-stained timber beam + cream panel (warm, period-appropriate)
- Black grid + warm terracotta panel (bold, contemporary, suits rooms with warm material palettes)
- Soft sage beam + white panel (gentle, works in rooms that need pattern without drama)
The coordination rule: The color inside the coffered panels should relate to at least one other element in the room — a wall color, an upholstery fabric, a rug tone. A ceiling color that exists nowhere else in the room floats disconnected from the room’s design.
Best suited to: Dining rooms, studies, living rooms where the coffered ceiling is already planned and color contrast is the next level of commitment.
13. A Sloped or Vaulted Ceiling Celebrated Rather than Hidden
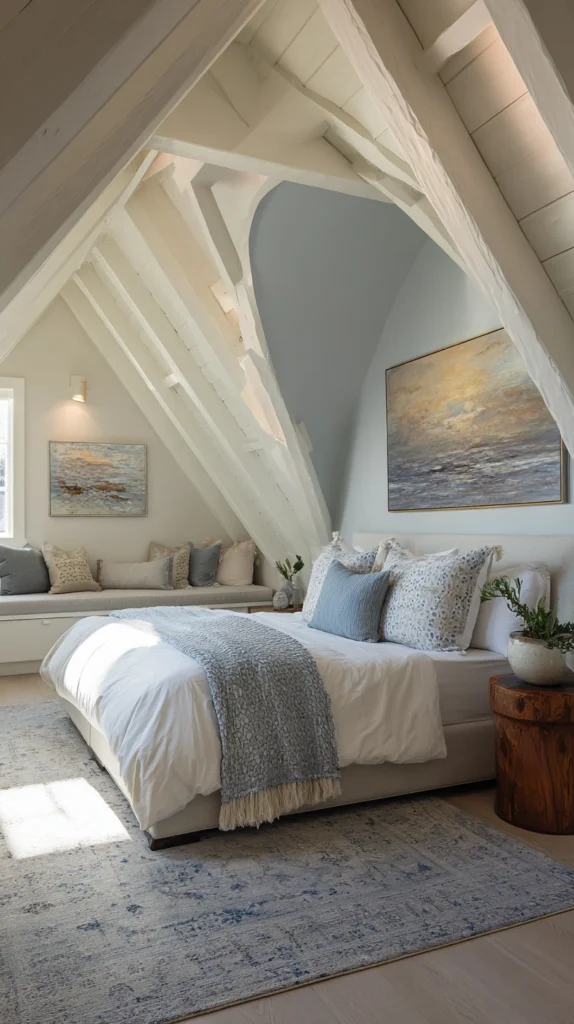
In rooms where the ceiling slopes — attic rooms, upper floors of older houses, barn conversions — the architectural character of the slope is frequently treated as a problem to manage rather than a quality to celebrate. Horizontal ceilings are installed to conceal the slope, and the spaces lose the spatial interest that makes them genuinely special.
The better approach is simpler: Leave the slope visible. Don’t install the horizontal ceiling that convention suggests.
Why sloped ceilings work well when embraced:
- The height variation — from a low, intimate edge to a higher apex — creates natural zones within the room suited to different activities
- The low edge creates shelter and enclosure; it’s the natural location for a bed, a sofa, a reading chair
- The high apex creates openness and draws the eye upward in a way no flat ceiling can
How to treat the sloped surface well:
- Paint in a considered color — the same as the walls for a continuous envelope effect, or slightly lighter to maximize the sense of height at the apex
- Install lighting at the low edge directed upward along the slope — wall-mounted uplighters or LED strip at the base of the slope work well
- Avoid hanging pendant lights from the sloped section; opt for wall-mounted or recessed fittings that suit the geometry
Best suited to: Attic rooms, cottage bedrooms, barn conversions, any room with a pitched roof.
14. A Pressed Metal or Tin Ceiling Panel
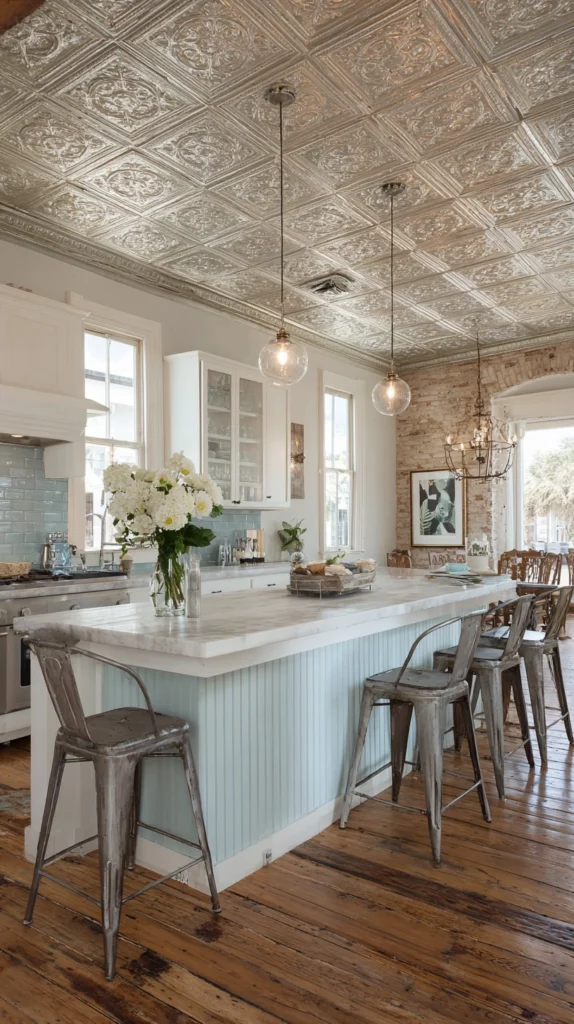
The pressed metal ceiling tile — stamped sheet steel or aluminum embossed with a repeating decorative pattern — is an American design tradition with roots in the mid-nineteenth century, when pressed tin was used as an economical and fire-resistant alternative to plaster ornament in homes, shops, and civic buildings across the country.
Contemporary availability: Reproduction panels are widely available from suppliers including American Tin Ceilings, Shanker Industries, and W.F. Norman Corporation. Patterns range from simple geometric to elaborately floral, in sizes from 2×2-foot individual tiles to 2×4-foot panels for faster coverage.
Surface finish options:
- Raw steel (paintable; the most economical option at $3–$8 per square foot)
- White or colored factory paint (convenient; $6–$12 per square foot)
- Antique copper, antique tin, or polished bronze ($10–$20 per square foot; the most visually rich option)
Installation: Panels can be nailed directly to a wood ceiling, installed in a suspended grid system over an existing ceiling, or adhered with construction adhesive. The grid system is the most forgiving method for DIY installation as it conceals any irregularity in the existing ceiling surface.
Best suited to: Victorian commercial building conversions, Craftsman interiors, rustic loft spaces, kitchen and bar areas where the industrial-heritage quality of the material is contextually appropriate.
15. A Suspended Pendant Light Installation as Ceiling Design
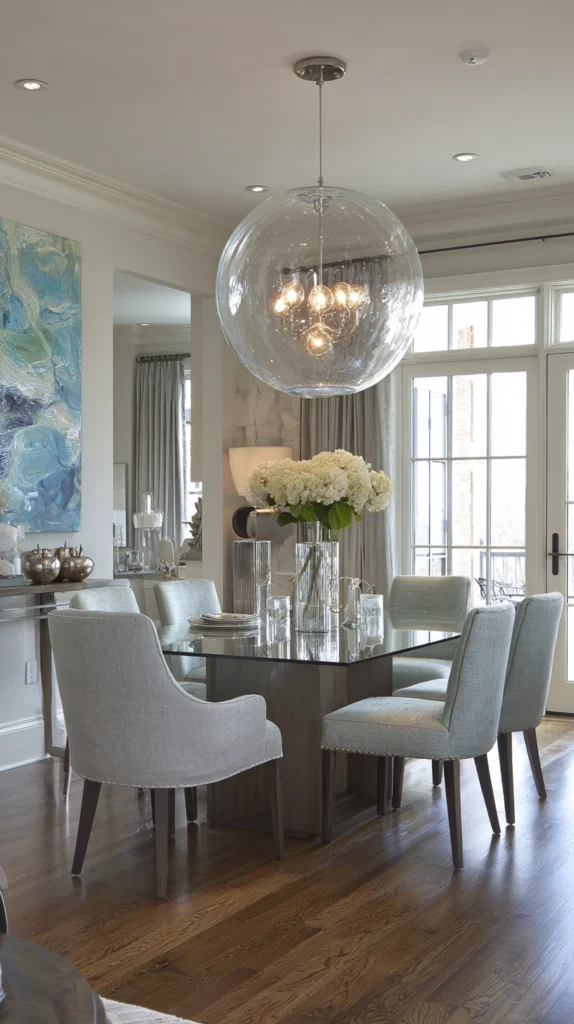
The final idea on this list is not a surface treatment at all — it’s a suspended installation that transforms the overhead visual field without touching the ceiling surface itself. A collection of pendant lights hung at varying heights and in a deliberate spatial arrangement creates an active overhead composition of light, shadow, and object that rivals any structural treatment in visual impact.
Installation formats:
- Cloud cluster: Multiple glass globe or bubble pendants at varying drop heights, concentrated over a dining table or seating area. Provides focal point lighting and visual drama simultaneously.
- Grid arrangement: Pendants hung at precise, even intervals across a kitchen ceiling — rigorous, graphic, and highly effective in contemporary interiors with clean architectural lines.
- Cascade: A collection of pendants — woven rattan, ceramic, or hand-blown glass — descending to different levels in a bedroom or stairwell. The asymmetry reads as artful rather than random when the pendant styles are consistent.
- Single monumental pendant: One large-scale sculptural pendant hung lower than convention suggests, making it the primary focal point of the room rather than a background light source.
Practical considerations:
- Pendant lights should hang to a standard of 7 feet from the floor to the base of the fitting in circulation areas; 30–36 inches above a dining table surface for task lighting
- Cluster installations require multiple ceiling roses or a purpose-made multi-pendant canopy plate — these are available from most lighting suppliers and simplify wiring considerably
- All electrical work in ceilings should be carried out by a qualified electrician
Best suited to: Dining rooms, kitchens, bedrooms, stairwells, any room where a lighting installation can serve simultaneously as a design feature and a functional light source.
Choosing the Right Ceiling Treatment for Your Room
Not every ceiling idea suits every room. Here’s a quick guide to matching treatment to context:
| Room | Best ceiling options |
|---|---|
| Low ceiling (under 8 ft) | Tray ceiling with uplighting, light-colored painted ceiling, sloped ceiling left open |
| Standard ceiling (8–9 ft) | Coffered grid, tongue and groove panels, pendant cluster, painted deep tone |
| High ceiling (9+ ft) | Exposed beams, full coffered ceiling, mirrored panel, pressed metal tiles |
| Dark or north-facing room | Mirrored panel, backlit tensile ceiling, light-colored timber paneling |
| Period home | Plaster medallion with cornice, pressed tin tiles, coffered ceiling in period style |
| Contemporary home | Acoustic cloud panels, geometric wallpaper, pendant installation, painted deep tone |
| Small room | Mirrored panel, simple painted ceiling (dark or light both work), tray with uplighting |
| Room with poor acoustics | Acoustic panels, tongue and groove timber (adds some absorption), stretched fabric |
The ceiling is the one surface in every room that no one walks on, leans against, or puts furniture against. That freedom from practical constraint is what makes it such a rewarding design opportunity — and the ideas above prove that acting on that opportunity doesn’t require a major renovation budget or specialist skills. It requires only the decision to treat the ceiling as the design surface it genuinely is.