15 Earthy Camper Interior Ideas for a Calm, Nature-Inspired Space
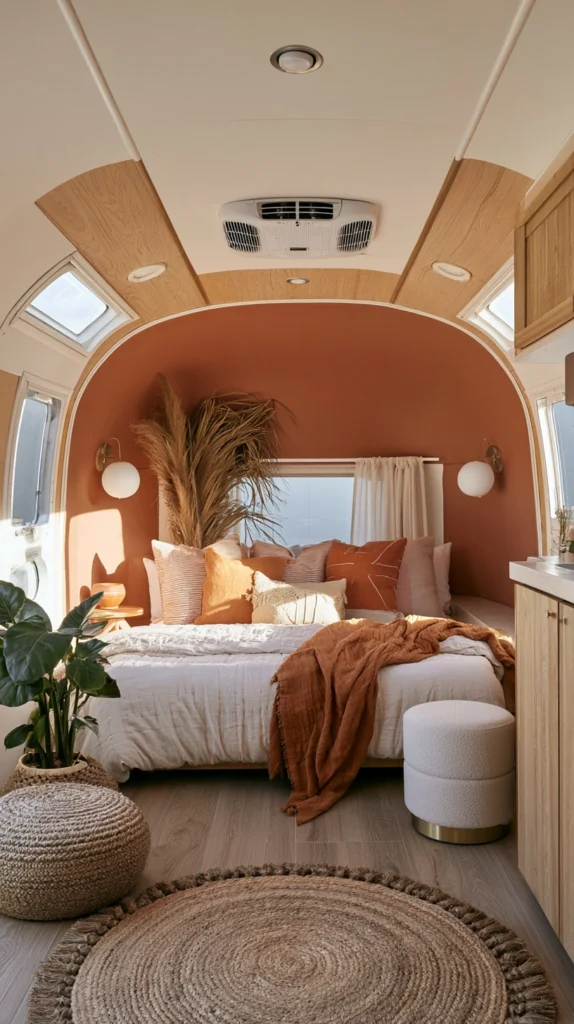
Earthy design in a camper isn’t about recreating a forest inside a moving vehicle. It’s about selecting materials, colors, and textures that feel grounded — ochre, clay, moss, linen, terracotta — and layering them in a way that makes a small manufactured space feel like it belongs somewhere rather than parked anywhere.

The aesthetic rewards understatement. One wrong move toward rustic maximalism and the whole thing tips into clutter.
These ideas are organized around how camper interiors actually function — from walls and surfaces to fabrics, lighting, and the finishing details that give a space its character.
1. Paint One Interior Wall in a Clay or Terracotta Tone
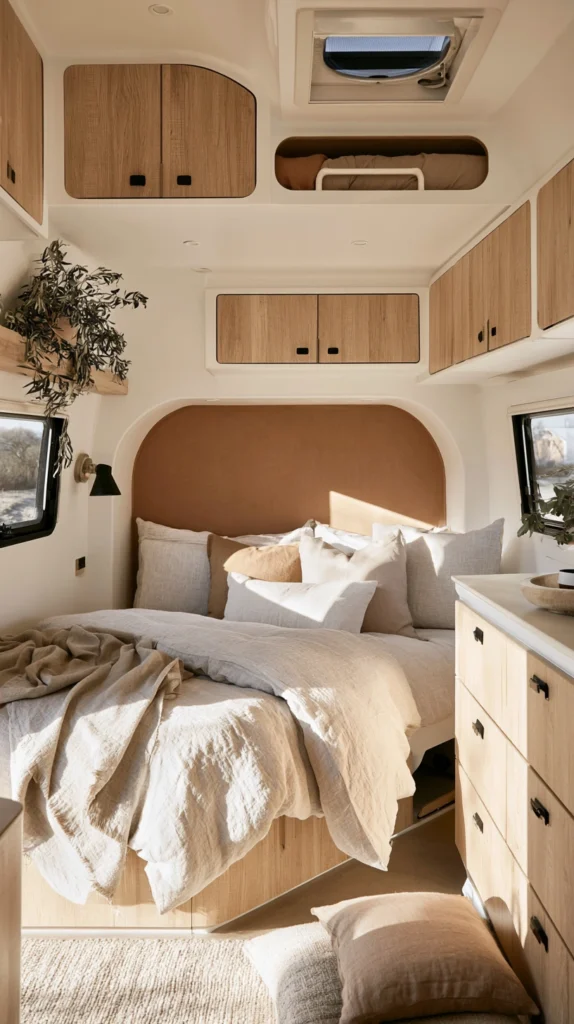
The fastest earthly transformation available in a camper is a single painted wall. Not all four walls — one. The wall behind the bed or main seating area absorbs the most visual attention, and painting it in a warm clay, terracotta, or dusty ochre immediately shifts the temperature of the entire interior.
Benjamin Moore’s “Terracotta Tile” (2174-30) and Sherwin-Williams “Fired Brick” (SW 6306) are two of the most reliable options for this application — both hold their warmth in low-light conditions rather than reading orange under artificial lighting. For a lighter interpretation, Benjamin Moore “Pale Terracotta” (2174-40) or Farrow & Ball “Red Earth” No.64 push toward clay without going saturated.
Use a satin or eggshell finish rather than flat — it resists scuffs better in a space that sees constant contact, and it’s wipeable when road grime makes it inside. For the application, a small 4-inch foam roller produces the smoothest finish on the slightly textured surfaces common in most production campers. Two coats over a white primer base coat are sufficient.
Tip: Test the color on a 12×12-inch section of the actual wall before committing. Camper walls often have a slight texture or sheen that shifts how paint colors read compared to a standard test swatch.
Budget: $25–$55
2. Layer Linen and Cotton Bedding in Muted Earth Tones
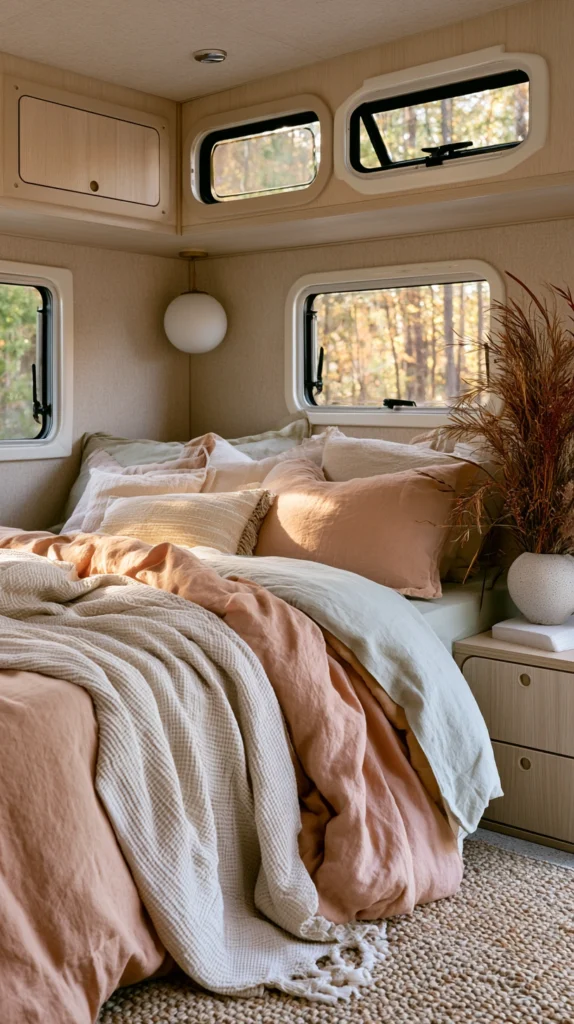
Bedding covers the largest single surface in most campers, which means it carries more visual weight than any other textile in the space. Switching factory bedding — typically polyester in neutral beige or gray — to linen or washed cotton in earth tones is the single highest-impact fabric upgrade available.
Look for bedding in tones like sage, rust, warm sand, dusty olive, or terracotta. Parachute, Cultiver, and Magic Linen all produce pre-washed linen sets that photograph well and actually soften with use. For budget options, H&M Home’s linen-blend sets in the $60–$90 range perform reasonably well for camper use where the sheets aren’t laundered as frequently as home bedding.
In a camper context, a duvet with a removable, washable cover is far more practical than a traditional comforter. Look for duvet inserts rated to at least 400 thread count cotton shell to avoid fill migration after repeated travel vibration. A duvet insert plus one linen cover in a warm earth tone will carry more visual character than two or three decorative throw pillows that shift around during transit.
Tip: Stick to two tones in your bedding — a base color and one accent. Three or more earthy tones on a bed become a patchwork that reads as disorganized rather than curated.
Budget: $65–$180
3. Install a Terracotta or Cement-Look Peel-and-Stick Tile Backsplash
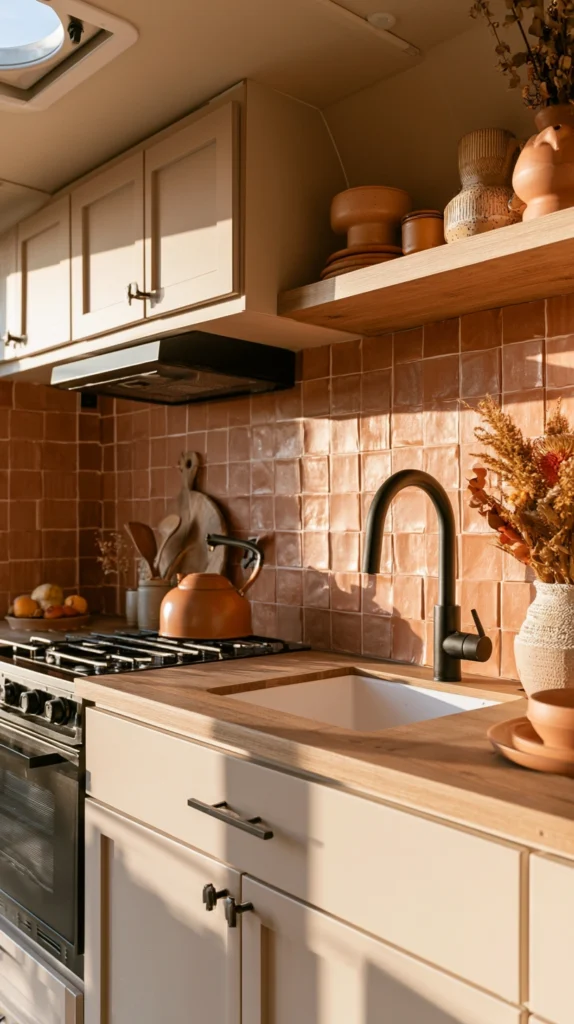
The kitchen backsplash in most production campers is either a continuation of the laminate countertop or a plain painted wall — both visually inert. A peel-and-stick tile in a terracotta, concrete gray, or handmade-looking ceramic pattern introduces the kind of surface variation that earthy interiors depend on.
Aspect Peel and Stick Tile and Smart Tiles both make backsplash panels rated for kitchen use. For an earthy look, avoid subway tiles — they read contemporary rather than grounded. Instead, look for hexagonal terracotta-tone tiles, Zellige-style irregular ceramic patterns, or concrete-look panels in warm gray or taupe. A typical camper backsplash runs 18–30 inches wide and 12–18 inches tall, putting the project at 3–4 square feet. Most panels come in 10×10-inch or 12×12-inch sheets, so four to six sheets is typically sufficient.
Surface prep matters significantly in campers. Wipe the wall with isopropyl alcohol, let it dry fully, then press panels firmly from center outward to avoid air pockets. The heat near a propane stove will test the adhesive over time — avoid placing panels directly adjacent to an open flame burner without a heat-tolerant adhesive backup.
Tip: Order one extra panel beyond what your measurement says you need. Cutting around a vent or outlet is easier when you have margin for error.
Budget: $30–$80
4. Hang Woven Wall Art Made from Natural Fiber
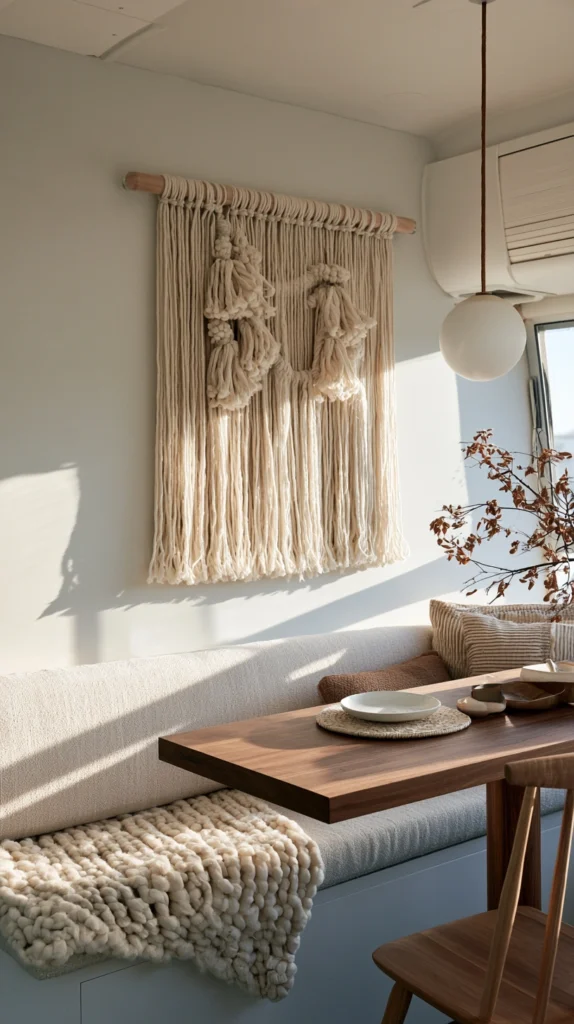
Woven wall hangings in macramé, jute, or cotton rope add texture to a flat camper wall in a way that paint alone cannot. They’re also the easiest large decorative elements to mount without damage — most hang from a single nail or removable adhesive hook, and they pack flat between trips.
For a camper scale, look for hangings in the 12–20 inch width range. Larger pieces overwhelm the proportions of a narrow wall and create a cramped feeling rather than a focal point. Etsy is the most reliable source for handmade options in natural undyed jute or cotton — search “natural fiber wall hanging” and filter to sellers with reviews showing actual finished color, since undyed jute photographs variably.
Mount the hanging over the dinette seating area or opposite the bed — positions where it can be seen from a resting position rather than buried behind a door or in a corner. The most effective earthy wall hangings incorporate driftwood or a raw branch as the hanging rod, which ties the textile to the material palette of the rest of the space.
Tip: Avoid macramé with fringe longer than 12 inches in a camper context. Long fringe shifts against furniture and walls in transit and arrives at your destination looking tangled rather than intentional.
Budget: $25–$85
5. Introduce a Stone or Concrete-Look Countertop Contact Paper
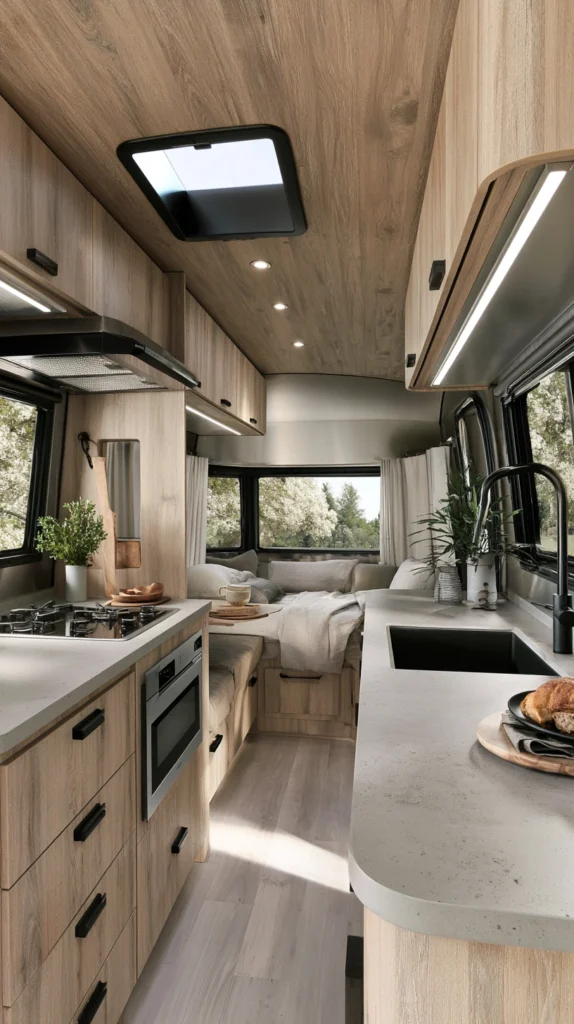
Camper countertops in production units are almost universally a laminate pattern designed to hide stains — faux marble or a generic beige pattern. Replacing that visual with a warm concrete gray, slate, or matte stone look via adhesive contact paper shifts the entire kitchen zone toward an earthy palette.
Con-Tact Brand and d-c-fix both make countertop-specific contact papers with textured surfaces that replicate stone reasonably well and hold up to moderate heat. The most effective earthy options are “concrete gray,” “slate anthracite,” and “dark stone” patterns — avoid anything with strong veining, which reads as a fake marble imitation rather than a natural stone reference. Most camper countertops run between 30–48 inches long and 18–22 inches deep, requiring one to two rolls of 18-inch-wide paper.
Application requires patience more than skill. Cut the paper several inches larger than the surface, peel back three inches of backing, align carefully, then press forward slowly with a plastic squeegee to eliminate bubbles. Around the sink cutout, score and fold the paper under the lip rather than cutting flush at the edge — this prevents lifting at the most vulnerable point.
Tip: Seal the edges with a bead of clear silicone caulk after application. This is the detail that separates installations that last through a season from ones that peel within three trips.
Budget: $18–$45
6. Use Rattan or Wicker Storage Baskets Instead of Plastic Bins
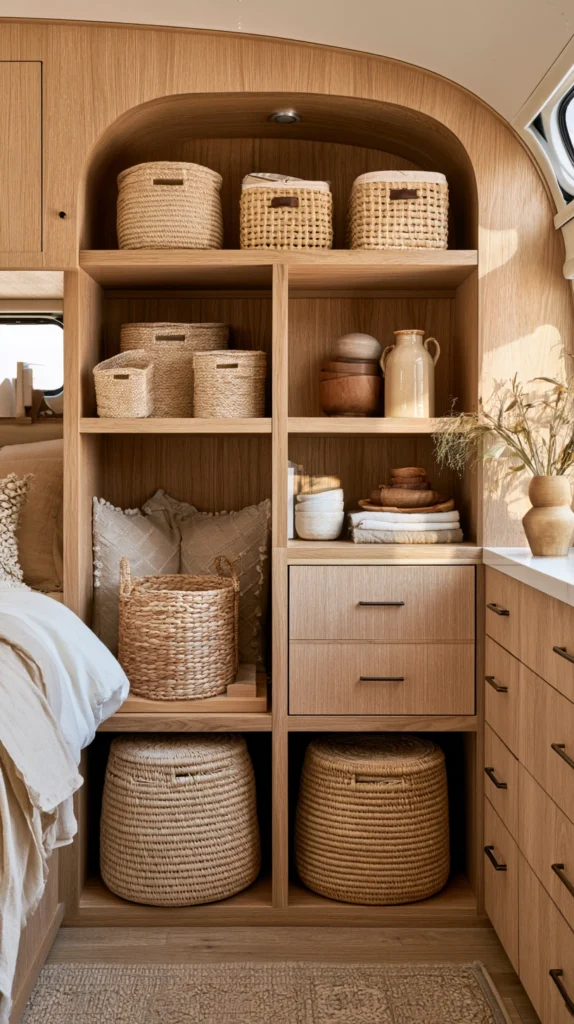
Storage in a camper defaults to whatever plastic bins were included from the manufacturer or purchased at a big-box store. Replacing even two or three of those bins with rattan or wicker baskets introduces organic material into the space while keeping everything just as functional.
For camper use, look for baskets with lids — open baskets let contents shift during travel and tend to accumulate dust. Seagrass lidded baskets from World Market or Ikea’s TOLKNING and KARISMATISK lines are appropriately sized for camper shelving and priced at $15–$35 each. Place them on the visible shelving in the living area or bedroom for maximum aesthetic effect, and keep the plastic bins in closed cabinets where they aren’t seen.
Measure your shelving depth before ordering. Many decorative baskets are sized for home shelving at 14–16 inches deep, while camper shelves commonly run 10–12 inches. An oversized basket that can’t close in a cabinet defeats the purpose.
Tip: Label the front of each lidded basket with a small tag cut from kraft paper and twine rather than a printed label. It maintains the natural material language without making the storage system look institutional.
Budget: $35–$100
7. Swap Factory Window Treatments for Woven Jute Roman Shades
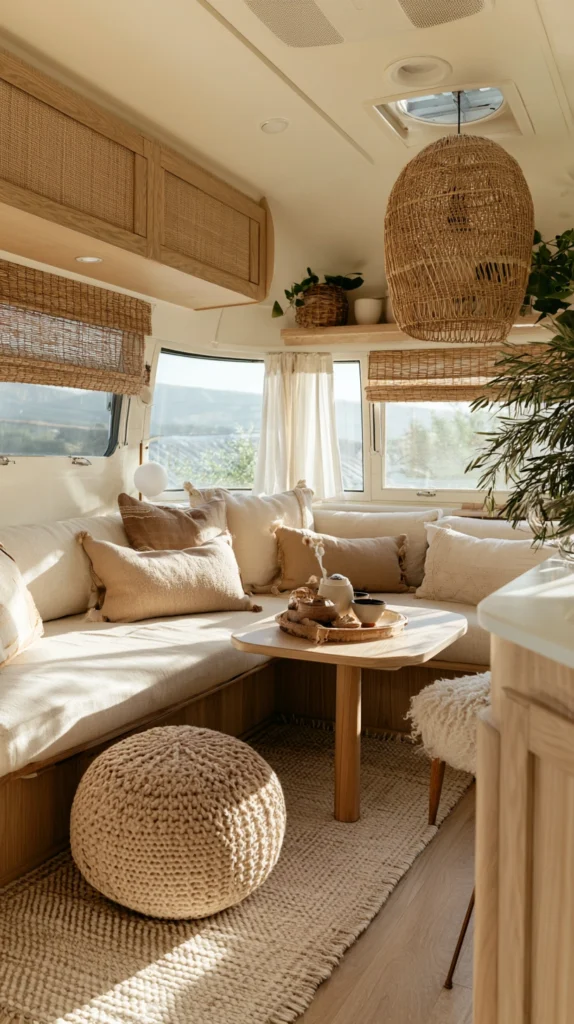
Most factory window coverings in campers are either day-night cellular shades in beige or a basic vinyl roller blind — both functional but neither contributing to any visual character. Woven jute or bamboo roman shades filter light in a way that creates a warm amber glow through the window rather than a flat bright patch, and that quality of light is central to the earthy aesthetic.
Standard camper window widths are typically 24, 27, or 36 inches. Target’s Threshold woven wood shade line and Home Depot’s Natural Light Bamboo Rollup series cover most of these dimensions without custom ordering, at $20–$45 per window. For privacy, layer a second white roller blackout shade behind the woven shade on the same bracket — this maintains the daytime atmospheric quality while still offering nighttime coverage.
Before mounting, unroll the shades fully for 24 hours. Woven shades arrive with a curl from packaging and hang unevenly when mounted immediately — a day of flat unrolling resolves this completely.
Tip: Mount the shade brackets 2 inches outside the window frame on each side rather than inside the frame. The wider visual width makes small camper windows appear more substantial, and the mounting hardware is easier to install without fighting the window trim.
Budget: $60–$180 for three to four windows
8. Add a Ceramic or Stoneware Mug and Dish Set
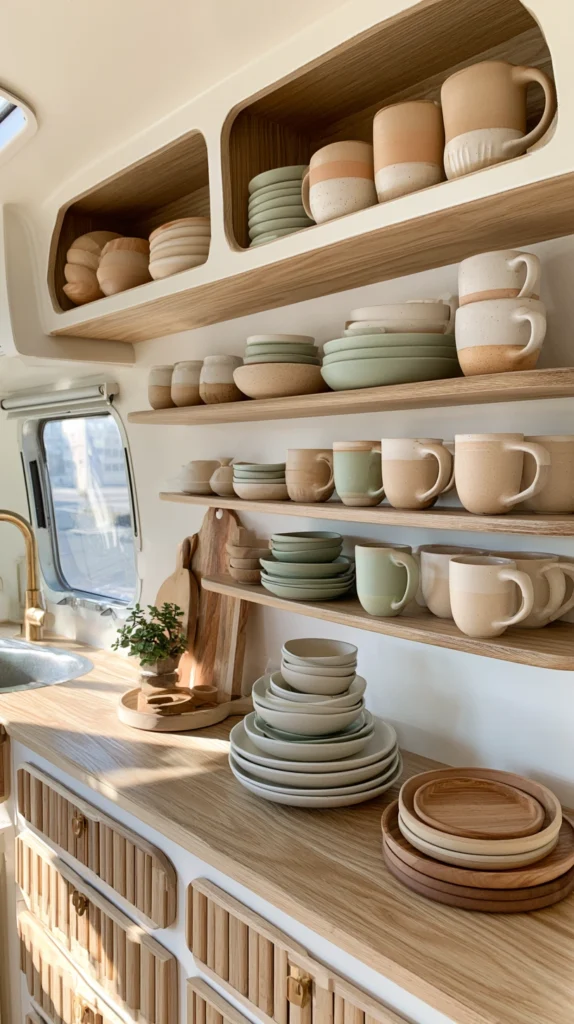
Plastic or melamine dishes are the default in most camper kitchens, and understandably so — they don’t break. But the visual quality of plastic dishware actively works against an earthy interior. A set of ceramic or stoneware dishes in matte earth tones is a small change that affects every meal in the space.
Heath Ceramics and East Fork make the most beautiful options, but start at $40–$60 per mug. A more practical approach: Ikea’s FÄRGKLAR collection in matte glaze, or Amazon’s Stone+Lain stoneware sets, offer the same matte ceramic quality at $25–$45 for a four-piece setting. Choose tones in warm sand, sage green, or a muted terracotta — these read as intentional against the earthy palette rather than generic.
For travel, wrap plates in dish drying mats folded between each plate, or store them in a padded dish organizer. Stoneware is heavier than melamine but more resistant to scratching and doesn’t absorb coffee stains the way plastic does over time.
Tip: Even if you keep your everyday plastic dishes for practical reasons, replacing just the mugs with ceramic ones makes a visible difference. Mugs are on the counter consistently and are the dishware most often seen during a relaxed camper morning.
Budget: $30–$75
9. Place a Low Succulent or Cactus Arrangement on the Dinette Table
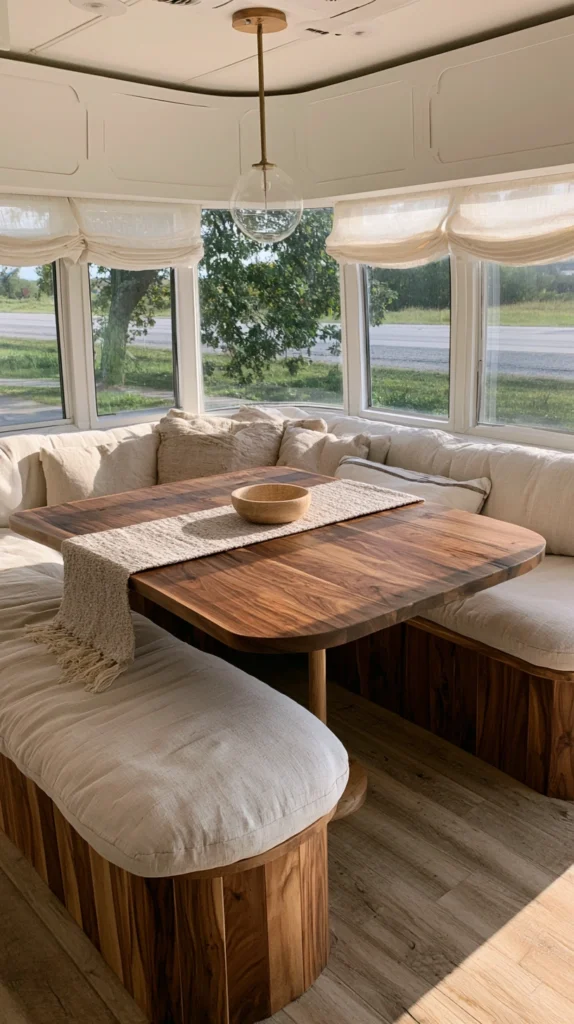
Live plants in a camper are a specific challenge — they need light, they tip over, they require water management between trips. Succulents and cacti solve all three problems simultaneously: low water requirement, compact root systems that tolerate small containers, and enough structural integrity to handle movement better than leafy plants.
A terracotta pot with a drainage hole, filled with a cactus-specific fast-draining soil, is the right container for camper use. The terracotta itself contributes to the earthy material palette and naturally regulates soil moisture. For species, Haworthia and Gasteria are the most forgiving in low-light interior conditions; Echeveria and Aloe do better near windows. A grouping of three pots in graduated sizes — 3-inch, 4-inch, and 5-inch — creates more visual interest than a single large pot.
Secure containers during travel by placing them inside a larger basket lined with a towel, or wedge them into a cup holder or corner shelf that prevents lateral movement. Water only when the soil is completely dry, which in a camper context usually means every two to three weeks.
Tip: Use pumice or perlite mixed at 50% with potting soil in a camper planter. The faster drainage prevents the root rot that often happens when camper plants are watered before a trip and then left sealed in a dark space for a week.
Budget: $20–$55
10. Line Cabinet Shelves with Kraft Paper or Cork Sheet
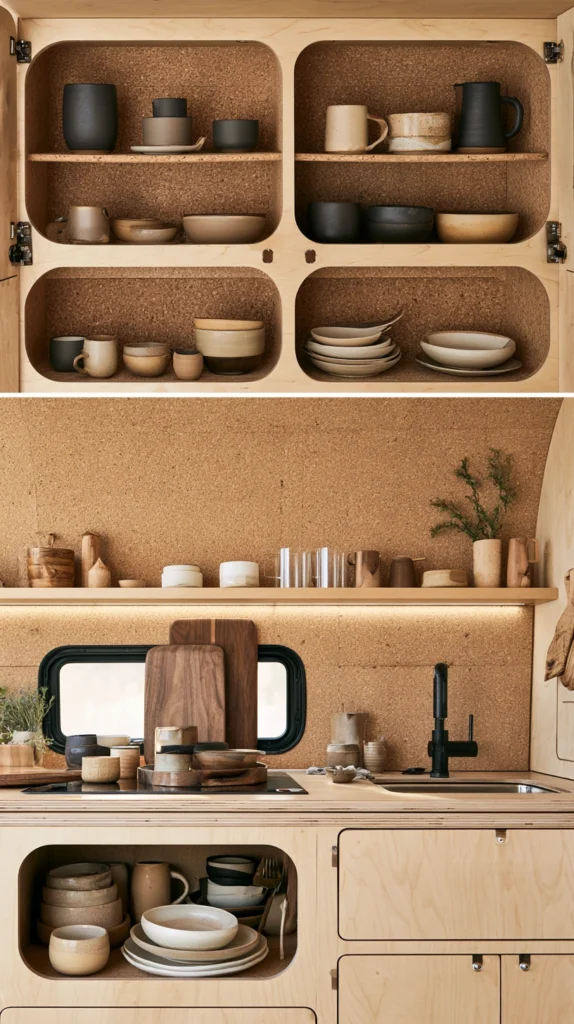
The inside of camper cabinets is almost always a stark white laminate — functional, but visually cold when the doors are open. Lining shelves with natural kraft paper or a thin cork sheet introduces an organic material in a place that costs nothing to alter and requires no tools.
Kraft paper roll liner from Amazon runs $8–$12 for 50 feet and cuts easily with scissors. Cork sheet liner — sold in rolls at hardware stores — is $15–$25 for enough material to cover a full camper kitchen’s shelving and adds a small amount of grip that prevents items from sliding in transit. Cut each piece to fit, slightly short of the front edge, so it doesn’t show when the door is closed.
Beyond aesthetics, cork has a functional benefit in a camper: it provides minimal cushioning for fragile dishware stacked directly on hard laminate shelves, and it’s easy to wipe clean.
Tip: Apply shelf liner adhesive spray on the cork if you want it to stay perfectly flat. Without adhesive, cork curls at the edges in humidity fluctuations, which happens every time a camper moves between climates.
Budget: $10–$28
11. Hang a Leather or Rope Wall Hook Rail
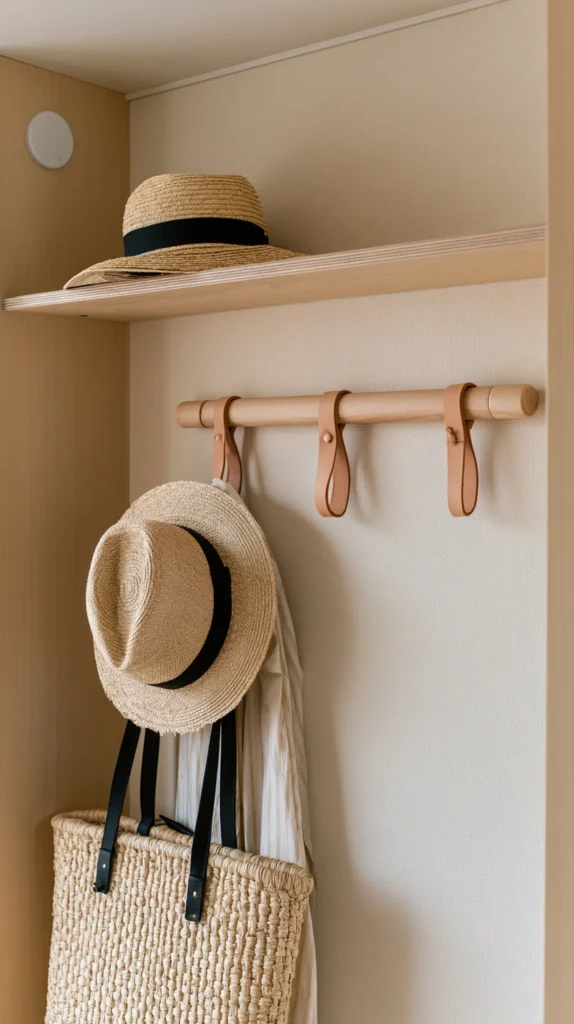
Camper entryways and walls adjacent to the door are perpetually cluttered with jackets, bags, and hats that have nowhere designated to go. A wall hook rail made from natural materials — leather strap hooks, rope-wrapped iron hooks, or a branch with cast hooks — solves the function problem while adding material texture to what is otherwise a transition wall with nothing on it.
Etsy sellers specializing in leather goods produce single-piece leather and wood hook rails in the 18–24-inch length range at $35–$65. For a budget DIY version: a 20-inch length of 2×2 hardwood dowel, three to four cast iron coat hooks ($3–$5 each at hardware stores), and a coat of dark walnut stain produces the same aesthetic at a fraction of the cost. Mount directly into a wall stud or use two toggle bolts rated for 30+ lbs — coat hooks with jackets on them carry more load than they appear to.
Place the hook rail at 60–65 inches from the floor for coats, or lower at 48 inches if the primary use is bags and smaller items. Both heights keep items above the floor and below any overhead cabinets.
Tip: Add a small catch tray below the hook rail — a ceramic dish or a shallow wooden bowl — for keys, sunglasses, and small items that otherwise scatter across every horizontal surface in the camper immediately after arrival.
Budget: $25–$75
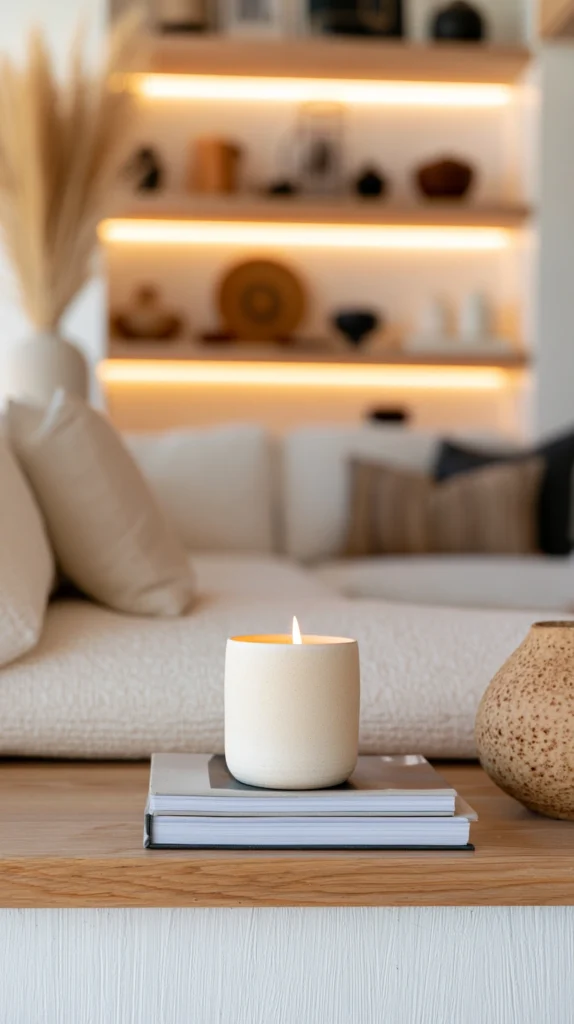
12. Choose Beeswax or Soy Candles in Natural Clay Vessels
Scent is the most underestimated element of earthy camper design. A space can look exactly right but still feel clinical if it smells like manufactured air freshener or simply like plastic and adhesive, which many newer campers do. Beeswax or soy candles in natural clay or concrete vessels address both the scent environment and the visual palette simultaneously.
For earthy scent profiles, look for candles with notes of cedar, vetiver, sandalwood, petrichor, or beeswax itself — these reinforce the material palette through the olfactory rather than working against it with florals or synthetics. Boy Smells, Keap, and P.F. Candle Co. all produce soy-based candles in matte ceramic or concrete vessels that double as permanent decorative objects after the wax is gone.
For camper safety, never leave candles burning unattended or when driving. Store candles in a padded location during travel, or choose candles in vessels with fitted lids to prevent wax from melting into soft shapes in a hot camper.
Tip: A single candle in a heavy terracotta vessel weighs less than most people expect and anchors a small surface visually. Place it on the dinette table or the live-edge shelf where it can be seen from multiple positions in the space.
Budget: $18–$55
13. Replace Plastic Soap Dispensers with Ceramic or Stone Bottles
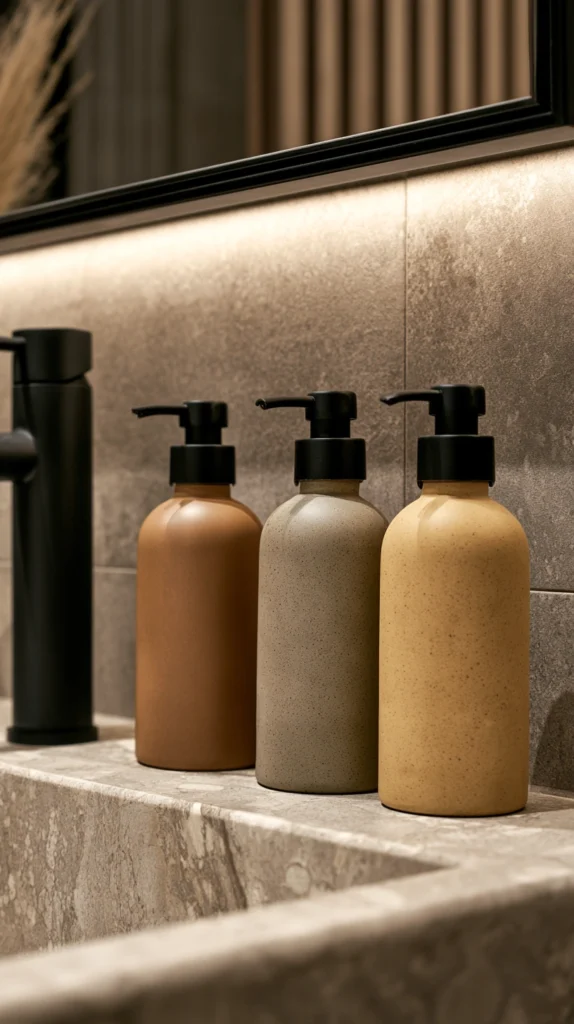
The camper bathroom is where earthy design efforts most often stall. There’s limited wall space, the surfaces are almost always white or cream, and plastic accessories — soap dispensers, toothbrush holders, cup holders — are what come installed or what get purchased at a camping supply store without much consideration.
Swapping one plastic soap dispenser for a ceramic or matte stone-look pump bottle immediately changes the quality of the surface it sits on. Sabon, Humble Bee, and various Etsy ceramic makers sell refillable pump bottles in matte clay finishes at $18–$35. For a more affordable entry, check TJ Maxx or HomeGoods — their housewares sections regularly carry ceramic dispenser sets in earth tones at $12–$20.
Secure pump bottles with a small loop of museum putty around the base or place them inside a low-walled tray that prevents sliding without restricting access. A loose bottle on a camper bathroom counter will find its way into the sink within the first drive.
Tip: Decant whatever hand soap or shampoo you use into the ceramic dispenser rather than trying to find products that come packaged in aesthetically appropriate bottles. The decanting approach costs nothing and gives you control over both the visual and the formula.
Budget: $15–$45
14. Use a Hammam or Waffle-Weave Towel in Natural Undyed Cotton
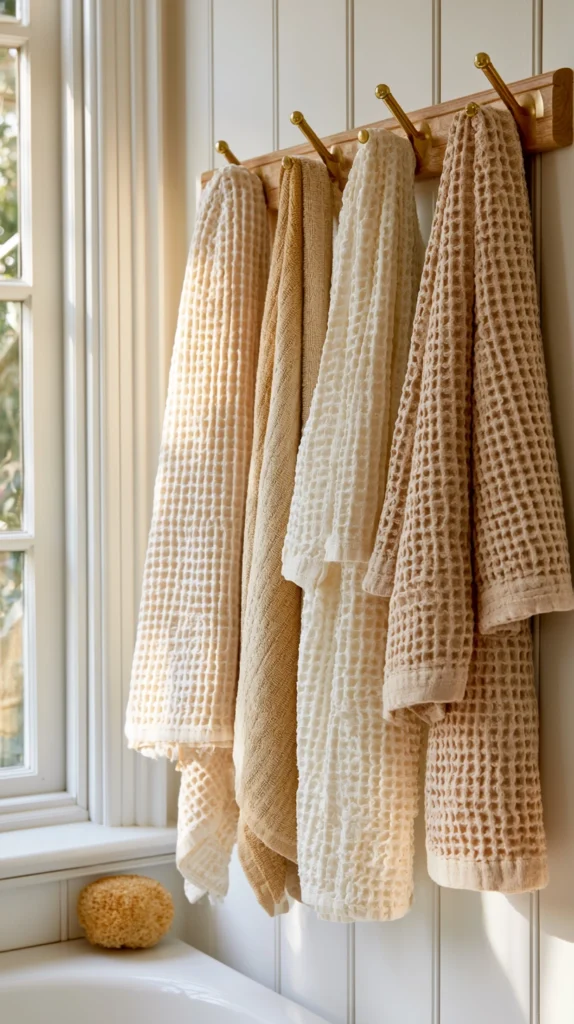
Towels are often an afterthought in camper packing — whatever is available goes in the bag. But a towel in natural undyed cotton, a muted sage, or a warm sand tone, folded or hung visibly in the bathroom, contributes to the material palette in a room where visual real estate is scarce.
Hammam towels (also called peshtemal or Turkish towels) are particularly well-suited to camper use. They’re significantly thinner than terry towels, which means faster drying — critical in a small space where wet towels don’t have room to hang spread out. They also fold to a fraction of the bulk of standard towels, which matters in tight camper storage. Parachute, Society6, and several Etsy shops sell natural cotton hammam towels in undyed or naturally dyed earth tones at $25–$45 for a large bath size.
Tip: Hang the towel on a wood or brass ring rather than a standard chrome towel bar if your bathroom has mounting space. The ring takes less wall real estate, and the way a hammam towel drapes through a ring is more visually intentional than a bar.
Budget: $25–$55 per towel
15. Build the Palette Around Two Anchor Earth Tones
Every idea above benefits from being organized around a color decision made before anything is purchased. The single most common failure in earthy camper interiors is assembling individual pieces that each read as earthy in isolation but that don’t cohere — terracotta wall, sage bedding, mustard throw, rust cushion, olive basket. Each is defensible. Together they create visual noise.
The constraint that works: choose two anchor tones. One warm and one neutral — terracotta paired with warm sand, sage paired with natural linen, dusty olive paired with clay. Every purchase gets evaluated against those two tones before it comes into the space. Accents can vary slightly, but the dominant visual palette stays anchored.
Natural and woven materials — jute, rattan, cork, seagrass — function as neutrals in this system and can be added freely without disrupting the palette, because their tonal range sits outside any specific color decision and reads as texture rather than color.
When evaluating colors for products ordered online, look at the product images in daylight photos rather than styled product shots under studio lighting. Warm studio lighting shifts every earth tone toward orange; cool lighting shifts them toward gray. The daylight version is what you’ll actually see in a camper during the day.
Budget: $0 — this is an editing decision, not a purchase
Final Thoughts
Earthy camper design works because it draws from a palette that already exists in the natural world just outside the door — clay, stone, linen, sand, wood, moss. When the interior connects to that palette, even a small manufactured space feels less like a vehicle and more like a place. The mistake most people make is trying to achieve that feeling through accumulation. More plants, more baskets, more textures. The campers who feel most grounded are the ones with the fewest wrong choices rather than the most right ones.
Start with the two anchor tones, then address the single surface with the most visual impact — usually the wall behind the bed or the kitchen backsplash. Add from there. The goal isn’t a styled photo. It’s a space that feels genuinely calm every time you open the door.