15 Shiplap Ceiling Ideas
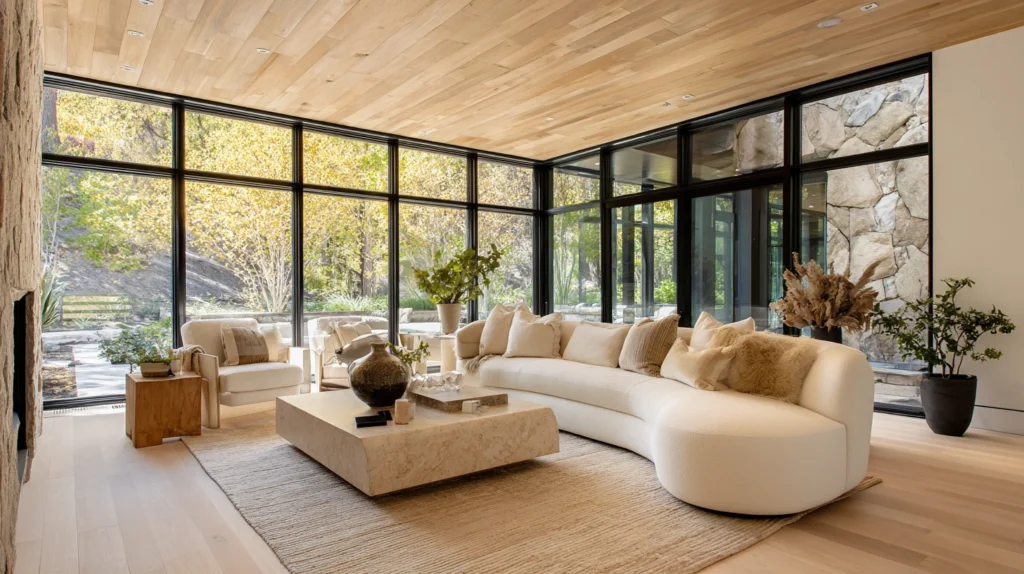
My living room ceiling was flat, white, and completely forgettable. Every wall in the house had been touched at some point. The ceiling never had.
I kept assuming shiplap belonged on walls only, the same fixed idea everyone seems to start with. Then I saw a photo of a shiplap ceiling in a mudroom and the whole assumption fell apart.
Bought enough boards for one small hallway ceiling as a test. Installed it over a weekend with a nail gun and a level. The hallway went from the most forgettable part of the house to the one guests mention first.
Every ceiling in the house has a different story to tell once you stop treating it as the surface nobody looks at.
Here are 15 shiplap ceiling ideas that turn the most overlooked plane in a room into its most memorable feature.
Why Most Shiplap Ceilings Fall Short
The common mistakes:
The uniform white default:
- Every shiplap ceiling assumed to mean bright white boards
- No consideration of stain, paint color, or contrast
- A missed opportunity to set the room’s entire mood from above
- White works, but it is rarely the most interesting choice available
The wrong board width for the room:
- Standard-width boards used regardless of ceiling height or room size
- Wide boards overwhelming a small room, narrow boards disappearing in a large one
- No thought given to how board width changes the ceiling’s visual weight
- Proportion matters overhead just as much as it does on walls
The ignored fifth wall concept:
- Ceiling treated as separate from the rest of the room’s design
- No connection to trim, wall color, or existing architectural details
- A shiplap ceiling installed in isolation rather than as part of a whole room
- The best ceilings work with the room, not as an afterthought above it
What a successful shiplap ceiling does:
Becomes a genuine architectural feature:
- Board width and direction chosen deliberately for the specific room
- Finish color connects intentionally to the walls, trim, or furniture below
- Installed with attention to joist location and consistent gaps
- Reads as original to the house, not added as a trend
My revelation: A ceiling is the one surface in a room nobody expects to be finished. That element of surprise is exactly what makes a shiplap ceiling so effective.
1. The Classic White Shiplap Ceiling
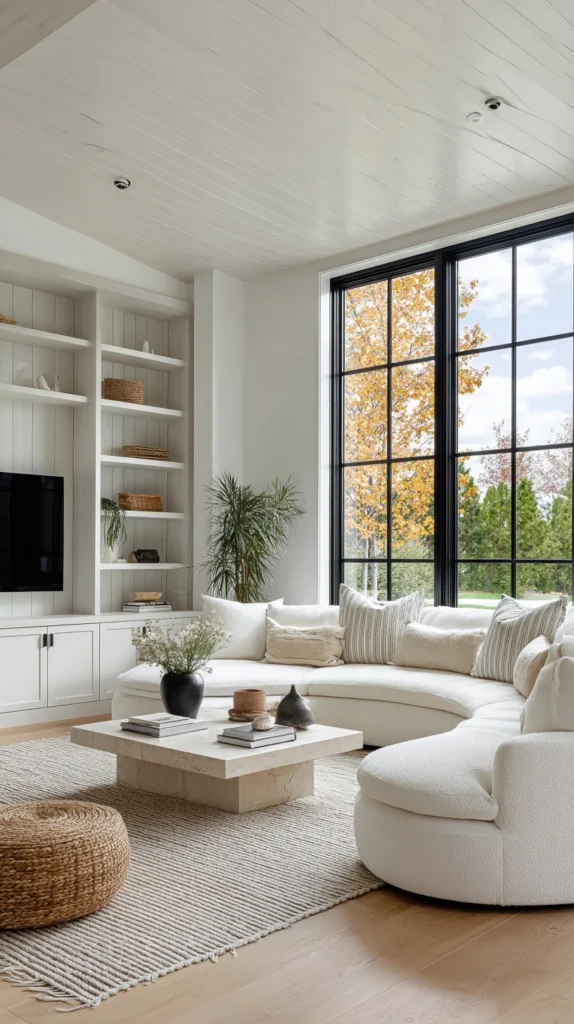
Bright white shiplap boards installed edge to edge — the most timeless, universally appealing shiplap ceiling treatment.
My blank canvas starting point:
What I had:
- A flat, painted drywall ceiling with zero texture
- A room that felt visually finished on the walls but flat overhead
- Hesitation about committing to anything too bold for a first project
The classic white discovery:
Why this remains the safest, most effective choice:
- Brightens the room by reflecting light rather than absorbing it
- Pairs with literally any wall color or design style
- Never feels dated the way a bold color choice eventually might
- The most forgiving option for a first shiplap ceiling attempt
Installation basics:
Getting it right:
- Prime boards before installing to reduce painting time overhead
- Use a level line as a guide for the first row along the longest wall
- Leave a consistent small gap between boards for authentic shadow lines
- Fill nail holes and touch up paint after full installation
Where this works best:
Ideal rooms:
- Living rooms and family rooms
- Primary bedrooms
- Any room wanting brightness alongside texture
Cost:
- Shiplap boards (per square foot): $1.50-3
- Average room ceiling (150 sq ft): $225-450
- Paint and finishing supplies: $30-50
- Total: $255-500
My classic white shiplap ceiling: Installed in the living room over a long weekend, it brightened the entire room noticeably and remains the detail every first-time visitor looks up and comments on.
Classic White Shiplap Tips
Prime and paint boards before installation:
Efficiency detail:
- Painting overhead after installation is slow and produces uneven coverage
- Priming and finishing boards on the ground first saves significant time
- A final touch-up coat after installation covers only nail holes and seams
- This order alone cuts total project time by roughly half
Use a slightly warmer white than the trim:
Color nuance:
- Matching the ceiling exactly to bright white trim can look flat and stark
- A slightly warmer white on the ceiling adds subtle depth from below
- This small difference is barely noticeable directly but softens the overall room
- Order paint samples and view them under the room’s actual lighting before committing
2. The Dark Moody Shiplap Ceiling
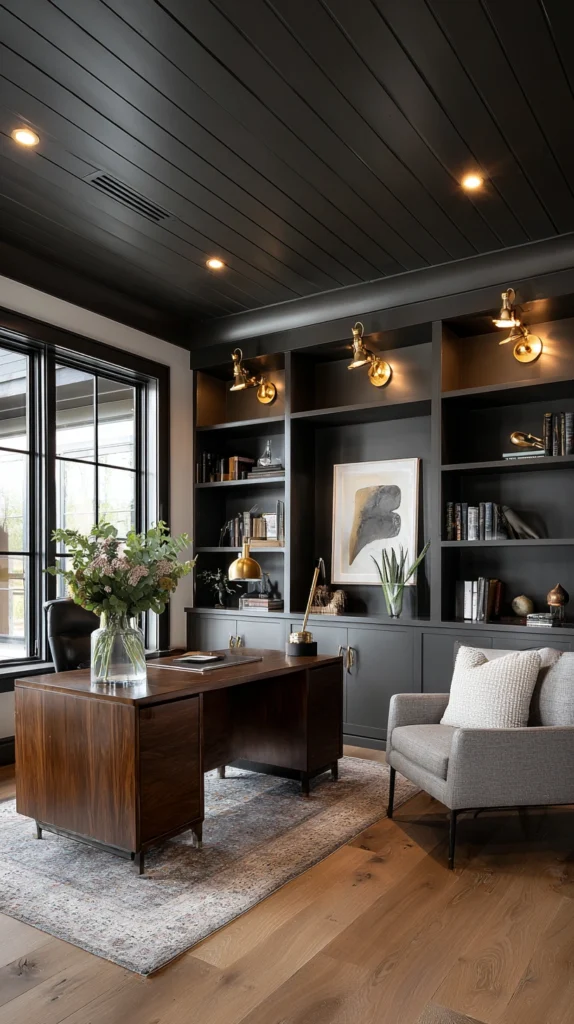
Shiplap boards painted in deep charcoal, navy, or black — a dramatic treatment that lowers a ceiling visually and adds genuine atmosphere.
My fear of going dark overhead:
What held me back:
- Assumed a dark ceiling would make the room feel smaller and heavier
- Every design instinct pointed toward keeping ceilings light
- Worried the room would feel closed in rather than atmospheric
The dark shiplap discovery:
Why dark ceilings work better than expected:
- Creates genuine intimacy and coziness in the right room
- Draws the eye upward in a way flat white never does
- Pairs beautifully with brass, black, or warm wood fixtures
- Works especially well in rooms with adequate natural light elsewhere
Color options:
Choosing the right dark tone:
- Charcoal gray for drama without full black commitment
- Deep navy for a moody, sophisticated feel
- True black for the boldest, most dramatic statement
- Deep forest green for an unexpected, richly saturated option
Where this works best:
Ideal rooms:
- Home offices and libraries
- Primary bedrooms wanting a cocooned, restful feel
- Dining rooms for dramatic evening ambiance
- Powder rooms, where a small space benefits from bold commitment
Cost:
- Shiplap boards: $1.50-3 per square foot
- Small room ceiling (80 sq ft): $120-240
- Dark paint and primer: $35-55
- Total: $155-295
My dark moody shiplap ceiling: A charcoal ceiling in the home office made the room feel genuinely enveloping rather than smaller, and the effect is even more dramatic once the evening lighting comes on.
Dark Shiplap Ceiling Tips
Pair with brighter walls to balance the drama:
Balance principle:
- A dark ceiling in a room with equally dark walls can feel oppressive
- Lighter or mid-tone walls let the dark ceiling read as intentional drama, not gloom
- This contrast is what makes a dark ceiling feel sophisticated rather than heavy
- Test the pairing with paint samples on both surfaces before committing
Add warm lighting to prevent the room from feeling cold:
Lighting requirement:
- Cool-toned overhead lighting against a dark ceiling reads as harsh
- Warm white bulbs (2700K-3000K) are essential for this treatment to feel cozy
- Layered lighting, including lamps and sconces, softens the overall effect further
- This detail is non-negotiable for a dark ceiling to succeed
3. The Whitewashed Reclaimed Shiplap Ceiling
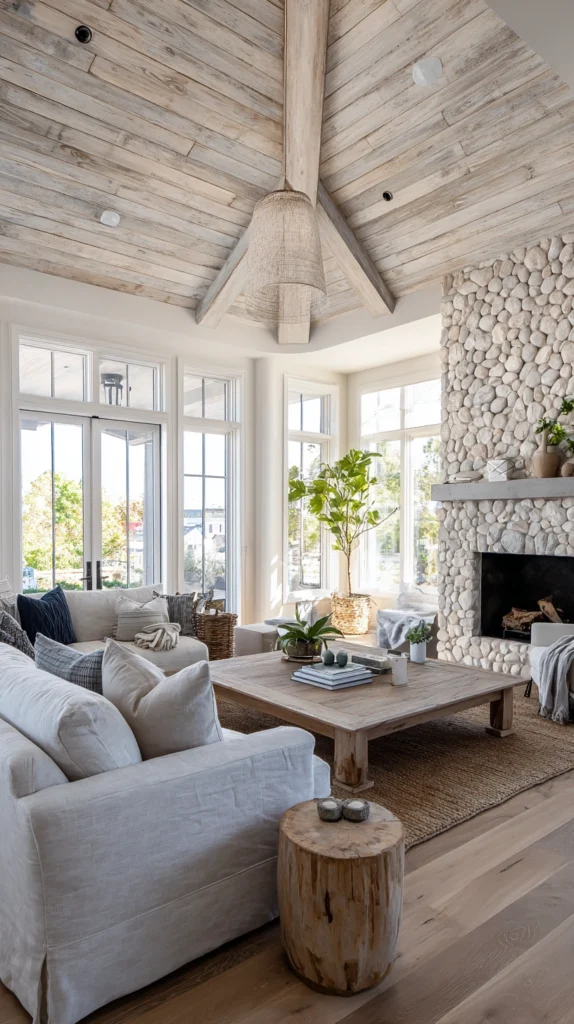
Reclaimed or textured wood boards finished with a light whitewash — combining authentic wood character with a bright, airy finish.
My search for texture without heaviness:
What I wanted:
- Genuine wood grain and character overhead
- A finish that still kept the room feeling light and open
- Worried raw or stained wood would darken the room too much
The whitewash solution:
Why this combination delivers both texture and brightness:
- Wood grain and knot character remain visible through the wash
- The white finish keeps the ceiling from visually lowering the room
- Reclaimed boards bring authentic texture new lumber cannot replicate
- Works especially well in rooms with lower ceiling height
Achieving the whitewash finish:
Technique basics:
- Mix white paint with water at roughly equal parts
- Brush onto raw boards and wipe excess while still wet
- Let the natural wood grain show through rather than fully covering it
- Apply a light second coat only where more coverage is needed
Where this works best:
Ideal rooms:
- Coastal and cottage-style living rooms
- Bathrooms and laundry rooms
- Sunrooms and screened porches
Cost:
- Reclaimed or textured shiplap boards: $2-5 per square foot
- Average room (120 sq ft): $240-600
- Whitewash supplies: $20-35
- Total: $260-635
My whitewashed reclaimed ceiling: The texture and slight imperfection of the reclaimed boards, combined with the white wash, gave the sunroom genuine character without ever feeling heavy overhead.
Whitewashed Shiplap Tips
Test the whitewash ratio on a scrap board first:
Before committing:
- Wood porosity varies significantly between reclaimed and new lumber
- A test board prevents an uneven or overly patchy full installation
- Adjust the water-to-paint ratio based on how the test board absorbs it
- This single step saves the most common whitewashing mistake
Source reclaimed boards with consistent thickness:
Installation practicality:
- Reclaimed wood often varies in thickness board to board
- Significant thickness variation creates an uneven ceiling surface
- Sort and set aside boards with inconsistent thickness for smaller accent uses
- Consistent thickness boards install far more smoothly overhead
4. The Wide Plank Shiplap Ceiling
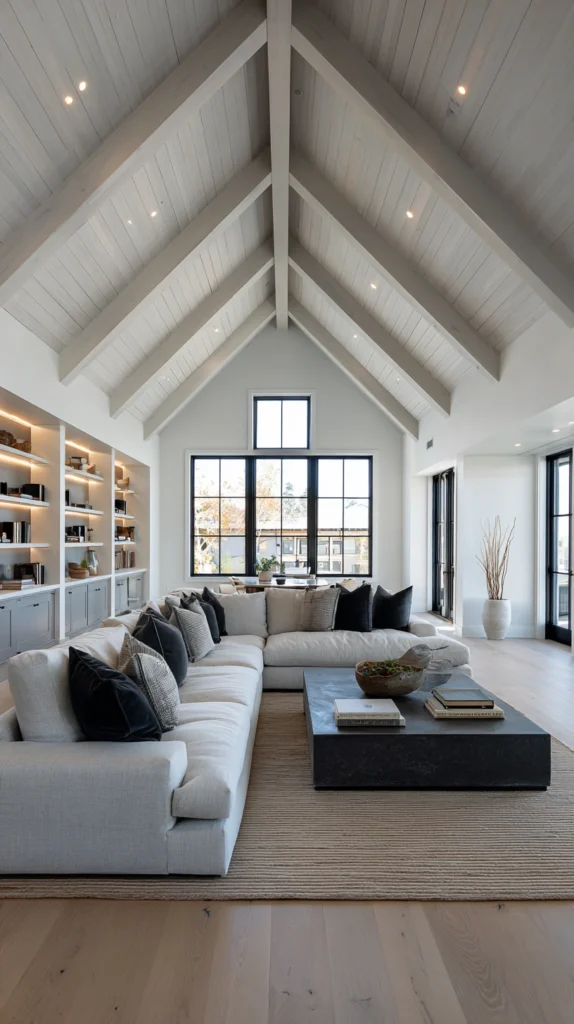
Extra-wide shiplap boards, typically eight to twelve inches, installed for a bolder, more graphic ceiling texture.
My standard board fatigue:
What felt expected:
- Narrow shiplap boards had become the default, seen everywhere
- Wanted a bolder, more distinctive board scale
- Assumed wider boards would look out of proportion overhead
The wide plank discovery:
Why wider boards change the whole feel:
- Fewer seams create a calmer, less busy ceiling texture
- Bolder shadow lines between boards read as more architectural
- Particularly well suited to larger rooms and higher ceilings
- A distinctive scale that stands apart from typical narrow shiplap
Proportion considerations:
Matching board width to room size:
- Eight-inch boards for medium-sized rooms with standard ceiling height
- Ten to twelve-inch boards for larger rooms or higher ceilings
- Narrower boards remain the better choice for small rooms or low ceilings
- Always view a sample board against the actual ceiling before ordering in bulk
Where this works best:
Ideal rooms:
- Great rooms and larger living spaces
- Primary bedrooms with vaulted or higher ceilings
- Dining rooms wanting a bold, architectural statement
Cost:
- Wide plank shiplap boards: $2-4 per square foot
- Average large room (200 sq ft): $400-800
- Total: $400-800
My wide plank shiplap ceiling: Ten-inch boards in the great room created a calmer, more architectural texture than the narrow shiplap I had originally planned, and the fewer seams actually made the whole ceiling feel more intentional.
Wide Plank Tips
Confirm ceiling height supports the wider scale:
Proportion rule:
- Wide boards on a low ceiling can feel heavy and overwhelming
- Rooms with at least standard eight-foot ceilings handle wider boards best
- Vaulted or higher ceilings can support even bolder plank widths
- Measure and consider proportion before ordering wide-format boards
Reduce the gap width slightly for wider boards:
Detail adjustment:
- Standard narrow-board gap spacing can look excessive on wider planks
- A slightly tighter, more consistent gap suits the bolder board scale
- This small adjustment keeps the wide plank ceiling from looking disjointed
- Test the gap spacing on a small section before committing to the full ceiling
5. The Vaulted Ceiling Shiplap Treatment
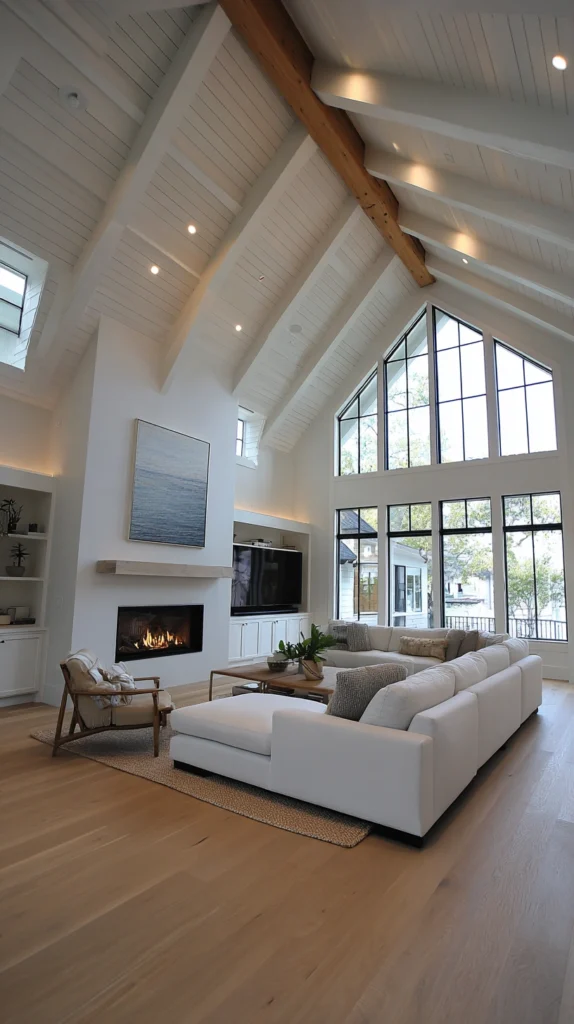
Shiplap installed following the angled planes of a vaulted or cathedral ceiling — emphasizing the architecture rather than covering it.
My underutilized vaulted ceiling:
What was missing:
- A genuinely vaulted ceiling left flat white and unremarkable
- Architectural height going unnoticed because nothing drew the eye upward
- A missed opportunity given the ceiling’s existing dramatic shape
The vaulted shiplap solution:
Why this treatment makes the most of existing architecture:
- Shiplap lines following the vault’s angles emphasize the height and shape
- Draws the eye upward in a way flat paint on a vaulted ceiling rarely does
- Turns an already interesting architectural feature into the room’s clear focal point
- Works with the room’s existing structure rather than fighting it
Installation considerations specific to vaulted ceilings:
What differs from a flat ceiling install:
- Boards typically run parallel to the ridge line for the cleanest look
- Angled cuts at the ridge and eave lines require careful measuring
- Scaffolding or an extension ladder setup is often necessary for safety
- This project frequently benefits from at least one additional set of hands
Where this works best:
Ideal rooms:
- Great rooms with existing vaulted or cathedral ceilings
- Primary bedrooms with architectural roofline
- Entryways with double-height ceilings
Cost:
- Shiplap boards for a vaulted ceiling (200-300 sq ft): $400-900
- Scaffolding rental (if needed): $100-250
- Total: $500-1,150
My vaulted shiplap ceiling: Running boards up both angled planes of the great room’s vaulted ceiling finally gave that architectural height the attention it deserved, and the room now feels intentionally dramatic rather than just tall.
Vaulted Shiplap Tips
Plan the ridge line meeting point before cutting any boards:
Precision requirement:
- The point where both angled planes meet at the ridge needs careful planning
- Mismatched angles at this seam are immediately noticeable from below
- Dry-fit boards near the ridge before committing to permanent installation
- This single planning step prevents the most visible potential mistake
Budget extra time and material for angled cuts:
Project reality:
- Angled cuts at the ridge and eave lines take significantly longer than straight cuts
- Expect more material waste than a standard flat ceiling installation
- Order approximately 15% more material than the calculated square footage
- This buffer accounts for both waste and the learning curve of angled cutting
6. The Herringbone Shiplap Accent Panel
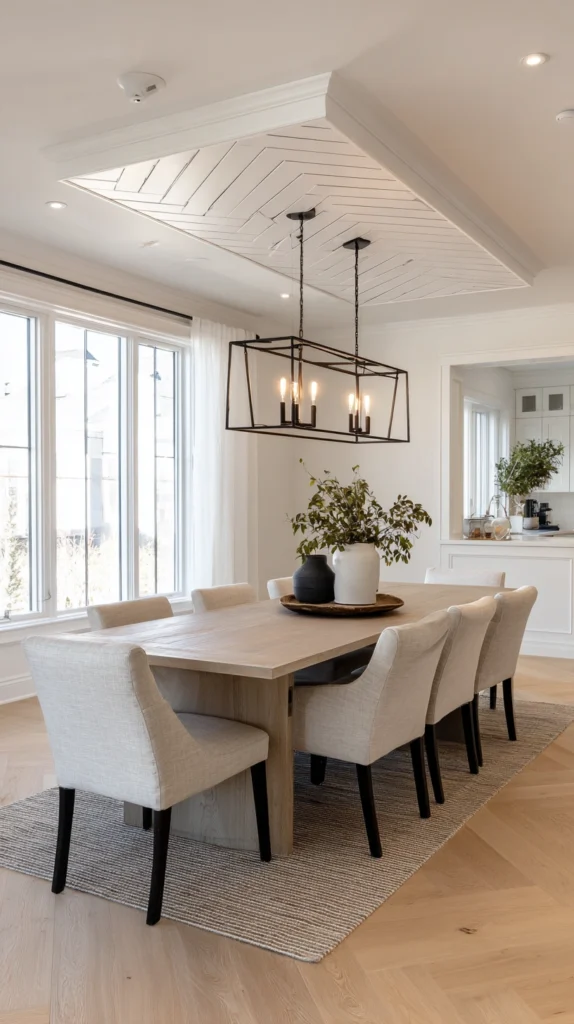
A defined ceiling section with shiplap boards arranged in a herringbone pattern — a striking focal treatment for one contained area.
My plain-pattern plateau:
What felt missing:
- Straight-run shiplap started to feel like the expected, default choice
- Wanted something with more visual complexity in one specific zone
- Assumed pattern work overhead required professional installation
The herringbone realization:
Why this pattern works so well as a contained ceiling accent:
- Delivers dramatic visual complexity relative to the actual installation effort
- Works beautifully as a focal panel rather than full-ceiling coverage
- Creates genuine architectural interest above a specific zone, like a dining table
- A defined rectangular panel keeps the project manageable in scope
Building the pattern:
Layout approach:
- Assemble the herringbone pattern on a plywood backing panel first, off the ceiling
- Cut boards at consistent 45-degree angles for the pattern
- Dry-fit the full pattern before any permanent attachment
- Mount the completed panel to the ceiling as a single finished unit
Where this works best:
Ideal placements:
- Above a dining table as a defined focal panel
- Entryway ceiling accent
- Above a bed as a dramatic overhead detail
Cost:
- Shiplap boards for the pattern: $3-6 per square foot
- Accent panel (6×6 feet, 36 sq ft): $110-215
- Plywood backing and supplies: $30-50
- Total: $140-265
My herringbone ceiling panel: A herringbone panel built on plywood and mounted above the dining table became the single most complimented detail in the house, and building it off the ceiling first made the pattern genuinely achievable.
Herringbone Ceiling Tips
Always assemble the pattern before mounting overhead:
The critical technique:
- Never attempt to cut and fit herringbone pieces directly on the ceiling
- Build the complete pattern on a flat backing panel on a table or floor first
- Mount the finished panel as one unit once fully assembled
- This approach makes an advanced pattern realistic for a non-professional installer
Keep the panel size proportional to the room:
Scale guidance:
- A herringbone pattern across an entire ceiling can become visually overwhelming
- A contained panel, roughly a third of the ceiling, reads as an intentional accent
- This scale also keeps both material cost and installation difficulty reasonable
- A well-proportioned smaller panel outperforms an overly ambitious full-ceiling attempt
7. The Painted Ceiling with Shiplap Border
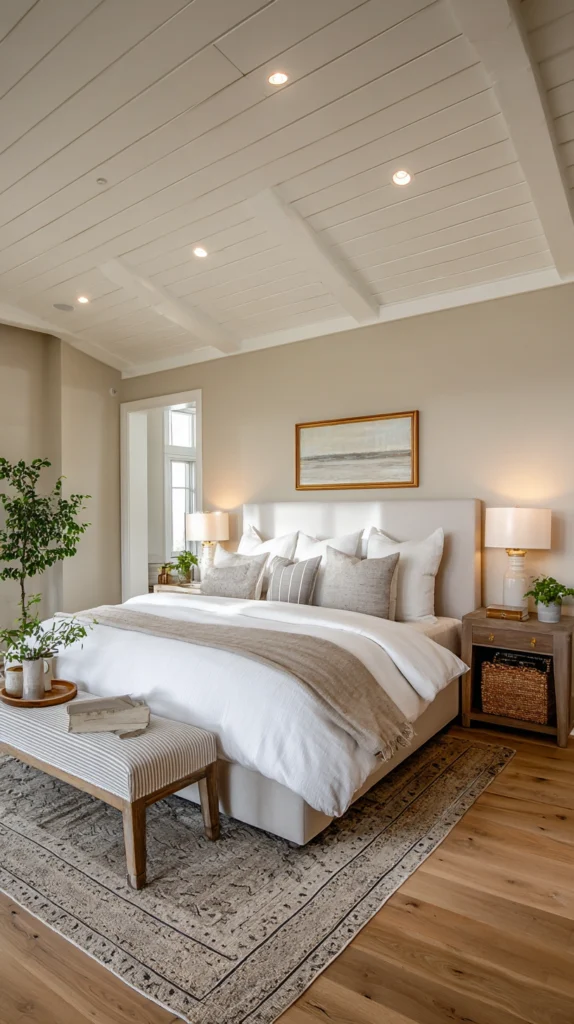
Shiplap boards installed only around the ceiling’s perimeter, framing a painted or wallpapered center section.
My all-or-nothing ceiling hesitation:
What I wanted instead:
- A subtle architectural frame without covering the entire ceiling in shiplap
- A project achievable in less time than full coverage would require
- A way to introduce shiplap without a large material investment
The shiplap border solution:
Why a border delivers real impact with minimal material:
- Frames the ceiling the way a rug frames a floor
- Uses a fraction of the material a full ceiling installation requires
- Introduces architectural detail while leaving room for a wallpapered or painted center
- The most budget-friendly true shiplap ceiling project on this list
Building the border:
Installation basics:
- Install shiplap boards in a defined band, typically twelve to eighteen inches wide, around the ceiling perimeter
- Miter corners for a clean, finished frame
- Leave the center section for paint, a soft color wash, or wallpaper
- Finish the shiplap border in a tone that contrasts gently with the center
Where this works best:
Ideal rooms:
- Dining rooms wanting a formal, framed ceiling
- Primary bedrooms pairing the border with a wallpapered center
- Any room not ready for full-ceiling coverage
Cost:
- Shiplap boards for the border (40 linear feet, standard room): $80-160
- Center paint or wallpaper: $30-150
- Total: $110-310
My shiplap border ceiling: A border of white shiplap framing a soft wallpapered center in the primary bedroom gave the room its first real ceiling detail, at a fraction of the cost full coverage would have required.
Shiplap Border Tips
Keep the border width consistent on all sides:
Precision detail:
- An uneven border width is immediately noticeable and reads as a mistake
- Measure and mark the full perimeter before installing a single board
- Consistency in this detail matters more than the specific width chosen
- A tape measure and level are worth the extra time before cutting begins
Choose a center treatment that complements, not competes:
Design balance:
- A busy or heavily patterned center wallpaper can fight visually with the shiplap frame
- Softer patterns or a solid painted color let the border read clearly as a frame
- The shiplap and center treatment should feel like one cohesive ceiling design
- Order samples of both elements together before finalizing either choice
8. The Stained Wood Tone Shiplap Ceiling
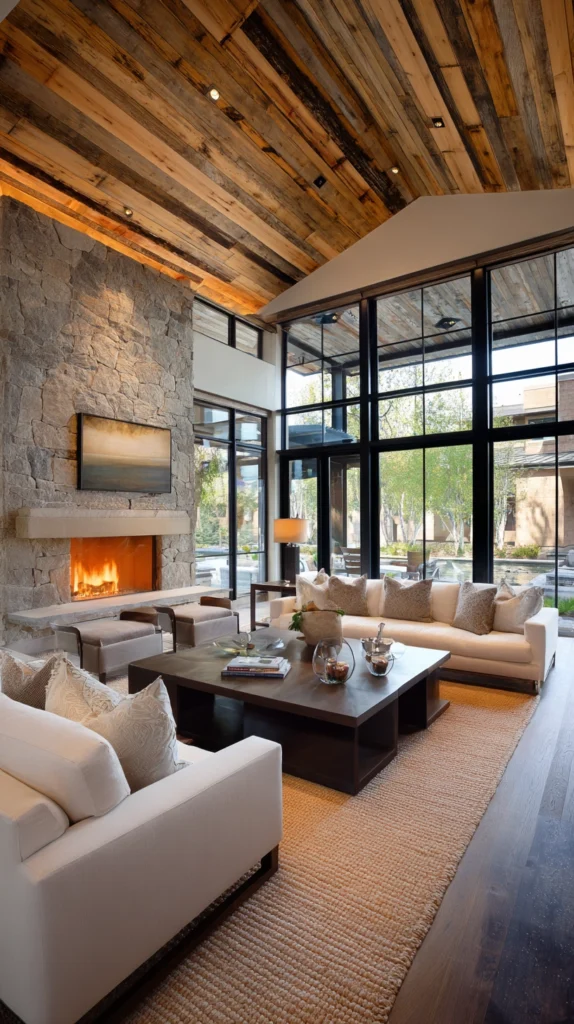
Shiplap boards left in a natural or stained wood finish rather than painted — bringing warmth and organic texture overhead.
My all-white house fatigue:
What was missing:
- Every surface in the house trending toward white or off-white
- Wanted one element with genuine warmth and wood character
- Painted shiplap, while nice, still felt like an extension of the same white palette
The stained wood discovery:
Why a natural wood finish changes the room’s entire feel:
- Adds genuine warmth that painted shiplap cannot replicate
- Wood grain remains fully visible, adding organic texture and variation
- Pairs beautifully with warm metals, leather, and natural fiber furnishings
- Creates a clear visual anchor distinct from an all-white or all-gray room
Stain color options:
Choosing the right tone:
- Light natural pine for a soft, Scandinavian-adjacent feel
- Warm honey oak for classic, timeless warmth
- Rich walnut for a more dramatic, formal ceiling
- Weathered gray-brown for a rustic, farmhouse feel
Where this works best:
Ideal rooms:
- Living rooms and family rooms with warm wood furniture already present
- Primary bedrooms wanting a cozy, grounded feel
- Home offices and libraries
Cost:
- Unfinished shiplap boards: $1.50-3 per square foot
- Average room (150 sq ft): $225-450
- Stain and sealant: $25-45
- Total: $250-495
My stained shiplap ceiling: A warm honey oak stain in the living room gave the previously all-white space genuine warmth, and it now anchors every other design decision made in that room since.
Stained Wood Ceiling Tips
Stain boards fully before installation, including edges:
Finishing thoroughness:
- Unstained edges become visible at the gaps between boards once installed
- Stain all four edges of each board, not just the visible face
- This detail prevents small unfinished strips from showing in the shadow lines
- A slightly longer prep process that meaningfully improves the finished look
Seal with a low-sheen topcoat to prevent overhead glare:
Finish selection:
- A high-gloss sealant overhead can create distracting glare from below
- Matte or satin topcoats let the wood grain read clearly without excess shine
- This choice also tends to hide minor imperfections better than a glossy finish
- Test the sheen level on a sample board under the room’s actual lighting
9. The Two-Tone Shiplap Ceiling
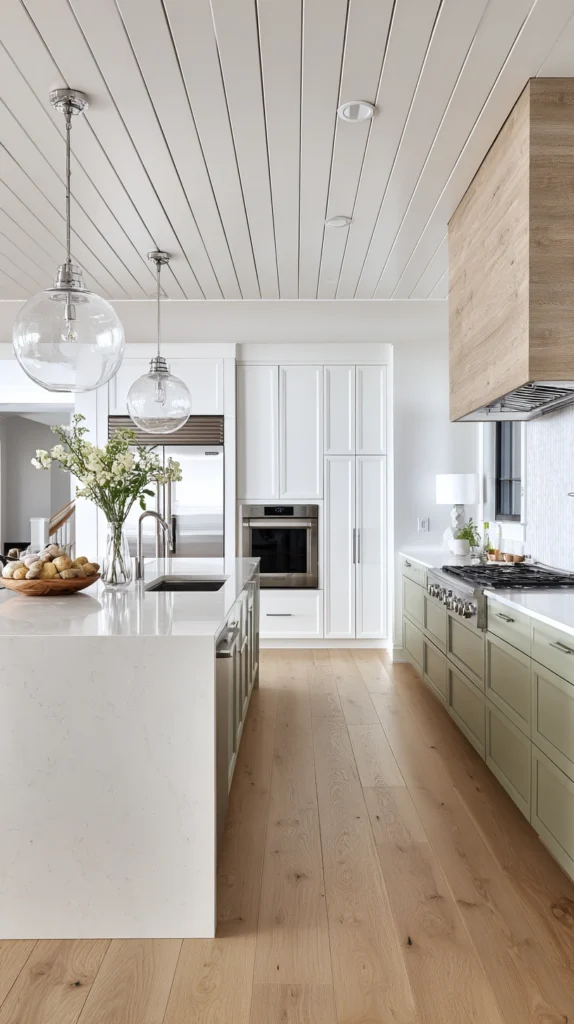
Shiplap boards painted in two coordinating colors, typically alternating or divided by zone — adding subtle dimension through color alone.
My single-color ceiling plateau:
What felt flat:
- Every shiplap ceiling I had seen used one uniform color throughout
- Wanted a way to add depth without changing board direction or width
- Never considered color variation itself as the source of visual interest
The two-tone solution:
Why alternating or zoned color adds genuine dimension:
- Creates subtle rhythm and movement without any change in board pattern
- Two closely related tones read as sophisticated rather than mismatched
- Can define zones within an open-concept space using ceiling color alone
- A relatively simple technique with an outsized visual return
Approaches to two-tone application:
Style options:
- Alternating individual boards between two closely related shades
- Dividing the ceiling by zone, such as over a kitchen island versus the rest of the kitchen
- A gradient effect moving gradually from lighter to darker across the ceiling
- One accent color reserved for a defined section, like above a breakfast nook
Where this works best:
Ideal rooms:
- Open-concept kitchens needing zone definition
- Kids’ rooms wanting a playful, subtle color moment
- Kitchens with an island or nook wanting its own defined ceiling treatment
Cost:
- Shiplap boards: $1.50-3 per square foot
- Two paint colors and supplies: $50-80
- Average room (120 sq ft): $230-440
My two-tone shiplap ceiling: Painting the boards above the kitchen island a soft sage against the surrounding white ceiling defined that zone instantly, without adding a single wall or structural change to the room.
Two-Tone Shiplap Tips
Choose two colors within the same tonal family:
Color coordination:
- High-contrast color pairings can look busy rather than sophisticated
- Two shades within the same family (two blues, two greens) create subtle depth
- This closeness in tone is what keeps the effect feeling intentional
- Order samples of both colors together before committing to either
Plan the zone division around an existing architectural line:
Layout logic:
- A color change working with an existing beam, soffit, or island edge looks intentional
- An arbitrary color division with no relationship to the room’s layout can look accidental
- Identify a natural transition point in the room before deciding where color changes
- This planning step is what separates a designed zone from a random color break
10. The Shiplap Ceiling with Exposed Beams
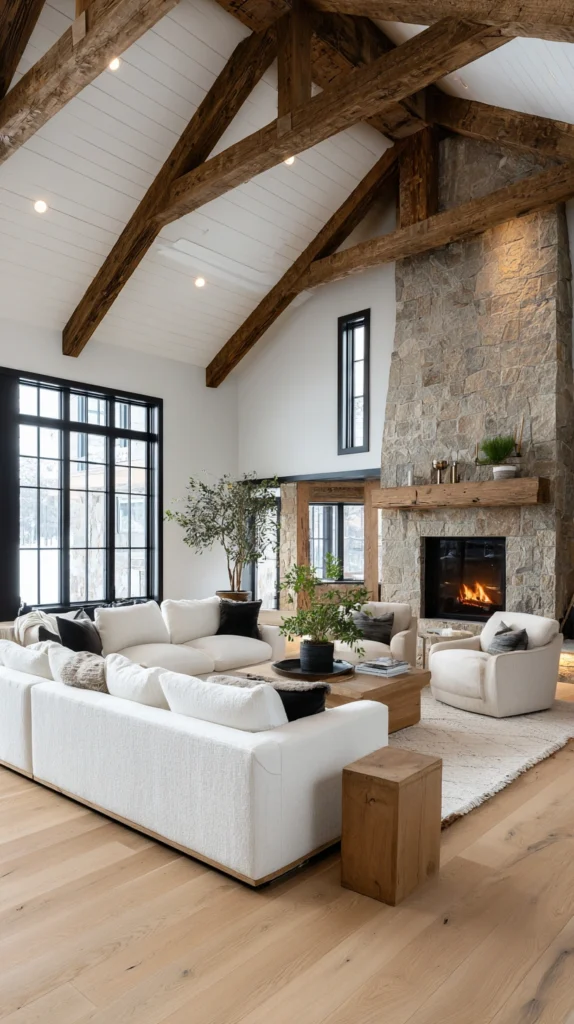
Shiplap boards installed between existing or added structural beams — combining two architectural elements into one cohesive ceiling treatment.
My competing architectural ideas:
What I was weighing:
- Wanted both the texture of shiplap and the structure of exposed beams
- Assumed choosing one meant giving up the other entirely
- Never considered combining both into a single ceiling design
The combined solution:
Why beams and shiplap work so well together:
- Beams provide structural rhythm and visual anchor points
- Shiplap fills the space between beams with texture and detail
- The combination reads as significantly more custom than either element alone
- Beams can be real structural elements or lightweight faux additions
Building the combination:
Installation approach:
- Install or expose beams first, establishing the overall rhythm and spacing
- Run shiplap boards perpendicular to the beams between each section
- Stain or paint the beams in a contrasting tone to the shiplap for definition
- Ensure consistent board direction and gap spacing across every section
Where this works best:
Ideal rooms:
- Great rooms and larger living spaces
- Primary bedrooms wanting a substantial architectural statement
- Dining rooms for a formal, custom-built feel
Cost:
- Shiplap boards: $1.50-3 per square foot
- Faux beams (per linear foot): $8-15
- Average room combination (150 sq ft ceiling, 4-5 beams): $600-1,200
My beam and shiplap ceiling: Combining stained faux beams with white shiplap between them in the great room created the exact custom, architectural look I had originally assumed would require a full renovation budget.
Beam and Shiplap Tips
Establish beam spacing before ordering any shiplap:
Sequencing importance:
- Beam placement determines the exact dimensions of each shiplap section
- Finalize and mark beam locations before calculating shiplap material needs
- This order prevents mismeasured sections and unnecessary material waste
- A small amount of extra planning here saves significant rework later
Stain beams darker than the shiplap for definition:
Contrast principle:
- Beams and shiplap in the same tone can visually blend into one flat surface
- A meaningful contrast between beam and board color keeps the structure legible
- This contrast is what makes the combination read as genuinely architectural
- Test both finishes together on samples before committing to either
11. The Nursery or Kids’ Room Pastel Shiplap Ceiling
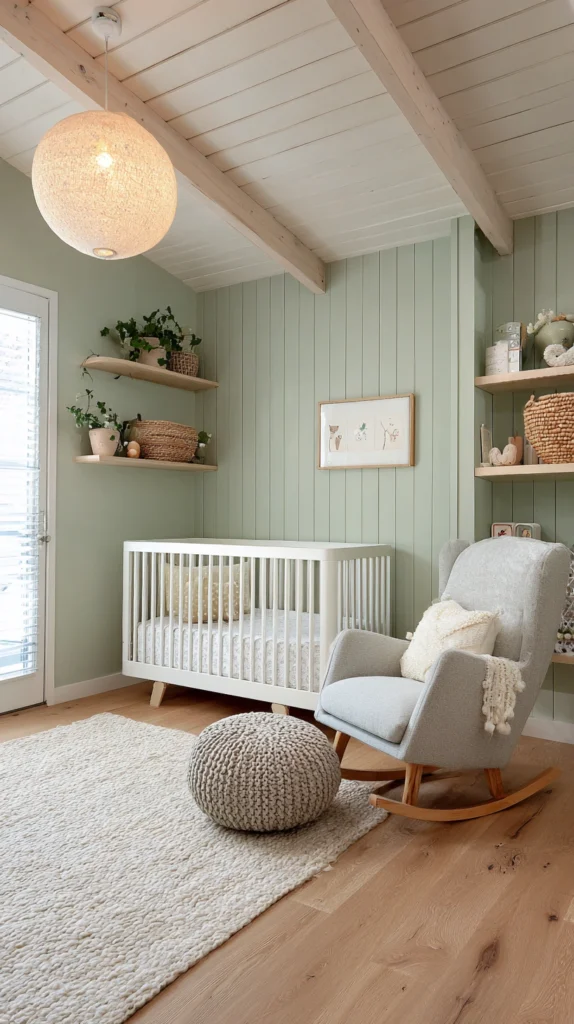
Shiplap boards painted in a soft pastel tone — bringing gentle color and texture to a children’s space without overwhelming it.
My too-plain nursery ceiling:
What was missing:
- A nursery with carefully chosen wall colors and furniture, but a flat white ceiling
- No connection between the ceiling and the room’s overall softness
- A missed opportunity in a room where the ceiling is viewed constantly from the crib
The pastel shiplap solution:
Why this works especially well in a child’s room:
- A baby or toddler spends significant time looking directly at the ceiling
- Soft color and texture overhead adds genuine visual interest at that specific vantage point
- Pastel tones stay gentle and age-appropriate without feeling babyish long-term
- A detail most nurseries skip entirely, making it feel especially considered
Color options:
Choosing the right pastel:
- Soft blush pink for a warm, gentle feel
- Pale sage green for a calm, nature-inspired nursery
- Muted powder blue for a classic, soothing tone
- Soft buttery yellow for a gender-neutral, cheerful option
Where this works best:
Ideal rooms:
- Nurseries, above the crib specifically
- Toddler and young children’s bedrooms
- Playrooms wanting a soft, considered ceiling detail
Cost:
- Shiplap boards: $1.50-3 per square foot
- Small room (100 sq ft): $150-300
- Pastel paint: $25-35
My pastel shiplap nursery ceiling: A soft sage ceiling above the crib became the detail that made the whole room feel finished, and it remains the first thing most visitors notice when they look up in that room.
Pastel Shiplap Tips
Choose a low-VOC paint for a child’s room:
Safety consideration:
- Nurseries and children’s rooms benefit from low-VOC or zero-VOC paint options
- Most major paint brands now offer this specifically for children’s spaces
- This choice supports better air quality in a room where a child spends significant time
- Confirm the specific product’s VOC rating before purchasing for this application
Test the pastel shade against the room’s actual lighting:
Color accuracy:
- Pastel tones shift noticeably under different lighting conditions
- A shade that looks perfect in the store can read differently under nursery lighting
- Paint a large sample directly on a ceiling section and view it at different times of day
- This step prevents a color mismatch that becomes very visible on such a large surface
12. The Shiplap Ceiling in a Bathroom
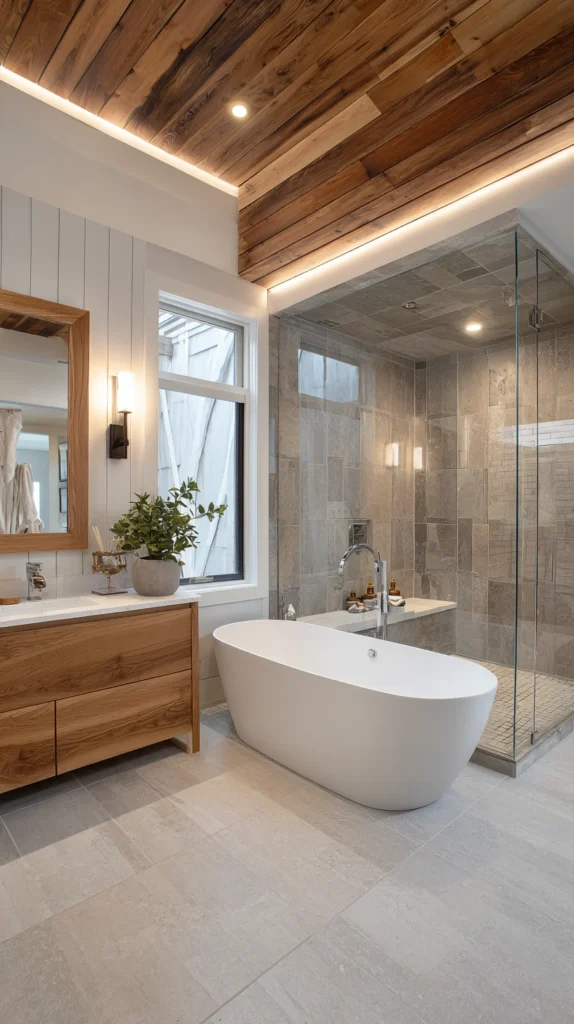
Water-resistant shiplap or properly sealed standard boards installed in a bathroom — adding warmth and texture to a typically hard-surfaced room.
My all-tile, all-hard bathroom:
What was missing:
- Every surface in the bathroom was tile, porcelain, or glass
- No warmth or texture anywhere, especially overhead
- Assumed wood and bathroom moisture were fundamentally incompatible
The bathroom shiplap solution:
Why this works with the right preparation:
- Properly sealed wood handles typical bathroom humidity without issue
- Adds genuine warmth to a room otherwise dominated by hard, cold surfaces
- Creates a spa-like, elevated feel distinct from a standard builder bathroom
- Works especially well in bathrooms with adequate ventilation
Moisture protection steps:
Preparing for bathroom conditions:
- Use PVC or moisture-resistant shiplap specifically rated for wet areas
- If using standard wood, apply a full sealant coat on all sides before installation
- Ensure the bathroom has an working exhaust fan to manage humidity
- Avoid direct placement above a shower stall without extra waterproofing measures
Where this works best:
Ideal rooms:
- Powder rooms with lower humidity exposure
- Primary bathrooms with strong ventilation
- Areas of the bathroom away from direct shower spray
Cost:
- Moisture-resistant shiplap boards: $2-4 per square foot
- Small bathroom ceiling (40 sq ft): $80-160
- Sealant and supplies: $20-30
My bathroom shiplap ceiling: Sealed shiplap in the powder room ceiling gave the smallest, hardest-surfaced room in the house genuine warmth, and two years in it shows no signs of moisture damage.
Bathroom Shiplap Tips
Confirm ventilation is adequate before installing:
Prerequisite check:
- A properly functioning exhaust fan is essential for wood surviving in a bathroom
- Test the fan’s actual airflow, not just whether it turns on
- Address any ventilation issues before starting a bathroom shiplap project
- This step matters more for the ceiling’s longevity than the wood product chosen
Choose PVC shiplap for showers or high-humidity zones specifically:
Material selection by zone:
- Standard sealed wood works well in lower-humidity bathroom areas
- PVC or composite shiplap is the safer choice directly above a shower or tub
- This material handles direct moisture exposure without the risk real wood carries
- The visual difference from real wood is minimal once painted
13. The Farmhouse Kitchen Shiplap Ceiling
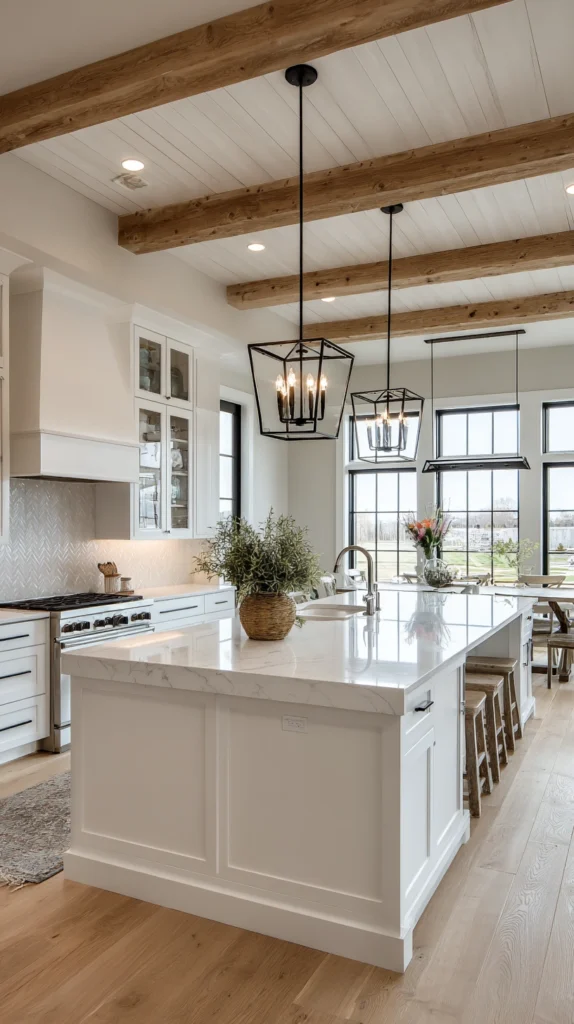
Shiplap boards installed across a kitchen ceiling, often paired with exposed beams or a range hood detail — a defining farmhouse kitchen feature.
My kitchen missing its signature detail:
What was absent:
- A kitchen with farmhouse cabinetry and fixtures, but a plain painted ceiling
- No single overhead detail tying the whole farmhouse aesthetic together
- The ceiling was the last unfinished piece of an otherwise cohesive kitchen
The farmhouse shiplap solution:
Why the kitchen ceiling completes the farmhouse look:
- Shiplap overhead is one of the most recognizable farmhouse kitchen signatures
- Ties the ceiling visually to farmhouse elements like shiplap backsplashes or islands
- Adds texture to a room often dominated by flat cabinet fronts and countertops
- Completes a design story that otherwise stops at eye level
Pairing with other kitchen elements:
Building the full look:
- Shiplap ceiling paired with a wood or shiplap-wrapped range hood
- White shiplap against warm wood open shelving
- Exposed faux beams running through the shiplap for added structure
- Black or brass pendant lighting for contrast against the white ceiling
Where this works best:
Ideal kitchens:
- Farmhouse and modern farmhouse kitchens
- Kitchens with existing shiplap on an island or backsplash
- Kitchens wanting a cohesive, complete design story
Cost:
- Shiplap boards: $1.50-3 per square foot
- Average kitchen ceiling (180 sq ft): $270-540
- Range hood shiplap wrap (if added): $80-150
My farmhouse kitchen shiplap ceiling: Extending the same shiplap already on the island up onto the ceiling finally made the whole kitchen feel like one cohesive design rather than several separate decisions.
Farmhouse Kitchen Tips
Match the ceiling shiplap to any existing shiplap elsewhere in the kitchen:
Cohesion detail:
- Mismatched board width or gap spacing between the ceiling and island creates visual disconnect
- Use the same board product for both if extending an existing shiplap feature
- This matching detail is what makes the kitchen read as one complete design
- Order extra of the original product specifically to maintain this consistency
Seal the ceiling near the stove for grease protection:
Practical consideration:
- Cooking grease and steam can accumulate on any surface near the stove over time
- A clear protective sealant on shiplap directly above the cooking area simplifies cleaning
- This step is particularly important for unpainted or lightly finished wood tones
- A wipeable sealed surface holds up significantly better than raw wood in this zone
14. The Shiplap Ceiling Accent Behind Open Shelving
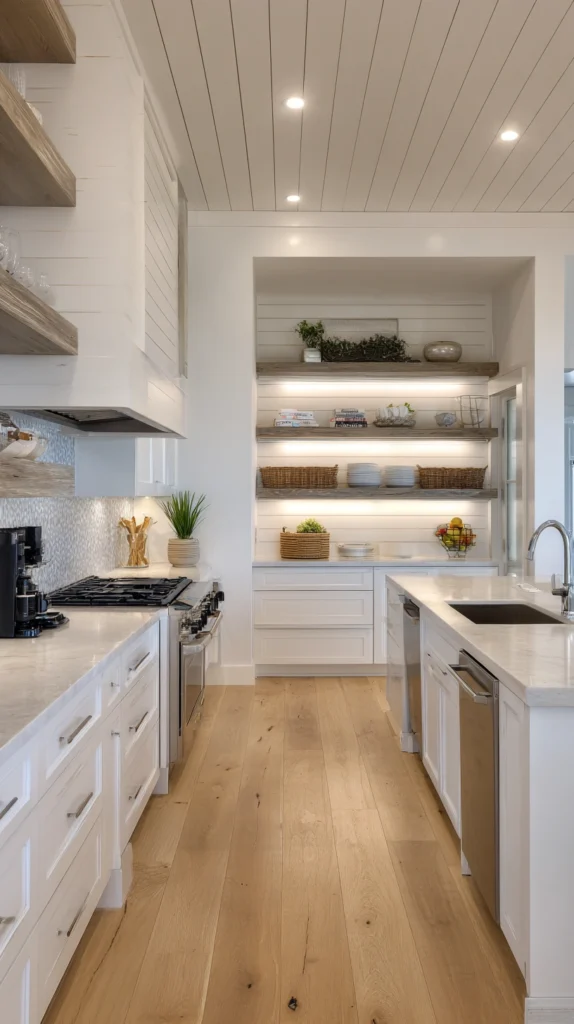
A defined shiplap section applied to the ceiling directly above open shelving — extending a wall feature upward for a fuller, more intentional look.
My disconnected shelving and ceiling:
What felt incomplete:
- Open shelving installed against a shiplap wall, but the ceiling above left plain
- The wall feature stopped abruptly at the ceiling line
- A missed opportunity to extend an already-loved design element upward
The connected accent solution:
Why extending the treatment upward completes the look:
- Removes the visual stopping point where wall shiplap meets a plain ceiling
- Creates a fuller, wrap-around feature rather than an isolated wall treatment
- Makes the open shelving area feel like a genuinely designed nook
- A relatively small additional project given the shelving area is already defined
Installation approach:
Extending the feature:
- Match the ceiling shiplap width and finish exactly to the existing wall treatment
- Install only within the footprint of the shelving area, not the full ceiling
- Maintain consistent gap spacing between the wall and ceiling boards
- Treat the corner transition carefully for a seamless wrap-around look
Where this works best:
Ideal placements:
- Kitchen open shelving nooks
- Living room built-in shelving areas
- Coffee bar or beverage station accents
Cost:
- Shiplap boards for a defined accent zone (20-30 sq ft): $30-90
- Total: $30-90
My shelving accent ceiling: Extending the kitchen’s wall shiplap up onto the ceiling directly above the open shelves turned a nice wall feature into a fully wrapped, genuinely designed nook.
Shelving Accent Tips
Match materials exactly to the existing wall treatment:
Consistency requirement:
- Any mismatch in board width or finish between wall and ceiling breaks the wrap-around effect
- Purchase from the same product line or batch as the original wall installation
- This exact matching is the single detail that makes the extension look planned from the start
- Keep a record of the original product specifications for this reason
Contain the ceiling treatment to the shelving footprint only:
Scope discipline:
- Extending shiplap across the entire ceiling changes this from an accent to a full renovation
- Limiting the ceiling treatment to directly above the shelving keeps the project small and defined
- This contained scope is what makes the project affordable and quick
- The contrast between the accent zone and the surrounding plain ceiling is part of the design
15. The Shiplap Ceiling with Integrated Lighting
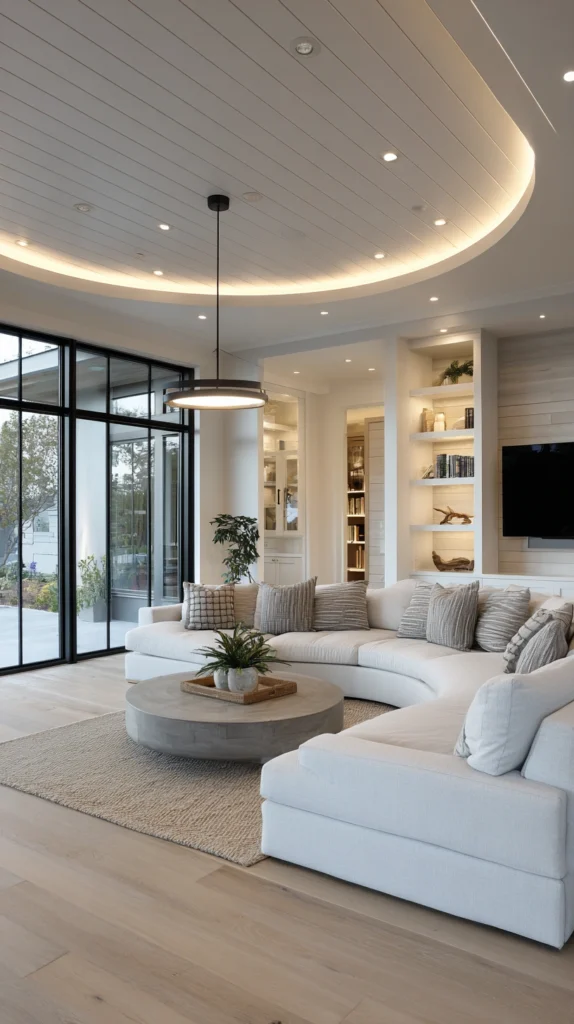
Shiplap boards installed with recessed or surface-mounted lighting planned directly into the layout — combining texture with functional illumination.
My afterthought lighting problem:
What kept happening:
- Shiplap installed first, lighting added or reworked around it afterward
- Awkward fixture placement that did not relate to the board layout
- A ceiling that looked finished during the day but felt unplanned once lit at night
The integrated lighting solution:
Why planning lighting alongside shiplap matters:
- Fixture placement can align intentionally with board seams or centered sections
- Recessed lighting cut into shiplap looks cleaner when planned before installation
- Avoids the retrofitting difficulty of cutting into finished boards later
- The finished ceiling looks equally considered during the day and at night
Lighting integration approaches:
Planning the layout together:
- Recessed can lights spaced evenly across the shiplap pattern
- A centered pendant or chandelier box planned before boards are cut around it
- Surface-mounted flush fixtures positioned to align with the board layout
- Under-shelf or cove lighting integrated at the edge where shiplap meets the wall
Where this works best:
Ideal rooms:
- Any room undergoing a full shiplap ceiling installation from scratch
- Kitchens needing both task lighting and ceiling texture
- Living rooms wanting a considered, cohesive overhead design
Cost:
- Shiplap boards: $1.50-3 per square foot
- Recessed lighting (per fixture, installed): $75-150
- Average room with 4-6 fixtures integrated: $600-1,400
My integrated lighting ceiling: Planning the recessed lighting layout before a single board went up meant the finished shiplap ceiling in the kitchen looks intentional and clean both in daylight and after dark, with no awkward fixture placement anywhere.
Integrated Lighting Tips
Finalize the lighting plan before ordering any shiplap:
Sequencing importance:
- Board layout and fixture placement need to be planned together, not separately
- Mark planned fixture locations on the ceiling before calculating board cuts
- This order prevents having to cut into finished boards after the fact
- A small amount of upfront planning avoids a significantly more difficult retrofit later
Choose low-profile recessed fixtures for the cleanest look:
Fixture selection:
- Bulky or deeply recessed fixtures can disrupt the flat plane of shiplap boards
- Slim, low-profile recessed lighting integrates more seamlessly into the surface
- This detail keeps the focus on the shiplap texture rather than the hardware
- Worth the slightly higher cost for the cleaner overall result
Choosing Your Shiplap Ceiling
By Room and Style
Traditional and classic:
- Classic white shiplap ceiling (idea 1)
- Shiplap ceiling with shiplap border (idea 7)
- Farmhouse kitchen shiplap ceiling (idea 13)
Modern and dramatic:
- Dark moody shiplap ceiling (idea 2)
- Wide plank shiplap ceiling (idea 4)
- Two-tone shiplap ceiling (idea 9)
Cottage and coastal:
- Whitewashed reclaimed shiplap ceiling (idea 3)
- Bathroom shiplap ceiling (idea 12)
Children’s spaces:
- Nursery or kids’ room pastel shiplap ceiling (idea 11)
By Effort Level
Lowest effort:
- Painted ceiling with shiplap border (idea 7)
- Shiplap accent behind open shelving (idea 14)
- Classic white shiplap ceiling, small room (idea 1)
Medium effort:
- Dark moody shiplap ceiling (idea 2)
- Two-tone shiplap ceiling (idea 9)
- Stained wood tone shiplap ceiling (idea 8)
- Bathroom shiplap ceiling (idea 12)
Higher commitment:
- Vaulted ceiling shiplap treatment (idea 5)
- Herringbone shiplap accent panel (idea 6)
- Shiplap ceiling with exposed beams (idea 10)
- Shiplap ceiling with integrated lighting (idea 15)
By Budget
Under $300:
- Painted ceiling with shiplap border (idea 7)
- Shiplap accent behind open shelving (idea 14)
- Nursery pastel shiplap ceiling (idea 11)
$300-600:
- Classic white shiplap ceiling (idea 1)
- Dark moody shiplap ceiling (idea 2)
- Two-tone shiplap ceiling (idea 9)
- Herringbone accent panel (idea 6)
$600-1,000:
- Wide plank shiplap ceiling (idea 4)
- Whitewashed reclaimed shiplap ceiling (idea 3)
- Farmhouse kitchen shiplap ceiling (idea 13)
$1,000+:
- Vaulted ceiling shiplap treatment (idea 5)
- Shiplap ceiling with exposed beams (idea 10)
- Shiplap ceiling with integrated lighting (idea 15)
Maintenance Through the Years
Every few months:
- Dust the ceiling surface, especially near ceiling fans that spread dust widely
- Check bathroom or kitchen shiplap for any early signs of moisture damage
Annually:
- Inspect stained or sealed finishes for fading, especially near windows
- Touch up nail holes or seams that have become visible over time
Before any repainting project:
- Confirm whether the shiplap ceiling needs masking or separate treatment
- Check that all boards remain securely fastened
My Complete Shiplap Ceiling Journey
What I built across three years:
Year one ($280):
- Classic white shiplap ceiling in the hallway
- Learned that even a small ceiling project changes how a whole space feels
Year two ($650):
- Dark moody shiplap ceiling in the home office
- Herringbone accent panel above the dining table
- Learned that bold color and pattern overhead read as far more sophisticated than expected
Year three ($420):
- Farmhouse kitchen shiplap ceiling extending existing wall shiplap
- Shiplap border in the primary bedroom
- Learned that matching and extending existing features creates the most cohesive results
Total investment: $1,350 across three years Most important lesson: The ceiling is worth exactly as much design attention as any wall in the room Single highest-impact change across all three years: The dark moody ceiling in the home office, for the most dramatic transformation per dollar spent
Getting Started This Weekend
Choose one room, not the whole house.
This weekend:
Step 1 — Pick the room that would benefit most from a ceiling detail:
- A room with existing wall shiplap to extend
- A small room like a powder room or hallway for a lower-risk first project
- A room where the ceiling currently gets no design attention at all
Step 2 — Locate the ceiling joists:
- Use a stud finder rated for ceilings
- Mark joist locations before finalizing board orientation
- This step prevents the most common installation failures
Step 3 — Choose classic white or a shiplap border for a first project:
- Both are the most forgiving, lowest-risk starting points
- Both teach the core skills needed for bolder projects later
- Both work in nearly any room, so the investment is never wasted
Step 4 — Plan lighting before installing, even for a simple ceiling:
- Confirm existing fixture locations work with the planned board layout
- Adjust fixture placement before boards go up, not after
My recommendation:
Start with classic white shiplap in a smaller room:
- Lowest cost and lowest time investment on this entire list
- Builds the exact skills needed for the more dramatic ideas later
- Provides real information about whether the rest of the house wants shiplap ceilings too
Stand underneath the finished ceiling and look up before deciding what comes next in the room.
Now go build the ceiling that finally gets the same attention as every wall around it.
Quick Summary
The 15 shiplap ceiling ideas:
Classic and timeless:
- Classic white shiplap ceiling (idea 1): the safest, most universal starting point
- Stained wood tone shiplap ceiling (idea 8): genuine warmth and grain
- Farmhouse kitchen shiplap ceiling (idea 13): a defining kitchen signature detail
Bold and dramatic:
- Dark moody shiplap ceiling (idea 2): lowers and warms a room instantly
- Wide plank shiplap ceiling (idea 4): bolder scale, fewer seams
- Two-tone shiplap ceiling (idea 9): subtle dimension through color alone
Texture and pattern:
- Whitewashed reclaimed shiplap ceiling (idea 3): authentic texture, bright finish
- Herringbone shiplap accent panel (idea 6): the most dramatic pattern option
- Shiplap ceiling with exposed beams (idea 10): structure and texture combined
Contained and low-cost:
- Painted ceiling with shiplap border (idea 7): maximum impact, minimal material
- Shiplap accent behind open shelving (idea 14): completes an existing feature
Architecture-specific:
- Vaulted ceiling shiplap treatment (idea 5): emphasizes existing dramatic height
- Shiplap ceiling with integrated lighting (idea 15): texture and function planned together
Room-specific:
- Nursery or kids’ room pastel shiplap ceiling (idea 11): soft color for a child’s space
- Shiplap ceiling in a bathroom (idea 12): warmth in an otherwise hard-surfaced room
The universal shiplap ceiling rules:
Always:
- Locate ceiling joists before installing any board with real weight
- Finish or stain boards on the ground before installing overhead
- Plan lighting placement before, not after, board installation
- Match new shiplap to any existing shiplap elsewhere in the room
Never:
- Assume white is the only option worth considering
- Install wide boards on a low ceiling without checking proportion first
- Skip moisture protection in a bathroom or kitchen application
- Cover an entire ceiling before testing the look on a smaller section
Common mistakes:
- Treating the ceiling as separate from the rest of the room’s design
- Choosing board width without considering the room’s actual proportions
- Finishing boards after installation instead of before
- Ignoring existing architectural features like beams or vaults the ceiling could work with
- Skipping the lighting plan until after the boards are already installed
Remember: the ceiling is the one surface most rooms leave completely undesigned, dark and bold colors overhead read as sophisticated rather than heavy when paired with the right lighting, matching new shiplap to existing features creates the most cohesive results, planning lighting alongside the board layout prevents the most common regret, and the best shiplap ceiling is the one that makes guests stop and look up before they look anywhere else.