12 Slope Backyard Landscaping Ideas That Will Transform Your Space
My backyard drops nearly 6 feet from the house to the back fence, and for years I just mowed the slope and called it done.
It was usable, barely. Mowing felt like a workout, and nobody ever actually sat out there.
Then I stopped treating the slope like a problem and started treating it like the most interesting feature in the yard. Same grade, completely different space.
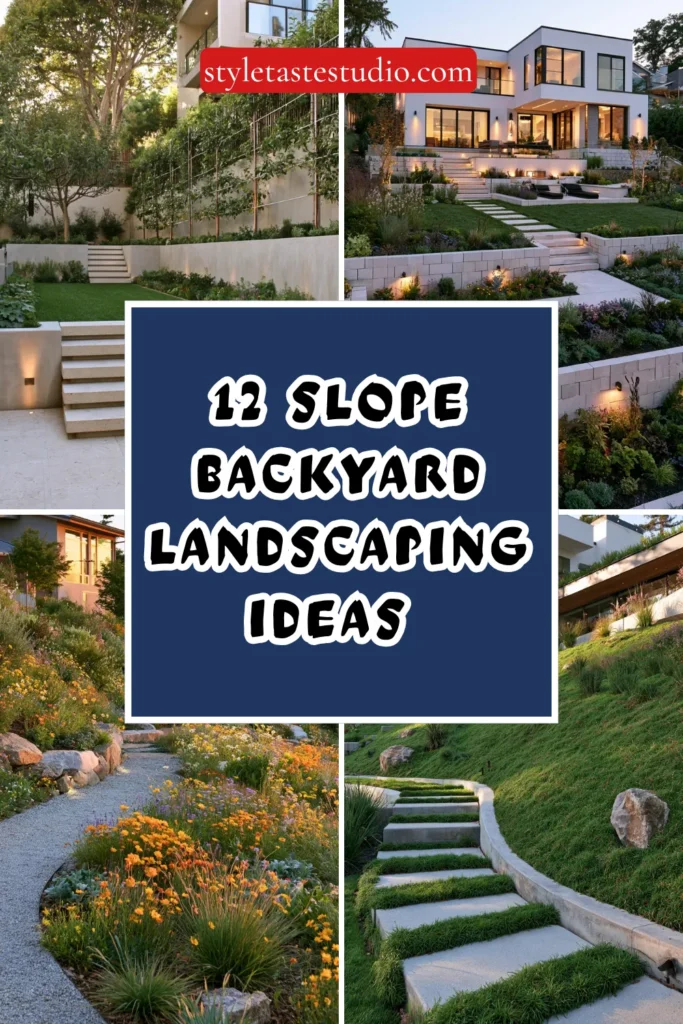
Here are 12 sloped backyard landscaping ideas that turn a tricky grade into the best part of your property instead of the part you avoid.
Every one of these works whether your slope is gentle or genuinely steep, just adjust the scale to match. A few require real earthwork and possibly a permit, while others are entirely plant-based projects you can tackle over a weekend with a shovel and some patience.
Start by figuring out where water actually flows across your slope during a heavy rain, since that single detail shapes which of these ideas will work best for your specific yard.
1. Terraced Retaining Wall Beds
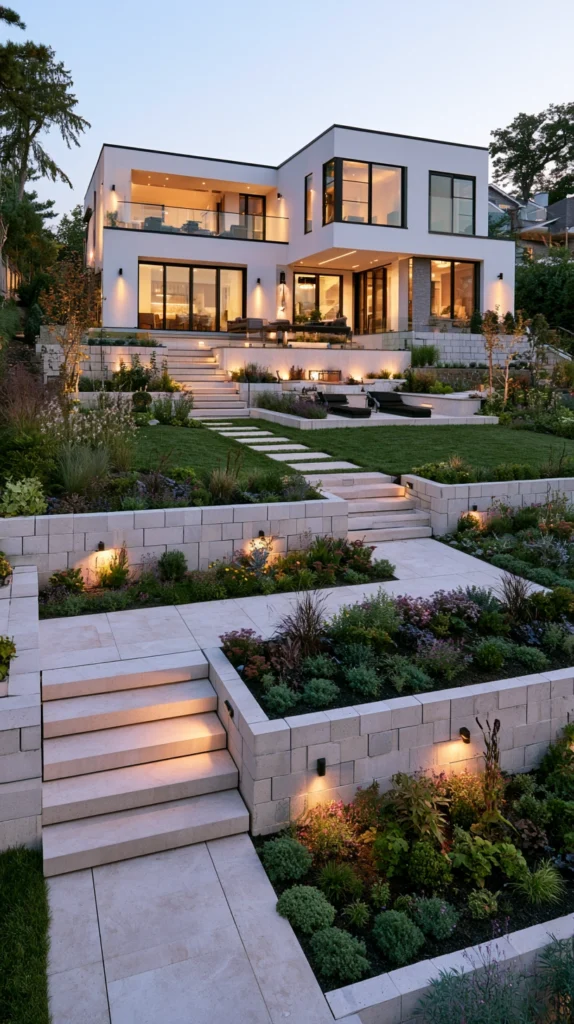
A series of stacked retaining walls that break a slope into flat, usable planting beds stepping down the grade.
Terracing is the classic answer to a sloped yard, and it earns that reputation because it actually solves the problem instead of just working around it. Each wall creates a genuinely flat bed behind it, which means real planting space instead of soil constantly washing downhill.
I built three tiers using segmental retaining wall block, each wall standing about 2 feet tall, which turned a steep unusable slope into three flat planting shelves running the width of the yard.
Budget tip: Segmental block systems from a home improvement store cost significantly less than natural stone and still lock together without mortar, which keeps both material and labor costs down for a DIY build.
A few structural details that matter:
- Set the base course on a compacted gravel footing below frost line, since a wall built on unstable ground will shift within a season or two
- Add drainage gravel and a perforated pipe behind each wall to relieve water pressure
- Batter each wall slightly backward into the slope, generally an inch per foot of height, for long-term stability
Anything taller than about 3 feet typically needs engineering review in most areas, so stick to shorter stacked tiers unless you’re bringing in a professional for a single tall wall.
Drainage gravel is the step I’d never skip after seeing what happens without it. A neighbor’s wall built without a gravel backfill bulged noticeably within two years, while mine has stayed perfectly true since day one.
2. Stepped Stone Staircase
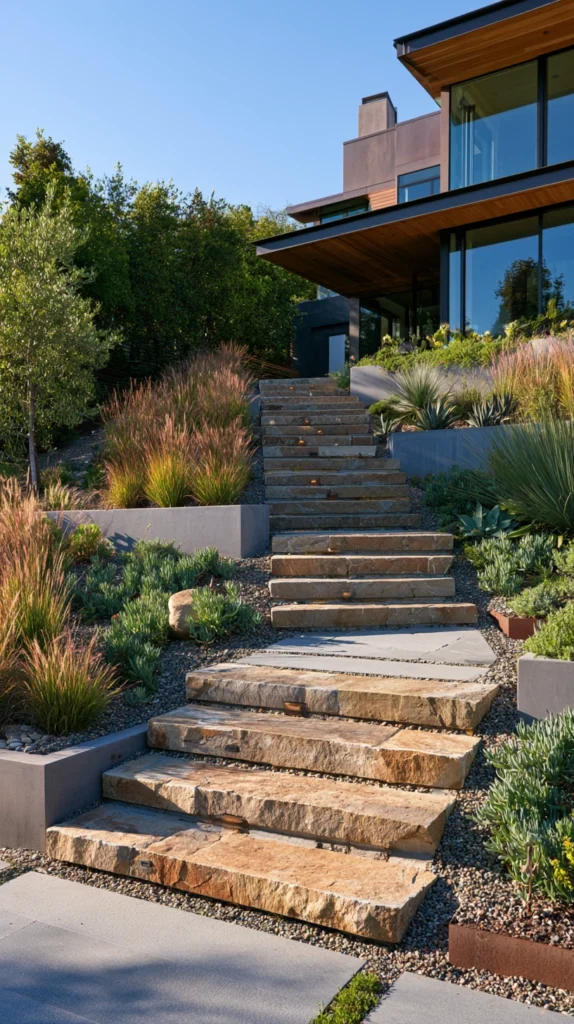
A wide, shallow stone staircase built directly into the slope, connecting the upper and lower parts of the yard as a functional and visual centerpiece.
If your slope currently forces an awkward diagonal walk or a worn dirt track straight down the hill, a proper staircase solves both the function and the look of that transition in one move.
I built mine using large flagstone treads set into a compacted gravel base, with each step rising 6 inches and running 16 inches deep, following the natural line of the slope rather than cutting straight down it.
Style tip: Keep risers shallow, ideally 6 inches or less, and treads deep, since a staircase built into a landscape should feel like a slow, comfortable descent rather than a steep indoor stairway.
A few build notes:
- Maintain consistent riser height throughout the entire run, since even small variations become serious trip hazards outdoors
- Add a slight forward slope, about a quarter inch per foot, on each tread for drainage
- Widen the staircase beyond a single-file width if space allows, since a generous stair reads as a feature rather than just a utility path
A well-built stone staircase often becomes the actual visual anchor of a sloped yard, more so than any planting bed or structure around it.
Lighting along the edges made a bigger safety difference than I expected once the sun went down. Small solar caps set into the risers of each step means nobody’s felt around blindly for the edge after dark since I added them.
3. Dry Creek Bed Drainage Feature
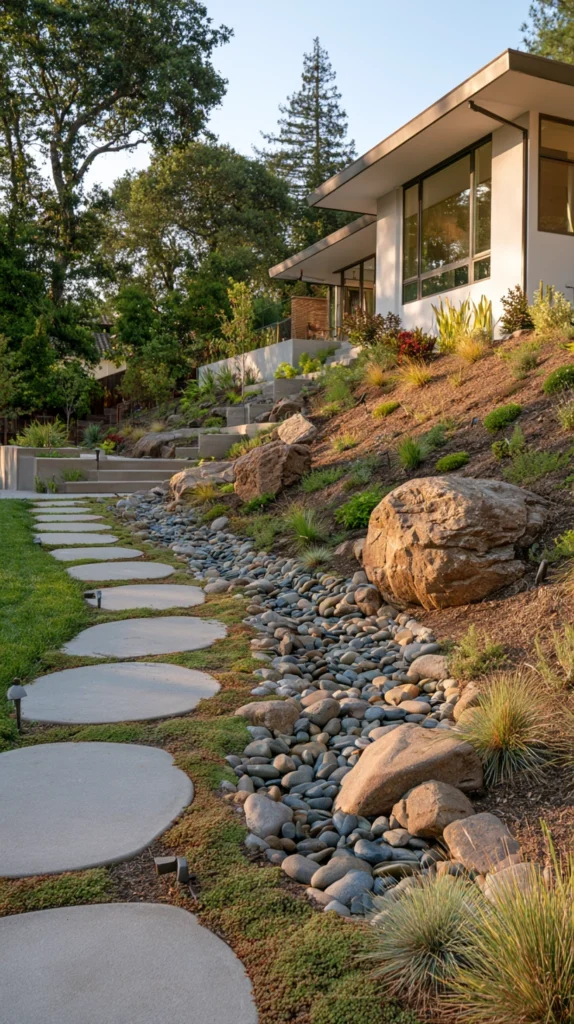
A rock-lined channel that follows the natural water flow down a slope, designed to manage runoff while doubling as a landscape feature.
Slopes move water fast, and a dry creek bed gives that water somewhere intentional to go instead of carving random erosion channels through your lawn every time it rains hard.
I lined a natural low point running through my slope with a mix of river rock and larger boulders, following the existing drainage path rather than forcing a new route, and it now handles every storm without a single new erosion gully.
Budget tip: Source river rock in bulk by the ton from a landscape supply yard rather than bagged rock from a garden center, since bulk pricing runs a fraction of the bagged retail cost for the same material.
A few design considerations:
- Vary rock size throughout the channel, using larger boulders at bends where water moves fastest
- Dig the channel slightly deeper and wider than you think you need, since undersized channels overflow during heavy storms
- Plant moisture-loving perennials along the edges to soften the hardscape and help absorb excess water
Even in a dry climate where it rarely actually carries water, a dry creek bed reads as an intentional design feature rather than an empty ditch.
Underlayment fabric beneath the rock is worth the extra step even though it’s invisible once finished. Skipping it on a small test section let weeds punch straight up through the rock within a single season, which the fabric-lined sections never experienced.
4. Wildflower Meadow Slope
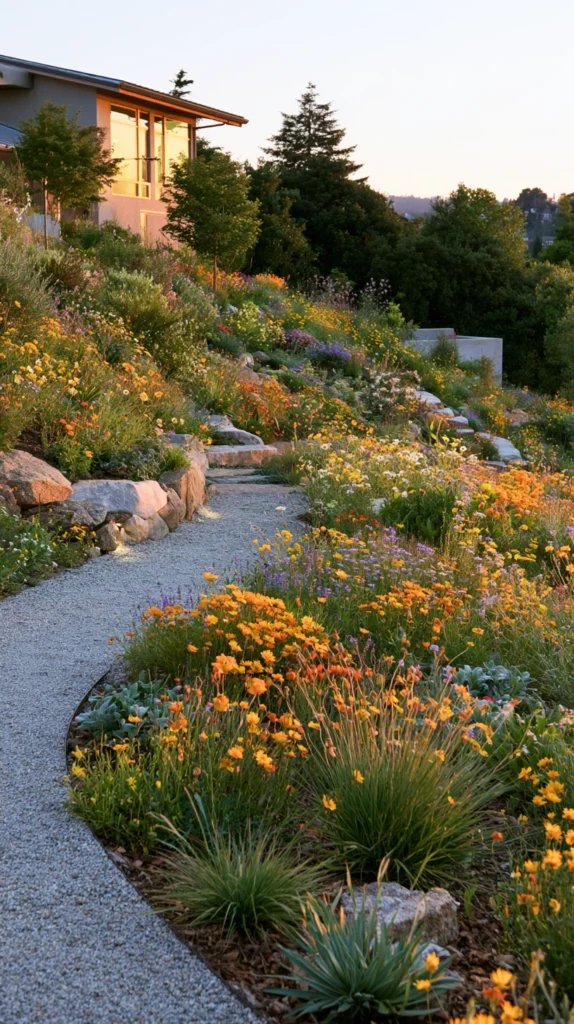
A steep section of slope converted from mowed lawn into a dense planting of native wildflowers and grasses, left to grow naturally rather than mowed.
Steep slopes are often the hardest sections of a yard to mow safely, and a wildflower meadow solves that entirely by removing the need to mow at all. The dense root systems of native plants also hold soil far better than turf grass ever does on a real grade.
I converted the steepest third of my slope, an area I genuinely dreaded mowing, into a native wildflower meadow using a regional seed mix suited to my area’s rainfall and soil type.
Budget tip: A single pound of wildflower seed mix covers a surprisingly large area, often 500 to 1,000 square feet, making this one of the cheapest ways to landscape a large slope on this entire list.
A few things worth knowing before converting:
- Kill existing turf grass first, either by smothering or herbicide, since wildflower seed struggles to establish through competing grass
- Water consistently through the first season while roots establish, even though the meadow will be largely self-sufficient afterward
- Mow the meadow once in late fall or early spring to reset growth, which is the only mowing it needs all year
This is also one of the best options here for supporting pollinators, since a mowed slope offers essentially nothing for bees and butterflies compared to a flowering meadow.
Patience through the first season is the hardest part of this project honestly. My meadow looked patchy and disappointing for most of that first summer, and it wasn’t until the second year that it filled in enough to actually look intentional rather than neglected.
5. Multi-Level Deck Following the Grade
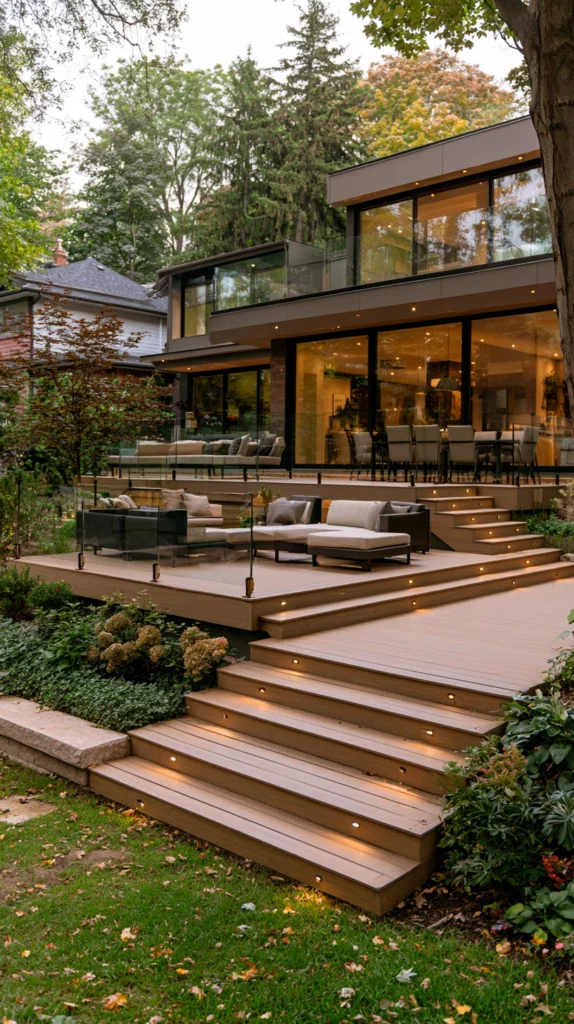
A tiered deck structure that steps down the slope in stages, providing flat outdoor living space without any excavation of the hillside itself.
Rather than fighting a slope with retaining walls and fill dirt, a stepped deck simply floats above the grade, which is often faster and less disruptive to install than a major regrading project.
Mine steps down in two levels connected by a short run of stairs, an upper deck off the kitchen for dining and a lower deck built lower on the slope for lounge seating, with the natural grade left completely undisturbed underneath.
Style tip: Use the same decking and railing materials across both levels, since visual continuity is what ties a stepped deck together into one cohesive structure instead of two separate platforms.
A few structural notes:
- Use adjustable deck footings or piers rated for the specific slope angle, since standard footings often aren’t designed for uneven grade
- Plan stair transitions early in the design process, since awkward stair placement is the most common mistake on stepped decks
- Leave the ground beneath the deck largely untouched, which avoids the erosion risk that comes with excavating a slope
A stepped deck is one of the fastest ways to reclaim genuinely usable flat space from a steep slope without moving a significant amount of earth.
Footing depth on a slope surprised me during the permitting process, since the downhill footings needed to go noticeably deeper than the uphill ones to reach stable, undisturbed soil beneath the grade.
6. Groundcover Erosion Control Blanket
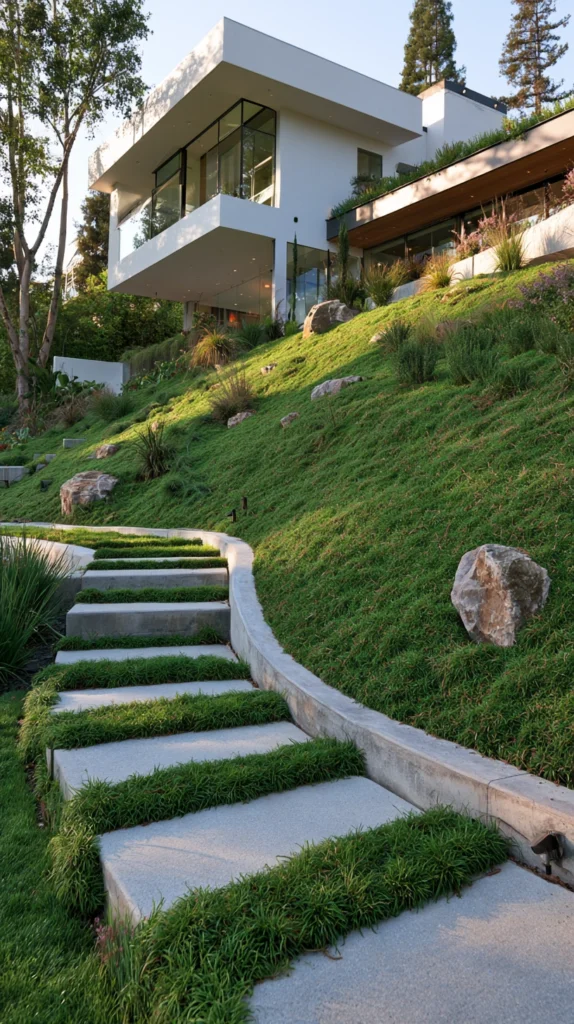
A dense planting of low, spreading groundcover specifically chosen for its root structure and ability to stabilize loose or eroding soil.
Not every slope needs hardscape or terracing. Sometimes the simplest fix is choosing the right plant to do the structural work that a retaining wall would otherwise handle.
I planted creeping juniper across a moderately steep, sun-exposed section of my slope that had been slowly eroding for years, and within two seasons the root mat had completely stopped soil movement in that area.
Budget tip: Buy groundcover in small plug trays rather than larger potted plants, since plugs cost a fraction of the price per plant and fill in just as fully within a season or two on a slope this size.
A few things worth knowing:
- Choose groundcover matched to your specific sun exposure, since a shade-loving variety planted on a hot, exposed slope will struggle regardless of its root strength
- Use biodegradable erosion control netting over new plantings on steep grades, which holds soil in place while roots establish
- Water new plantings deeply and consistently through the first season, since establishment is the vulnerable window before roots take hold
This is genuinely one of the lowest-cost, lowest-labor solutions on this list, especially for a slope that’s more moderate than dramatically steep.
Staggering plugs in a diagonal grid rather than straight rows made the coverage close in noticeably faster. The offset pattern left fewer bare gaps for weeds or erosion to sneak through during that vulnerable first-season window.
7. Boulder and Rock Garden Slope
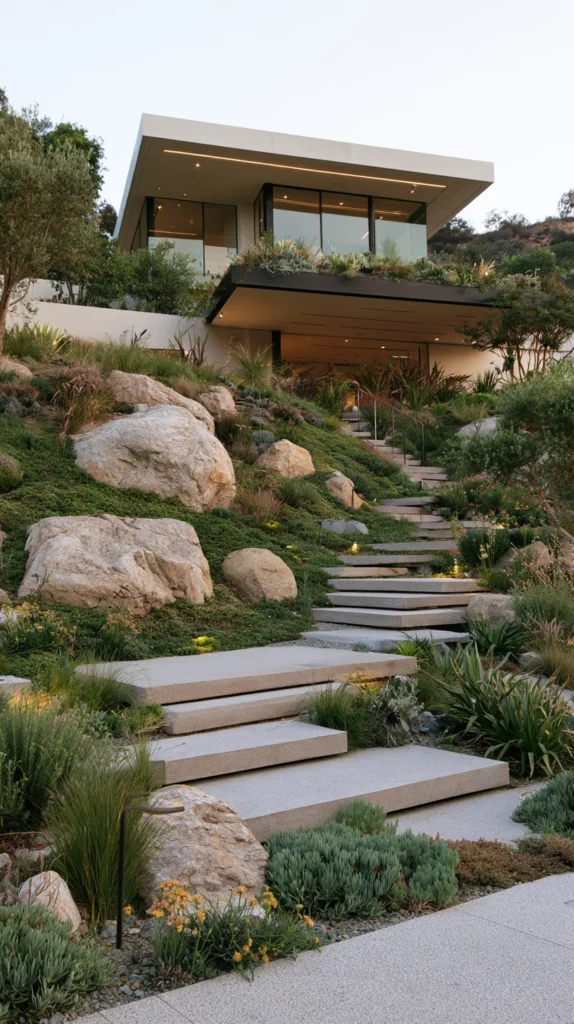
A naturalistic arrangement of large boulders set into the slope, paired with drought-tolerant plants tucked between and around the stones.
Large boulders do double duty on a slope, they add real structural stability by breaking up the grade, and they create a genuinely striking naturalistic look that mimics how rock actually appears on a natural hillside.
I set five large boulders into the steepest section of my slope, partially burying each one so it looks like it’s emerging from the hill rather than sitting on top of it, then filled the gaps with sedum, creeping thyme, and a few dwarf conifers.
Style tip: Bury boulders at least a third of their total height, since a rock that sits fully on the surface reads as placed rather than natural, while a partially buried boulder looks like it’s always belonged there.
A few installation notes:
- Use heavy equipment or professional help for genuinely large boulders, since anything over a couple hundred pounds isn’t safely moved by hand
- Vary boulder size and shape rather than using matching stones, which reads as far more natural
- Choose drought-tolerant plants for the gaps, since soil around boulders tends to drain quickly and dry out faster than flat ground
This is one of the more physically demanding builds on this list if you’re placing large stone by hand, but the finished look is genuinely hard to replicate any other way.
Delivery access is worth mapping out before ordering anything large. My first boulder delivery couldn’t reach the actual placement spot, and I ended up paying extra for a second trip with a smaller machine that could navigate the narrower side yard.
8. Switchback Garden Path
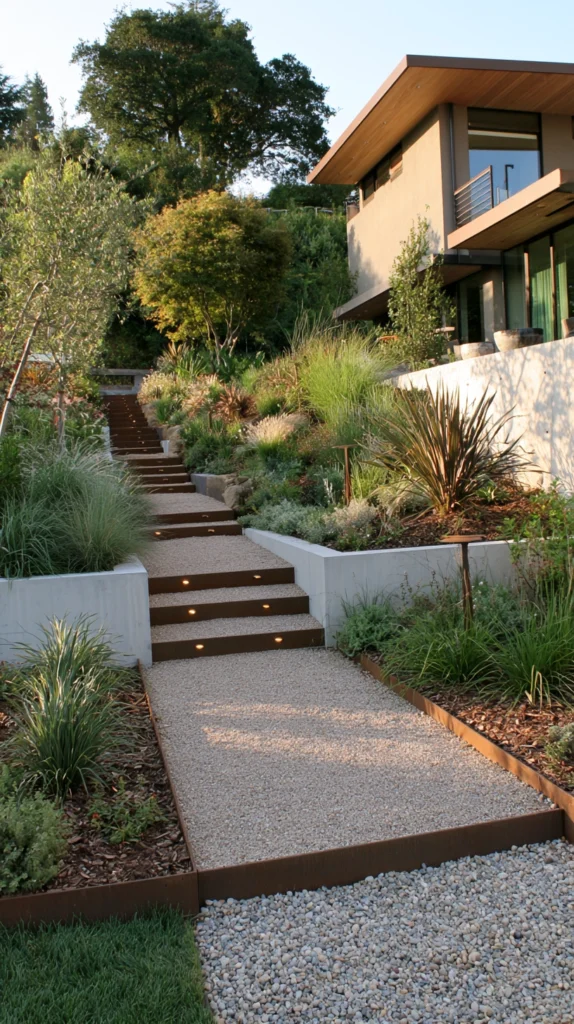
A winding path that zigzags gradually across the slope rather than climbing it directly, making the grade feel far gentler to walk.
A path built straight up a steep slope is exhausting and often unsafe in wet weather. A switchback path solves this the same way mountain trails do, by covering the elevation change over a longer, gentler distance.
I built mine using compacted gravel switching back three times across the width of my slope, with each turn anchored by a small landing area and a section of low retaining wall to hold the path surface level.
Budget tip: Compacted gravel costs far less than stone or paver switchbacks and handles a winding grade just as well, especially if the path sees moderate rather than heavy daily foot traffic.
A few design considerations:
- Keep the path grade itself under about 8 percent wherever possible, which is roughly the steepest comfortable slope for casual walking
- Build a small flat landing at each switchback turn, since a sharp turn on a steep grade feels awkward and can be genuinely unsafe underfoot
- Add low edging or small retaining sections at each turn to keep gravel from migrating downhill over time
This is one of the more elegant solutions here for slopes too steep for a straight staircase but not steep enough to need a full terraced retaining wall system.
Walking the actual route repeatedly before digging anything permanent saved me from a switchback layout that looked fine on paper but felt awkward underfoot. I adjusted two of the turn locations after physically walking the flagged path several times.
9. Slope-Side Fire Pit Overlook
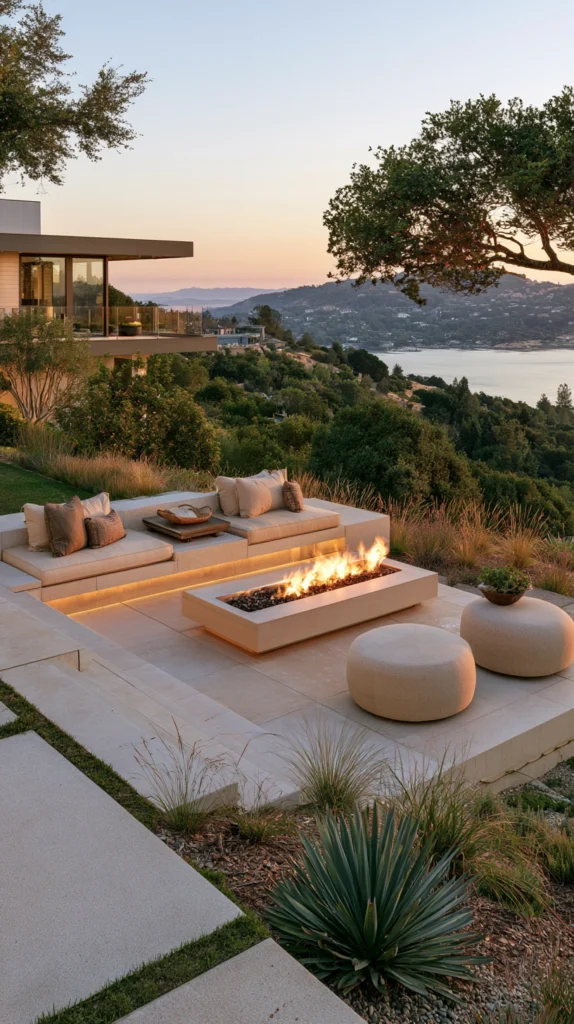
A leveled platform built partway up or at the top of a slope, positioned to take advantage of the elevated view, anchored by a fire pit or seating area.
A sloped yard often has one thing a flat yard doesn’t, an actual view. Building a dedicated overlook takes advantage of that elevation instead of treating it purely as an obstacle to level out.
I cut a small level platform into the upper third of my slope, framed it in the same segmental block used for my terraced beds, and centered it around a simple steel fire bowl with seating for six facing out over the lower yard.
Style tip: Orient seating to actually face the view or the sunset, not just the fire, since the elevation itself is the real feature and the fire pit should support that focal point rather than compete with it.
A few build notes:
- Retain the uphill side of the platform with a short wall to prevent soil from washing onto the seating area
- Grade the platform itself with a very slight slope, about 1 to 2 percent, for drainage
- Check local fire code for setback distances from structures and property lines before finalizing placement
This idea works especially well on slopes with any kind of view, whether that’s a distant tree line, a neighborhood skyline, or just a nicer angle on your own garden below.
I tested the platform location before finalizing anything by dragging a folding chair up to a few candidate spots at different times of day. The elevation I ended up choosing wasn’t the highest point on the slope, just the one with the best actual sightline at sunset.
10. Espalier Fruit Trees Along Terraced Walls
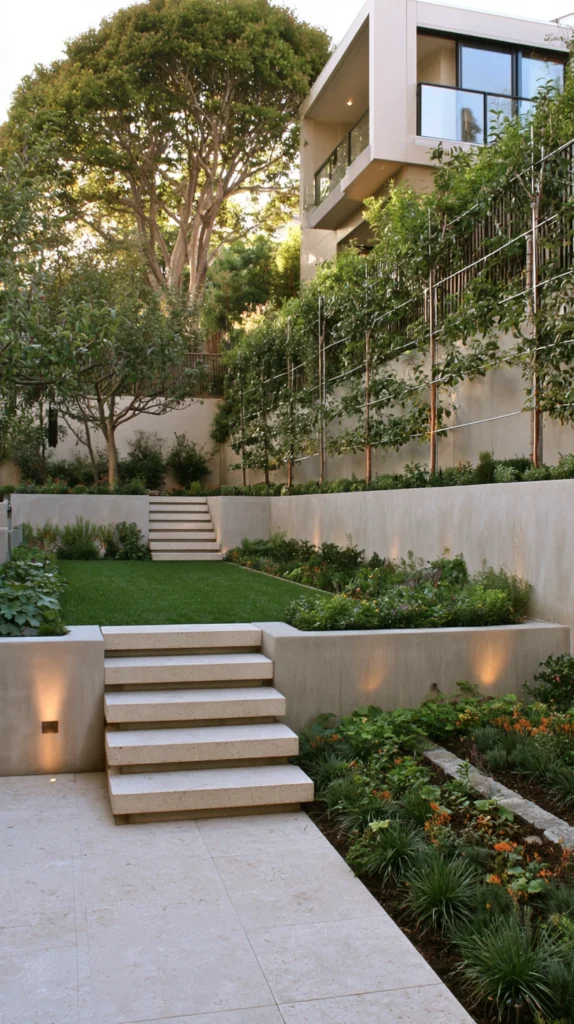
Fruit trees trained flat against the face of retaining walls on a terraced slope, combining structural planting with an actual harvest.
If you’re already building retaining walls to terrace a slope, the vertical wall faces themselves are prime real estate that most people leave completely bare. Training fruit trees flat against them puts that space to work.
I trained a row of espaliered pear trees against the south-facing side of my lowest retaining wall, where the stone holds and radiates heat, which has noticeably sped up fruit ripening compared to a freestanding tree in the open yard.
Budget tip: Start with young, inexpensive whip trees rather than pre-trained espaliered specimens, since training the branches yourself against an existing wall costs a fraction of buying trees already shaped.
A few things to plan around:
- Install a simple wire support system a few inches off the wall face before planting, giving branches something to be tied to as they grow
- Choose a south or west-facing wall for the warmth benefit, since a shaded wall won’t offer the same ripening advantage
- Prune consistently through the growing season to keep growth trained flat against the wall rather than sprawling outward
This is a slower-maturing feature than most on this list, but it turns otherwise wasted vertical wall space into a genuinely productive part of the garden.
Reflected heat off the stone wall does have a downside worth watching for, since it can push buds to open earlier than nearby freestanding trees, occasionally putting them at slightly higher risk from a late frost.
11. Slope Stabilization with Ornamental Grasses
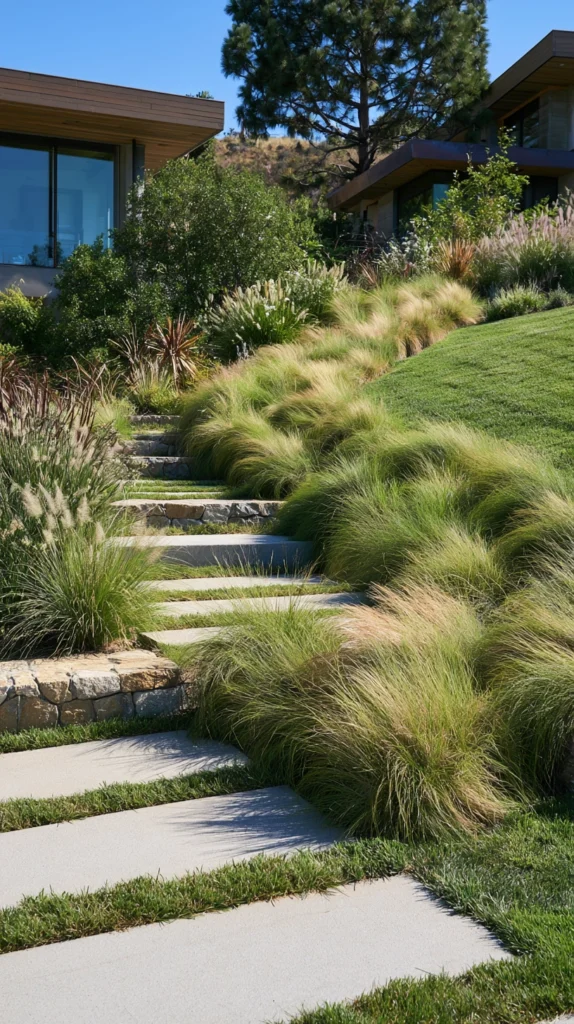
A dense band of deep-rooted ornamental grasses planted across the steepest portion of a slope specifically to prevent erosion while adding real visual movement.
Ornamental grasses combine two things a difficult slope actually needs, deep, fibrous root systems that hold soil in place, and enough height and texture to read as an intentional design feature rather than a patch job.
I planted a wide band of little bluestem and switchgrass across the mid-section of my slope where erosion had been worst, spacing clumps about 18 inches apart to knit together into a solid, soil-holding mass within two growing seasons.
Style tip: Choose native prairie grass species specifically for slope work, since their root systems typically extend several feet deep, far beyond what most ornamental garden grasses develop.
A few practical notes:
- Cut grasses back hard in late winter to reset growth before the new season starts
- Avoid over-fertilizing, since lean soil actually encourages deeper, stronger root development in most native grass species
- Interplant a few taller specimens for visual height variation, rather than a single uniform mass of one grass type
This is a lower-cost, lower-labor alternative to structural retaining walls for slopes that are steep but not so severe that they need hard engineering to stay put.
Erosion netting over the newly planted band made a visible difference during that first vulnerable season. A section I left unnetted lost several plugs to a single hard rain, while the netted areas held everything in place until roots could take over the job themselves.
12. Sculptural Gabion Wall Terracing
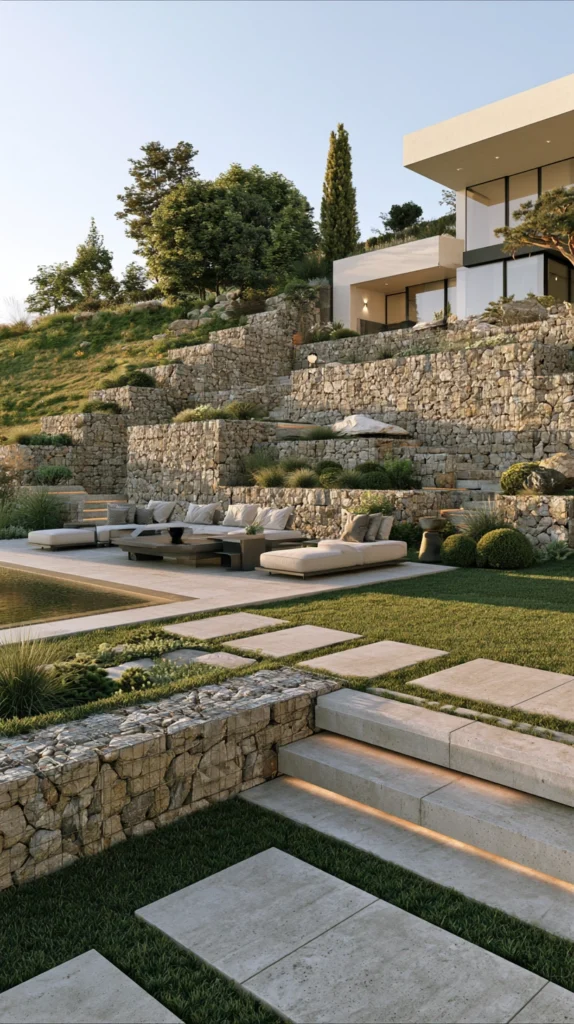
Wire cages filled with stone, called gabions, stacked to create terraced retaining walls with a distinct industrial, textured look.
Gabion walls solve the same structural problem as a traditional retaining wall, but with a completely different visual result and considerably faster construction, since you’re filling wire cages with stone rather than mortaring individual blocks.
I built two stacked gabion tiers along the steepest section of my slope, using galvanized wire cages filled with a mix of local fieldstone, which let water drain freely through the wall instead of building pressure behind it like a solid wall would.
Budget tip: Fill gabion cages with rubble, broken concrete, or mismatched local stone instead of purchased decorative rock, since the wire cage hides irregular material just as effectively as it holds uniform stone.
A few build considerations:
- Anchor cages to each other and to the ground with hog rings or lacing wire so the structure doesn’t shift under load
- Use a filter fabric behind the cages to prevent fine soil from washing through the gaps in the stone
- Step each tier back slightly from the one below for stability, the same way you would with a traditional block retaining wall
Because gabions drain so freely, they’re often a smart choice for slopes in areas with heavy rainfall, where a solid wall would need much more robust drainage engineering to avoid pressure buildup.
Filling the cages took considerably longer than I expected, mostly because hand-placing stone for a clean face looks noticeably better than just dumping rock in randomly. Spending the extra time facing the visible side paid off in how finished the whole wall looks now.
Quick-Start Shopping List
- Segmental retaining wall block and crushed gravel for terraced beds
- A regional native wildflower seed mix for a low-maintenance meadow slope
- Creeping juniper or other groundcover plugs for erosion control
- Galvanized gabion wire cages and local fieldstone for a fast-build terrace wall
- Flagstone treads and compacted gravel base material for a stepped staircase
Budget-Friendly and Rental-Friendly Version
If you’re renting or working with limited funds, start with groundcover and grasses rather than built structures. A dense planting of erosion-controlling groundcover or native grasses costs a fraction of a retaining wall, requires no digging into permanent structures, and can be left behind or thinned out without any real loss if you move.
Success Indicators
You’ll know a sloped landscaping design is working when soil stays put through a heavy rain instead of washing downhill, when the slope becomes a space you actually walk into and use rather than avoid, and when maintenance feels manageable instead of like an ongoing battle against gravity.
A good sloped design also holds up through the seasons that test it hardest. If a slope still looks stable and intentional after the worst storm of the year, the structure and planting choices were the right fit for your specific grade.
- No visible new erosion channels appear after a heavy rain
- The slope has at least one genuinely flat, usable space somewhere along its length
- Plantings or structures still look stable and intact after a full year of weather
- You find yourself using the slope rather than just mowing or maintaining it from a distance
Remember: the best sloped backyard design works with your specific grade instead of trying to erase it entirely, so start by understanding exactly how steep your slope really is and where the water naturally wants to go, then choose the ideas here that solve those two things first before worrying about anything purely decorative.
Whatever combination of ideas you land on, give the design at least one full rainy season before judging whether it’s really working, since erosion control and drainage decisions often only reveal their weak points once genuinely tested by real weather.