15 Cozy Kitchen Nook and Banquette Ideas for Fall
Most breakfast nooks get treated as an afterthought — a small table wedged into whatever corner was left over once the rest of the kitchen layout was finalized, with two chairs that don’t quite match and a window that’s never been dressed. It works fine for a quick bowl of cereal standing in for breakfast on the way out the door.
That setup wastes the one spot in most kitchens actually built for sitting still. A nook or banquette isn’t just overflow seating — it’s the kitchen’s smallest, most intimate room within a room, and in fall specifically, it’s the corner most capable of becoming the place people actually want to linger with a coffee, a book, or a slow Sunday morning that has nowhere else to be.

A cozy fall nook isn’t a bigger version of a quick-use breakfast spot. It’s a different design problem entirely — one built around layered comfort, warmth, and a reason to stay rather than just a place to eat. Get the bench, the cushions, and the light right, and a corner that used to get walked past becomes the spot everyone ends up sitting in.
Here are 15 ideas for turning a kitchen nook or banquette into the coziest seat in the house for fall.
Why a Fall Nook Plays by Different Rules Than a Summer One
The rules are not the same for every season in this particular corner:
Summer Nook Advantages:
- Bright, quick-use functionality, since most summer meals happen fast and often outdoors instead
- Light, breathable cushions and minimal layering, matching the season’s overall mood
- Less pressure on the spot to do more than hold a plate for fifteen minutes
The summer nook comparison: function over lingering
Fall Nook Advantages and Realities:
- The spot becomes a genuine destination, since outdoor seating is no longer the easy default
- Longer, slower use — coffee, homework, a book — that rewards real comfort rather than a hard bench and a thin cushion
- A natural pairing with the season’s emphasis on staying in, making this corner one of the most-used spots in the whole house for months at a stretch
The key insight:
- A summer nook rewards simplicity and speed
- A fall nook rewards comfort, layering, and a reason to actually stay seated
- These are different design problems, not the same bench with a thicker cushion added
The Comfort and Scale Reality
The most important measurement in a cozy nook:
The bench depth:
- A bench seat under 18 inches deep reads as a quick-use perch; one closer to 20–22 inches invites someone to actually settle in
- Depth matters more than length for whether the spot feels like a genuine lingering place or just overflow seating
- Know this — it governs the cushion, throw, and pillow choices that follow
The “layer for the length of the sit” calculation:
- A spot meant for a fifteen-minute breakfast needs less cushioning and warmth than one meant to hold someone through a slow afternoon
- Working backward from how long people are actually expected to sit there changes the cushion thickness, the throw blanket, and even the lighting choice
- Most nooks benefit from being slightly over-prepared for comfort rather than under-prepared, since a too-firm or too-cold seat gets abandoned quickly
Most cozy nooks get built in layers, not all at once:
- The bench or seating structure comes first, since it’s the hardest and most expensive element to change later
- The cushions and textiles come next, once there’s a structure to layer them onto
- The smallest finishing touches — a pillow, a throw, a piece of art — come last, and are the easiest layer to swap as the season shifts
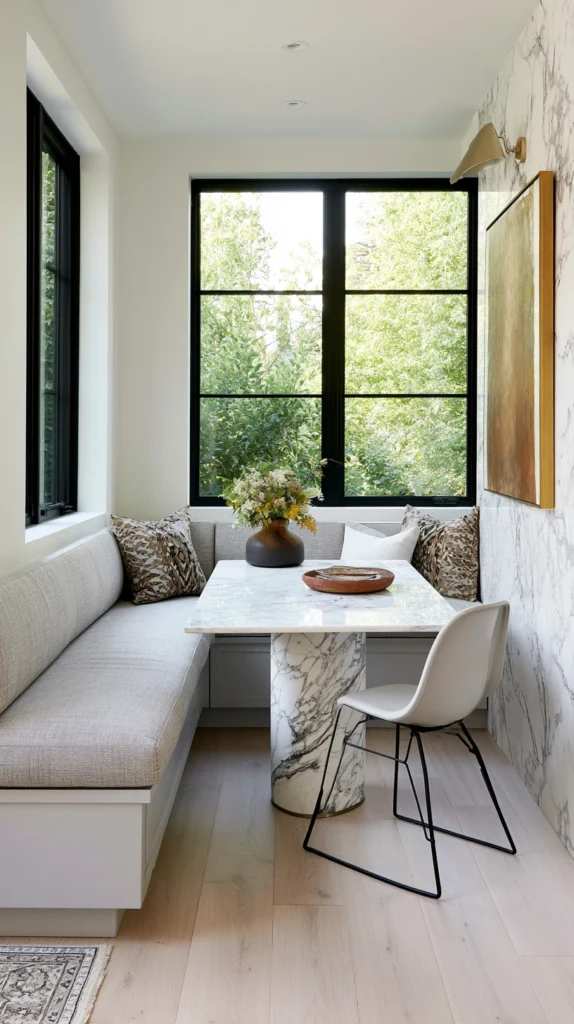
1. The Built-In Banquette Bench (The Foundation of a True Nook)
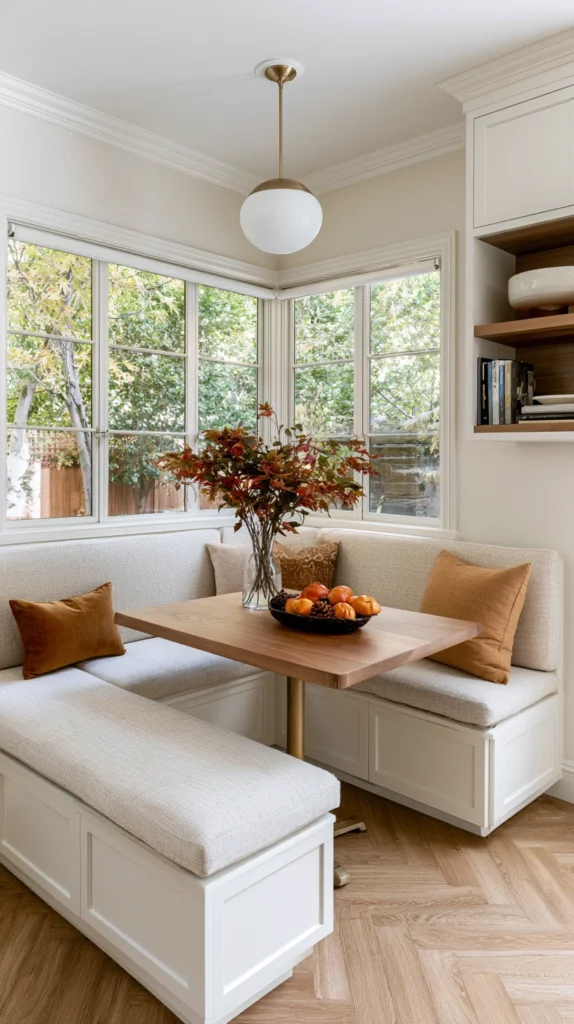
A permanent, built-in bench seat, often L-shaped or fitted along two walls of a corner — the single addition most responsible for turning a generic breakfast spot into a genuine architectural nook.
Why a built-in bench changes the whole feel of the space
- The room-within-a-room effect: a built-in bench, especially an L-shaped one, defines the nook’s boundaries the way walls define a room, giving the spot a sense of enclosure no set of freestanding chairs can replicate
- The seating capacity it adds in a small footprint: a banquette typically seats more people in the same square footage than an equivalent arrangement of individual chairs
- The long-term investment value: unlike furniture that might get swapped out over the years, a built-in bench tends to become a permanent, defining feature of the kitchen itself
The options
- An L-shaped corner banquette, wrapping two walls for maximum seating capacity
- A single straight bench, paired with chairs on the table’s opposite side
- A U-shaped banquette, for a fully enclosed nook in a larger kitchen
- A banquette with a slightly raised platform, adding architectural definition beyond just the bench itself
The practical execution
- Build to a genuine sitting depth of 20–22 inches rather than a shallower bench that reads as decorative more than functional
- Confirm table height and bench height are properly proportioned to each other, typically a seat height of 17–18 inches paired with a standard 29–30 inch table
- Work with a contractor or experienced carpenter for a true built-in, since this is the most structurally involved idea on the entire list
Cost breakdown
- DIY built-in bench, materials: $300–800
- Professionally built banquette: $1,500–4,000+
- Total: $300–4,000+, depending on scope and whether it’s DIY or professional
The built-in bench wrapping the corner: the one addition every other idea on this list ends up arranged around.
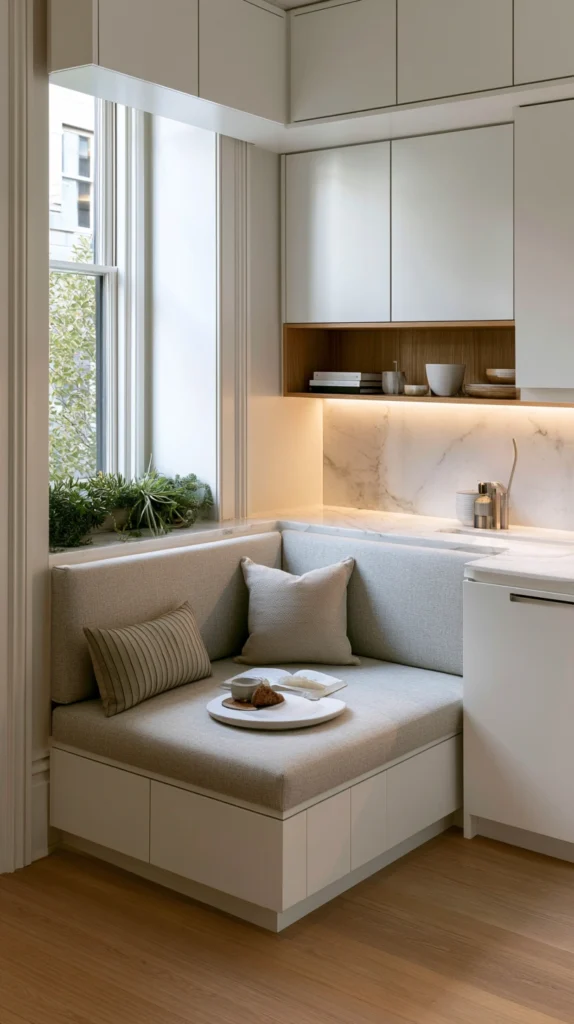
2. The Window Seat Nook (Borrowing the View as Part of the Comfort)
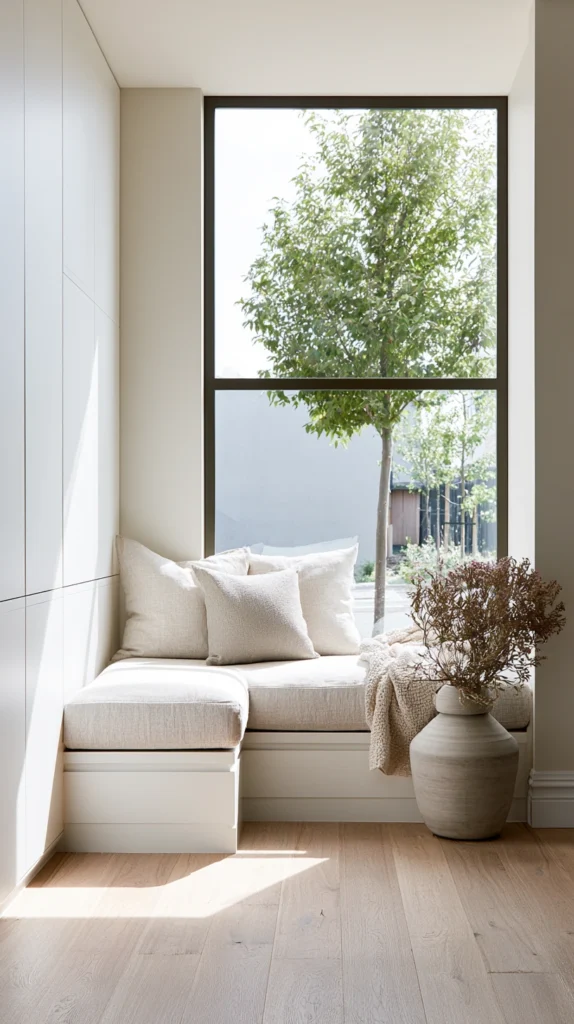
A bench seat built directly beneath or beside a kitchen window, positioning the nook to take advantage of natural light and an outward view — the layout that turns the spot into a genuine retreat rather than just a place to eat.
Why a window changes how the whole nook functions
- The daylight advantage it offers: a window seat gets natural light for a longer stretch of the day than a nook tucked into an interior corner, making it a genuinely pleasant reading or coffee spot even on a gray fall morning
- The view as a built-in amenity: looking out at a changing fall landscape adds a passive, ever-changing element to the nook that no decor choice alone can replicate
- The architectural opportunity it creates: a window seat often allows for built-in storage beneath the bench itself, since the space below a window seat is otherwise difficult to use for anything else
The options
- A bench seat built directly under an existing window, the most classic version of this layout
- A bay or bow window nook, for a more dramatic, fully enclosed seating area
- A window seat with a deep sill used as additional display space, for small plants or seasonal styling
- A window seat paired with a small side table, rather than a full dining table, for a more solitary reading-focused nook
The practical execution
- Measure the window’s height and sill depth carefully before building, since not every window is positioned at a height that comfortably supports a bench below it
- Add a lift-top or drawer storage system beneath the bench if the window seat doesn’t already include one, making efficient use of an otherwise hard-to-access space
- Layer window treatments (see Idea #8) to manage both light and the warmth lost through window glass specifically in this spot
Cost breakdown
- DIY window seat bench, materials: $200–600
- Professionally built window seat with storage: $1,000–3,000+
- Total: $200–3,000+, depending on scope
3. The Upholstered Bench With Hidden Storage (Comfort and Function in One Piece)

An upholstered bench seat, often with a lift-top or drawer storage system built into its base — the seating choice that adds genuine softness underneath while also solving a kitchen’s perpetual storage shortage.
Why upholstery and storage together earn a dedicated spot on this list
- The comfort upgrade over a hard wood bench: a fully upholstered seat, rather than a wood bench topped only with a cushion, provides consistent comfort across the entire seat rather than just wherever a cushion happens to sit
- The dual-purpose function it adds: in a kitchen where storage is almost always at a premium, a bench that also holds linens, extra dishware, or out-of-season items earns its footprint twice over
- The upholstery fabric opportunity: a fully upholstered bench introduces a much larger fabric surface than a simple seat cushion, giving the nook a real opportunity for color and pattern
The options
- A fully upholstered bench with a lift-top seat, combining maximum comfort with hidden storage
- An upholstered bench with drawers built into the front, for storage accessed without lifting the seat itself
- A tufted or channel-stitched upholstery style, adding texture beyond a simple flat cushion
- A performance fabric upholstery, chosen specifically for durability in a kitchen environment prone to spills
The practical execution
- Choose a performance or outdoor-rated fabric for any upholstered kitchen bench, given how much more wear this surface sees compared to upholstered furniture elsewhere in the house
- Confirm the lift-top or drawer mechanism is rated for regular daily use, not just occasional access, if the storage underneath is meant to be a genuinely active part of the kitchen’s organization
- Add a removable cushion cover or slipcover over the main upholstery for an extra layer of stain protection that can be washed separately
Cost breakdown
- DIY upholstered bench conversion: $150–400
- Professionally upholstered bench with storage: $600–1,800
- Total: $150–1,800, depending on scope
4. The Layered Cushion and Throw Pillow System (The Fastest Comfort Upgrade Available)
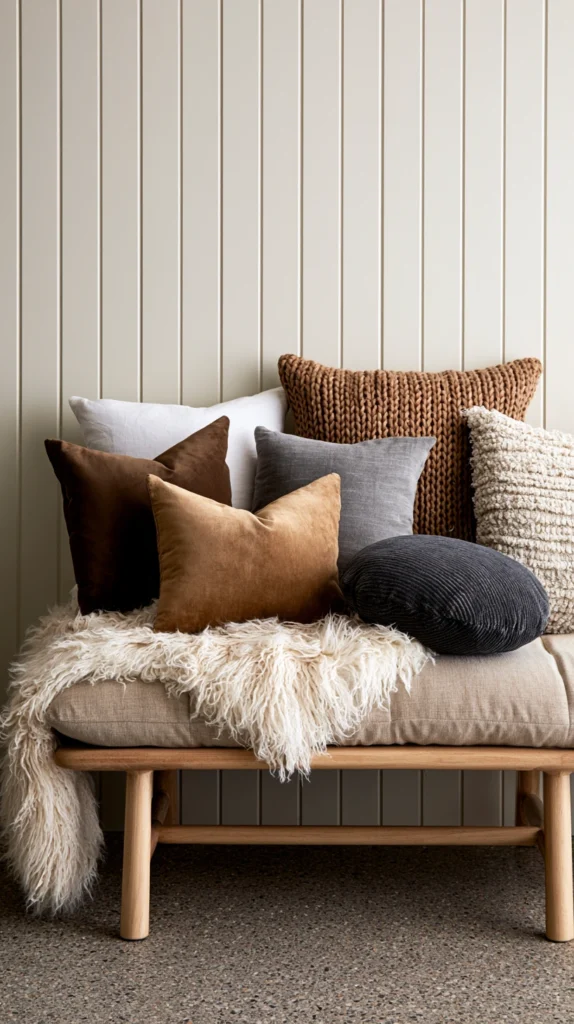
A thick seat cushion, paired with a curated mix of throw pillows in varying sizes and textures — the lowest-cost, fastest way to make an existing bench or banquette feel genuinely cozy rather than simply functional.
Why layering cushions matters more than any single cushion choice
- The comfort threshold a single thin cushion rarely meets: a bench seat needs real depth and density in its cushioning to feel genuinely comfortable for an extended sit, not just a thin pad that technically softens the wood beneath it
- The visual warmth pillows add beyond function: a cluster of varied throw pillows introduces color, pattern, and texture in a way a single flat seat cushion alone can’t
- The seasonal flexibility this layer offers: unlike the bench itself, cushion covers and throw pillows can be swapped easily as the season changes, keeping the nook feeling current without any structural changes
The options
- A high-density foam seat cushion, cut to the bench’s exact dimensions for full coverage
- A mix of lumbar and square throw pillows, in varying but coordinated colors
- Velvet or corduroy pillow covers, adding a tactile warmth that linen or cotton don’t provide
- A single long bench cushion versus individual seat cushions, depending on whether a more tailored or more relaxed look is preferred
The practical execution
- Choose foam at least 3–4 inches thick for genuine comfort, rather than a thinner pad that compresses quickly under regular use
- Use a washable or removable cover on the main seat cushion specifically, given how much food and spill exposure this surface gets
- Limit the throw pillow count to what the bench can hold without overwhelming the actual usable seating space, since too many pillows can defeat the purpose of a seat meant to be sat in
Cost breakdown
- Custom-cut foam cushion, with cover: $80–200
- Throw pillows, a set of 4–6: $60–150
- Total: $140–350
5. The Pendant Light Over the Nook (A Dedicated Fixture for a Defined Spot)
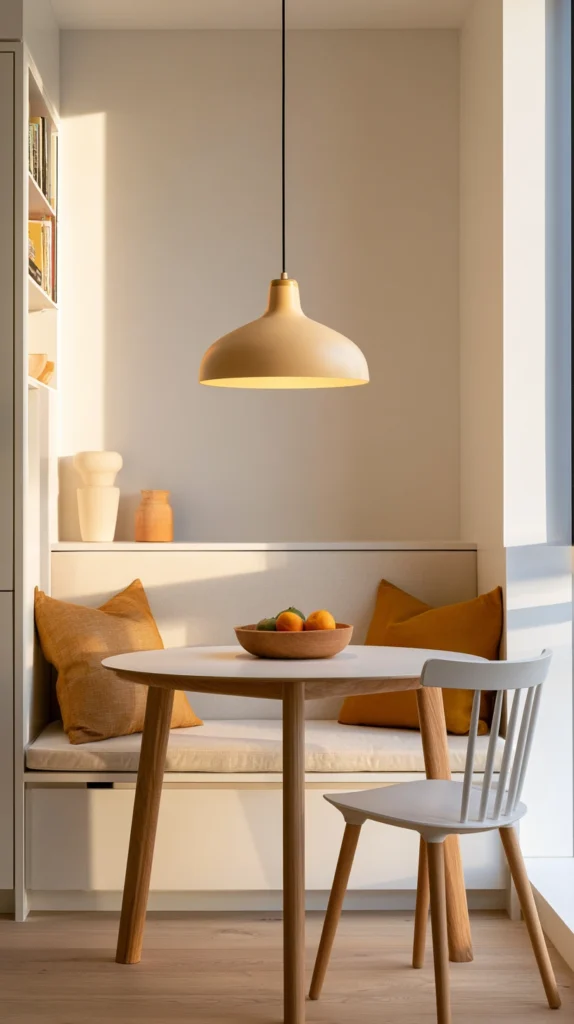
A pendant light or small chandelier, hung directly above the nook’s table, separate from the kitchen’s main overhead lighting — the fixture that gives the nook its own clear identity within the larger room.
Why the nook deserves its own dedicated light source
- The zone-definition function: a pendant hung specifically over the nook visually separates it from the rest of the kitchen, reinforcing the sense of a room within a room established by the bench itself
- The mood-setting value beyond general kitchen lighting: the nook’s main overhead kitchen light is built for task visibility, while a pendant over the table can be warmer, dimmer, and more atmospheric, suited to lingering rather than chopping vegetables
- The early-darkness case fall specifically creates: as daylight shortens, the nook’s pendant becomes a more significant light source for more hours of the day, particularly if the spot is used for an evening cup of tea or a homework session after dark
The options
- A single pendant, centered directly above the table
- A small chandelier, for a more substantial, slightly more formal nook
- A linear or multi-arm fixture, suited to a longer bench and table combination
- A pendant on a separate dimmer switch, allowing the nook’s light to be adjusted independently from the rest of the kitchen**
The practical execution
- Hang so the bottom of the fixture sits 28–34 inches above the tabletop, low enough to feel intimate without obstructing sightlines across the table
- Size the fixture to roughly half to two-thirds the width of the table beneath it, for proper visual proportion
- Confirm the fixture is wired to its own switch where possible, separate from the kitchen’s main lighting, so the nook can be lit on its own for an evening visit without turning on the entire room
Cost breakdown
- Budget pendant: $50–120
- Mid-range statement fixture: $150–350
- Total: $50–350
6. The Mismatched Bench-and-Chair Combination (Asymmetry That Adds Character)
A bench on one side of the table paired with individual chairs on the other, rather than bench seating on every side — the layout that introduces visual variety and a more relaxed, gathered feeling than a fully matched banquette.
Why mixing seating types works better than full uniformity
- The character it adds over a fully matched set: a bench paired with two or three individual chairs reads as more personal and assembled over time than a banquette built and upholstered as a single uniform unit
- The flexible capacity it offers: chairs can be pulled out, added, or removed far more easily than bench seating, giving this layout more day-to-day flexibility for varying group sizes
- The lower upfront cost in many cases: a single bench paired with existing or secondhand chairs is often less expensive than a full custom-built banquette on every side
The options
- A wood bench paired with two or three mismatched wood chairs, varying in finish or style
- A bench paired with a single chair at each end, for a more symmetrical but still varied look
- An upholstered bench paired with wood chairs, mixing material as well as form
- A bench on the window side paired with chairs facing into the room, balancing the view access from Idea #2 with flexible seating elsewhere**
The practical execution
- Anchor the mismatched chairs with one consistent element — the same seat height, or a shared wood tone — so the combination reads as intentional rather than simply incomplete
- Source chairs secondhand or from estate sales for genuine variety and character, rather than buying a full new set
- Cushion the chairs to match the bench’s comfort level, so the seating doesn’t feel notably less comfortable on one side of the table than the other
Cost breakdown
- Bench: covered under Idea #1 or #3
- Secondhand chairs, each: $20–80
- A full set of 2–3 chairs: $60–240
- Total: $60–240, in addition to the bench itself
7. The Built-In Shelving or Display Flanking the Nook (Storage and Styling Around the Seat)
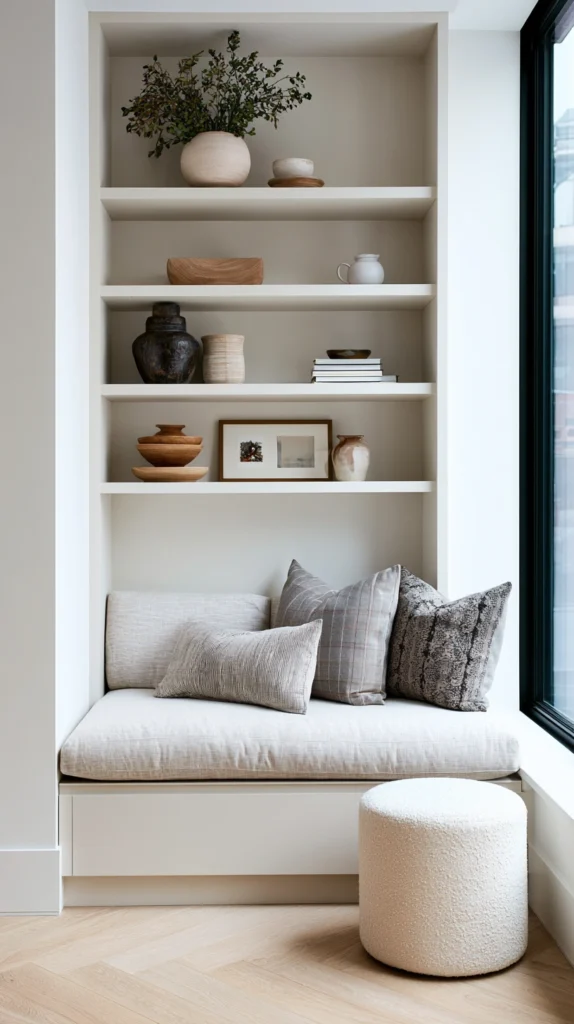
Open shelving or a small built-in cabinet, installed on the wall directly beside or above the nook — the addition that gives the spot a sense of being fully furnished, not just a bench and a table dropped into a corner.
Why flanking storage matters as much as the seating itself
- The completed-room effect it creates: shelving beside the nook gives the whole corner the same sense of intention a living room gets from a bookshelf beside an armchair, rather than leaving the nook feeling like an isolated piece of furniture
- The practical storage it adds for the nook’s own use: a stack of books, board games, or table linens specific to this spot can live right beside it rather than being stored elsewhere in the kitchen
- The styling opportunity it provides: open shelving beside the nook becomes a natural spot for the kind of small seasonal vignette covered elsewhere in kitchen styling — a candle, a small plant, a stack of cookbooks
The options
- Open floating shelves, mounted on the wall beside the nook
- A small built-in cabinet, for more concealed storage alongside open display space
- A single shelf positioned above the bench’s back, for decor rather than functional storage
- Shelving that wraps the corner, following the same L-shape as an L-shaped banquette below it**
The practical execution
- Mount shelves at a height that doesn’t interfere with anyone sitting or standing near the bench
- Style with a mix of practical items — books, games — and purely decorative ones, the same vignette-building principle used throughout kitchen and entryway styling
- Anchor heavier shelving into wall studs, particularly important for any shelf intended to hold books or stacked dishware rather than purely lightweight decor
Cost breakdown
- Open floating shelf, each: $20–45
- A small built-in cabinet: $150–400
- Total: $20–400, depending on the option chosen
8. The Curtain or Roman Shade (Softening the Nook’s Window and Managing Fall’s Light)
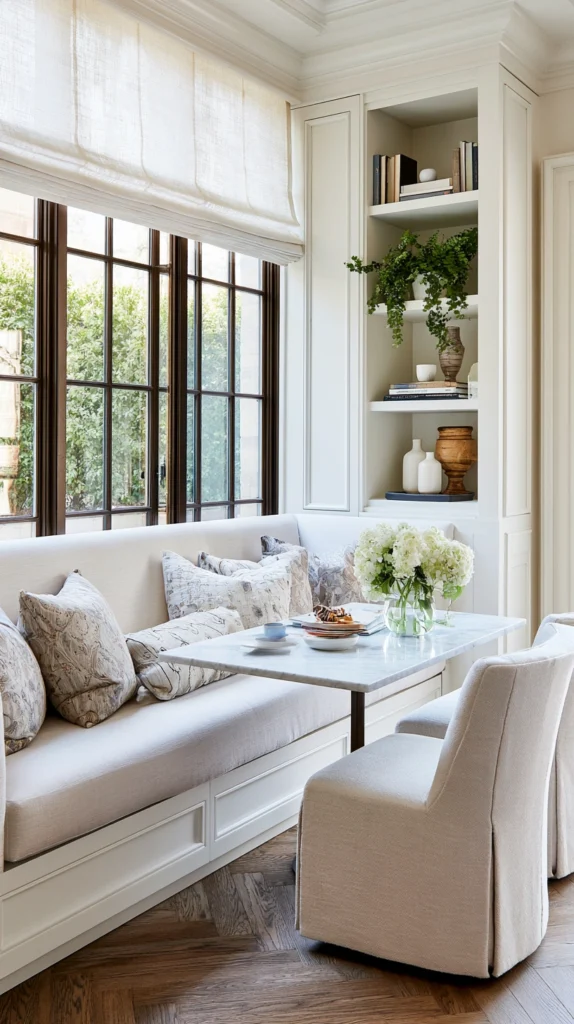
A fabric curtain or Roman shade, installed over the nook’s window — the textile layer that adds softness to the spot’s hardest surface while also managing the practical light and heat issues a window-adjacent seat faces specifically in fall.
Why the nook’s window needs more than the rest of the kitchen’s windows do
- The proximity factor: a window directly beside or above a seating spot affects comfort more directly than a window elsewhere in the kitchen, since cold glass and direct glare are both felt right where someone is sitting
- The softening effect on an otherwise hard-surfaced corner: between the bench, the table, and the window itself, a nook can read as fairly hard and unsoftened without a fabric layer somewhere in the mix
- The heat retention benefit specifically relevant to fall: a window-adjacent nook loses warmth faster than the rest of the kitchen, and a closed curtain or shade in the evening genuinely helps retain heat right where people are sitting
The options
- A simple Roman shade, for a tailored, lower-profile window treatment that doesn’t compete with the bench cushions
- A café curtain, covering only the lower half of the window for privacy while preserving the most light
- A full curtain panel, for a softer, more traditional look paired with a deeper window
- A patterned fabric, echoing or complementing the throw pillow choices from Idea #4 for a cohesive textile story
The practical execution
- Measure the window carefully, since nook windows are sometimes a nonstandard size given their specific architectural placement
- Choose a washable fabric, given the window’s proximity to a spot where food and drink are regularly used
- Close window treatments specifically in the evening for the heat-retention benefit, rather than leaving them open all day out of habit
Cost breakdown
- Roman shade: $30–80
- Curtain panels, a pair: $30–70
- Total: $30–80
9. The Faux Fur or Sheepskin Throw Layer (Texture That Signals Fall Immediately)
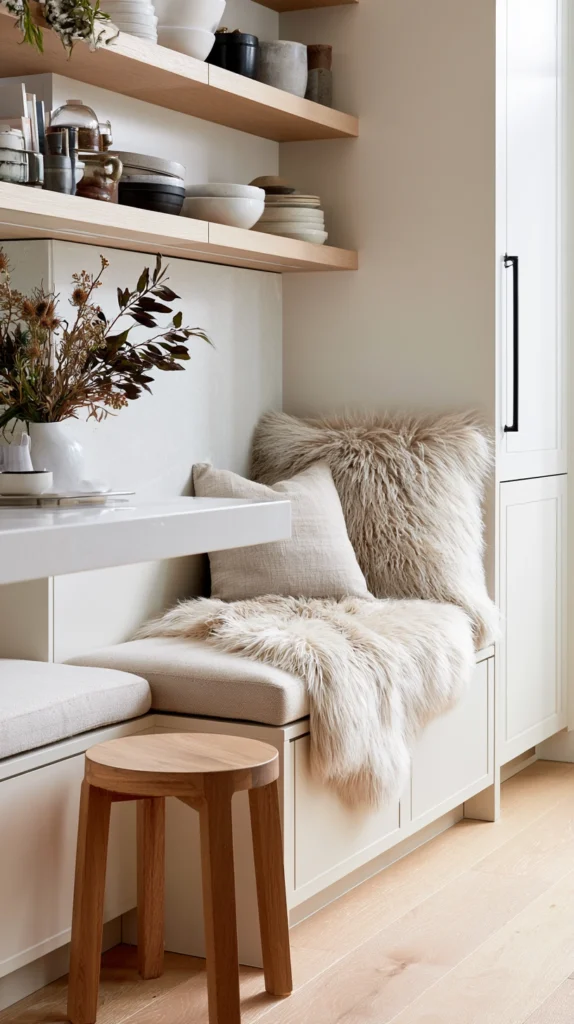
A faux fur or sheepskin throw, draped over the back or seat of the bench — the texture layer most immediately associated with the season, and one of the fastest single additions to make a nook feel cozy.
Why this specific texture earns its own dedicated idea
- The instant seasonal signal it provides: few textures read as immediately cozy and fall-appropriate as a sheepskin or faux fur throw, more so than a flat woven blanket alone
- The tactile invitation it creates: a soft, textured throw draped over a bench doesn’t just look inviting, it visibly suggests the kind of lingering comfort the whole nook concept is built around
- The low-commitment, easy-to-style nature of the addition: unlike reupholstering a bench or adding built-in shelving, this is a purely textile layer that can be added in minutes and adjusted seasonally without any tools
The options
- A faux sheepskin throw, draped over one end of the bench or a single chair
- A genuine sheepskin, for a more substantial, authentic texture and warmth
- A chunky knit throw blanket, for a different but equally cozy texture alternative
- A mix of a sheepskin and a folded knit throw together, layering two different textures on the same bench
The practical execution
- Drape rather than fold flat, allowing the throw’s natural texture and shape to read clearly rather than disappearing into a tidy stack
- Position at one end of the bench rather than spread evenly across the whole seat, keeping the rest of the bench fully usable
- Shake out and fluff periodically, since this texture flattens with regular use more visibly than a flat woven throw would
Cost breakdown
- Faux sheepskin throw: $20–45
- Genuine sheepskin: $50–120
- Total: $20–120
10. The Curved Banquette (A Softer Shape for a Softer Feeling)
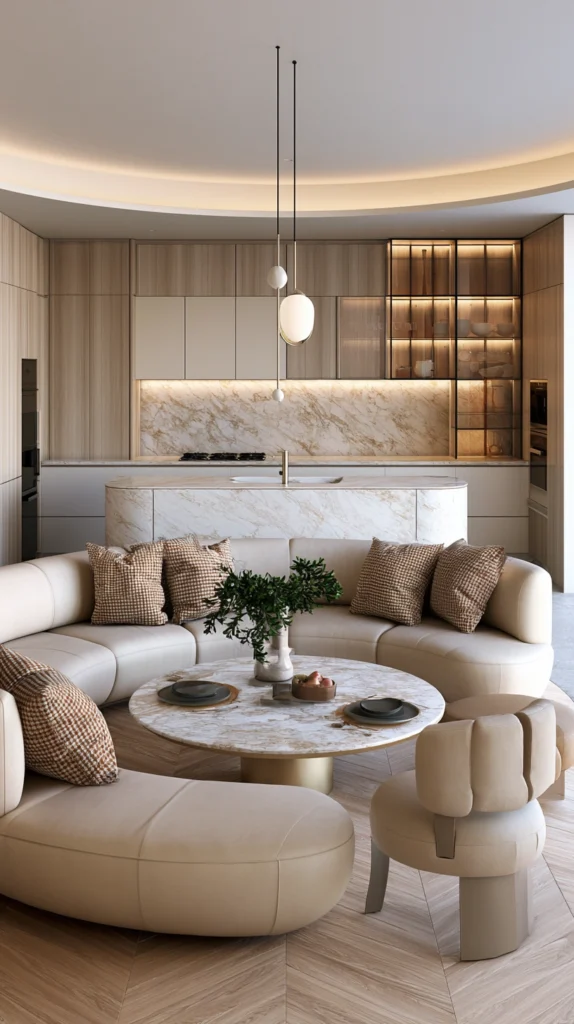
A curved or rounded bench, rather than the standard straight or L-shaped banquette, wrapping a table in a gentle arc — a less common but increasingly popular shape that reinforces the nook’s sense of enclosure even more than a straight bench does.
Why a curved shape changes the feeling of the whole nook
- The enclosure effect it amplifies: a curved bench wraps around the table and the people seated at it more completely than a straight or angled bench, intensifying the sense of a contained, protected spot
- The conversational benefit it offers: a curve naturally angles seated guests slightly toward each other and the table’s center, encouraging conversation in a way a straight bench against a flat wall doesn’t
- The softer visual language it introduces: in a kitchen otherwise full of straight lines and right angles — cabinets, counters, appliances — a curved bench stands out as a deliberately different shape, reinforcing the nook’s identity as a distinct, softer space within the room
The options
- A fully curved booth-style bench, wrapping most or all the way around an oval or round table
- A gently curved bench on just one side, paired with straight seating or chairs elsewhere
- A curved bench built into a bay window, combining this idea directly with Idea #2
- A curved bench with a tufted or channeled upholstery pattern, emphasizing the curve’s shape even further through the fabric detailing**
The practical execution
- Pair with a round or oval table rather than a rectangular one, since a curved bench is built specifically to follow a rounded table’s shape
- Expect a higher cost and more specialized construction than a standard straight bench, since curved cabinetry and upholstery both require more skilled labor
- Confirm the curve’s radius is gentle enough to remain comfortable for genuine extended sitting, rather than so tight that it becomes awkward for anyone seated at the bench’s furthest points
Cost breakdown
- DIY curved bench, materials: $400–900
- Professionally built and upholstered curved banquette: $2,000–5,000+
- Total: $400–5,000+, depending on scope
11. The Corner Maximization Layout (Getting the Most From a Small, Awkward Space)
A nook specifically designed to fill an oddly shaped or underused kitchen corner — built to the exact dimensions of the available space rather than fitting a standard pre-built bench into whatever room happens to be left over.
Why a custom corner approach outperforms a generic furniture solution
- The exact-fit advantage: many kitchen corners are irregular, interrupted by a support post, a window at an unusual height, or an angled wall, and a custom-built nook can work around those specifics in a way a standard rectangular bench can’t
- The wasted-space reclamation it offers: corners are frequently the most underused square footage in an entire kitchen, and a nook built specifically for that shape turns genuinely dead space into the room’s coziest feature
- The space-efficiency it provides for a smaller kitchen overall: a corner nook, built to fit precisely, often takes up less total floor space than a freestanding table-and-chairs arrangement achieving the same seating capacity
The options
- An L-shaped bench built to match an L-shaped corner exactly, maximizing every inch of the available footprint
- A triangular or wedge-shaped bench, for a particularly tight or unusually angled corner
- A nook built around a structural element, like a support post or chimney breast, incorporating it into the design rather than working around it awkwardly
- A nook with a custom-shaped table, cut to fit the exact bench configuration rather than using an off-the-shelf table shape**
The practical execution
- Measure the corner’s actual dimensions precisely, including any irregularities, before designing or ordering any bench
- Work with a carpenter experienced in built-in furniture for any genuinely irregular space, since a generic prefabricated bench rarely fits a non-standard corner well
- Consider a custom or cut-to-fit table top specifically, rather than assuming a standard rectangular or round table will fit the resulting bench shape correctly
Cost breakdown
- Custom-built corner bench, materials and labor: $800–2,500
- Custom-cut table to match: $200–600
- Total: $1,000–3,100
12. The Art or Display Wall Behind the Bench (Personality at Eye Level While Seated)
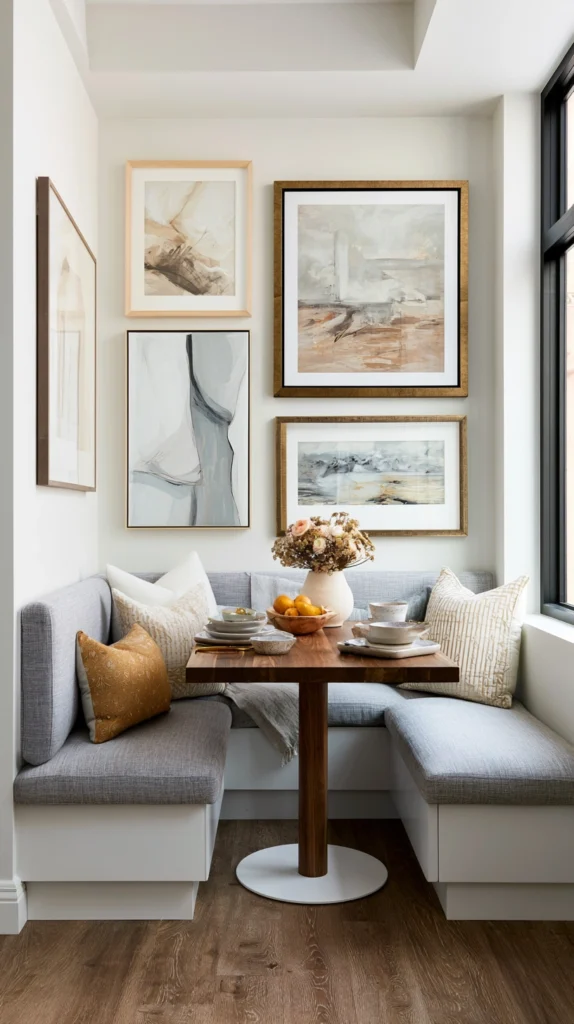
A small gallery wall, a single statement piece of art, or a styled display, hung on the wall directly behind the bench’s back — the detail that gives someone sitting in the nook something specific to look at, and gives anyone glancing over from elsewhere in the kitchen a clear visual focal point.
Why the wall behind the bench deserves deliberate attention
- The seated sightline it addresses directly: unlike most wall decor, this wall is seen primarily by someone sitting with their back to it, or by anyone facing the nook from across the room, both of which are specific, predictable vantage points worth designing for intentionally
- The personality layer it adds to an otherwise furniture-defined space: the bench, table, and cushions establish the nook’s comfort, but the wall behind it is where the spot’s actual personality and point of view get expressed
- The protective function some display choices serve: certain art or display choices, like a row of small shelves, also protect the wall itself from the wear a frequently-used bench back can cause over time
The options
- A small gallery wall, mixing art, photos, and small objects above the bench’s back
- A single oversized piece of art, for a simpler, more graphic statement
- A mix of art and small shelving, combining personality with the storage function from Idea #7
- A patterned wallpaper application, treating the entire wall as the display rather than hanging individual pieces on top of a plain surface**
The practical execution
- Hang the lowest edge of any art or shelving high enough to clear the heads of anyone seated on the bench, avoiding a constant bump against the wall
- Choose pieces that hold up to a bit of incidental contact, given how close this wall sits to a high-use seating spot
- Coordinate loosely with the throw pillow and cushion palette from Idea #4, so the wall and the seating read as part of the same considered space rather than two unrelated decisions
Cost breakdown
- Frames and small art pieces, a gallery wall of 4–6: $50–150
- A single statement art piece: $60–200
- Total: $50–200
13. The Radiator or Heated Bench Pairing (Real Warmth Built Into the Seat Itself)

A bench positioned directly above or beside an existing radiator, or fitted with a small heated cushion pad, providing actual warmth at the seat rather than relying on ambient room heat alone.
Why genuine heat at the seat matters more in this specific spot
- The window-proximity cold it counters directly: many nooks, especially window seats, sit in one of the coldest parts of the kitchen, and a heat source positioned right at the seat addresses that directly rather than depending on the room’s general heating to compensate
- The extended-sit comfort it enables: a nook meant to be used for a slow morning or a long afternoon benefits disproportionately from real warmth, since the comfort of a long sit depends more on temperature than a quick meal ever did
- The practical integration it allows with an existing radiator: many older homes already have a radiator positioned beneath or near a window, and a bench built to incorporate it, rather than work around it, turns an existing heat source into part of the seating design itself
The options
- A bench built with a radiator grille or vented panel, allowing an existing radiator to heat the space without being blocked by solid bench construction
- A bench with a small heated cushion pad, for spaces without an existing radiator to work around
- A bench positioned strategically near, but not directly blocking, a floor vent or other existing heat source
- A bench with a low-profile electric under-seat warmer, for a more modern, retrofit-friendly heating option**
The practical execution
- Never fully enclose or block an existing radiator with solid bench construction, since this both reduces heating efficiency and can pose a safety issue; use a vented or grille-front design instead
- Choose a heated cushion pad rated specifically for furniture use, with proper safety certifications, rather than improvising with a product meant for another purpose
- Position any heat source to warm the seat without overheating cushion fabric or foam to the point of damage over repeated use
Cost breakdown
- Heated cushion pad: $30–70
- Custom bench built around an existing radiator: $400–1,200 additional over a standard bench build
- Total: $30–1,200, depending on the approach and whether a radiator is already present
14. The Layered Rug Underfoot (Warmth and Definition for the Floor Beneath the Table)
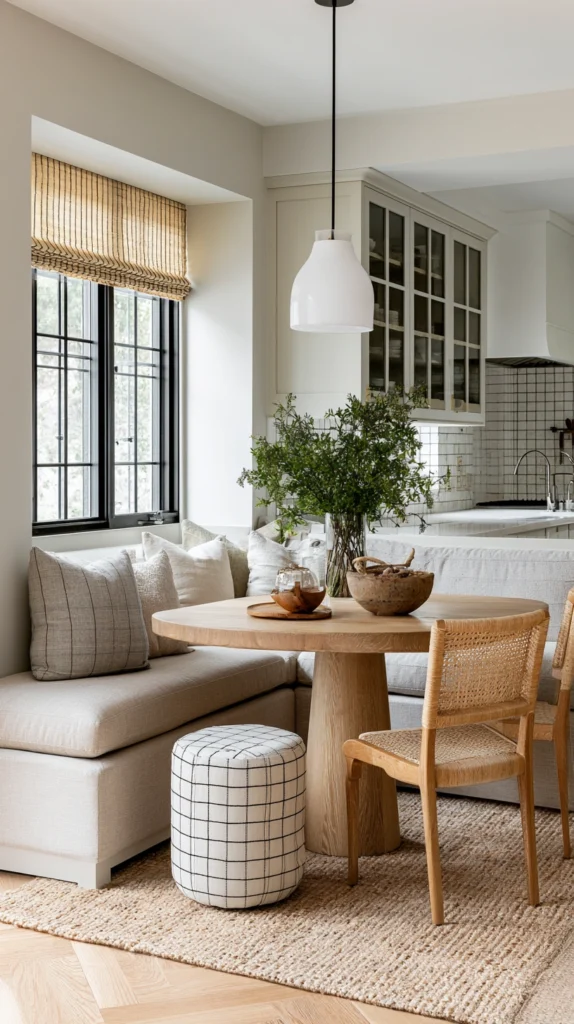
An area rug, placed beneath the nook’s table and extending slightly under the bench, grounding the floor the way a rug defines a living room seating area.
Why the floor deserves the same layering attention as the bench above it
- The cold-floor problem most kitchens share: kitchen flooring is frequently tile, stone, or hard vinyl, chosen for durability and easy cleaning, and that same flooring turns genuinely cold underfoot once fall temperatures drop
- The visual grounding it provides: a rug beneath the nook’s table defines the spot’s floor boundary the same way the bench defines its seating boundary, reinforcing the sense of a distinct space within the larger kitchen
- The sound-softening bonus in a hard-surfaced room: kitchens often have more echo and hard-surface noise than other rooms, and a rug beneath the table specifically softens some of that within the nook itself
The options
- A flatweave or low-pile rug, durable enough to handle kitchen spills and easy to clean
- A washable rug, specifically rated for kitchen and high-spill environments
- A vintage or distressed-look rug, already forgiving of the wear a high-use spot puts on it
- A round rug, paired with the curved banquette from Idea #10 for a shape-matched look**
The practical execution
- Choose a flatweave or low-pile material over a plush rug, since a deep pile both traps crumbs more easily and creates an uneven surface for chair legs to slide on
- Size the rug to extend a few inches beyond the bench and chair legs on every side, rather than leaving a narrow gap of bare floor at the edges
- Clean significantly more often than a rug elsewhere in the house, given the kitchen’s higher spill and crumb exposure
Cost breakdown
- Budget flatweave or washable rug: $50–120
- Mid-range rug: $120–300
- Total: $50–300
15. The Seasonal Tablescape (A Small, Swappable Centerpiece for the Nook’s Table)
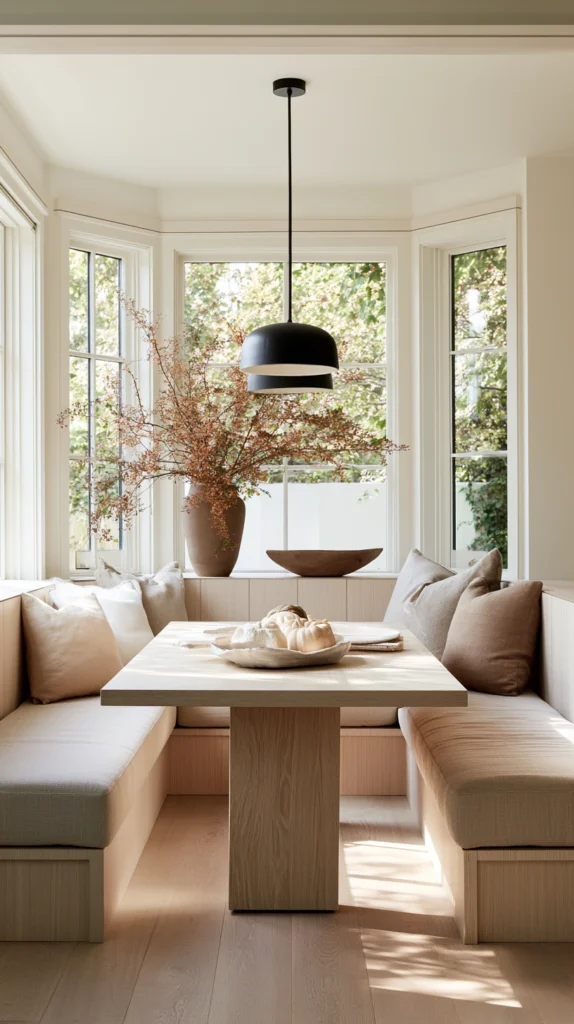
A simple seasonal centerpiece — a small vase, a few gourds, a candle — placed on the nook’s table itself, the finishing touch that signals the season directly on the one surface used every single day.
Why the smallest layer on this list still matters
- The daily-visibility factor: unlike a wall display or a throw blanket, the table’s centerpiece is seen up close every single time the nook is used, making it one of the most consistently noticed details in the entire space
- The low-cost, high-frequency payoff: this is among the least expensive ideas on the list, and because it’s seen so often, it delivers a disproportionate amount of seasonal atmosphere relative to its cost
- The easy rotation it allows: a tablescape can be refreshed in minutes as the season progresses, from early fall gourds to a more pared-down winter version, without touching any other element of the nook
The options
- A small cluster of mini pumpkins and gourds, kept low enough not to block sightlines across the table
- A single low candle or a small grouping of votives, for an evening-appropriate version of the centerpiece
- A small vase of dried branches or wheat, echoing the same dried botanical idea used elsewhere in fall styling
- A simple table runner paired with a low centerpiece, layering the tabletop the same way the bench itself is layered with cushions
The practical execution
- Keep the centerpiece low and narrow enough that it doesn’t block conversation or sightlines across a typically small nook table
- Choose stable, low-tip-risk pieces, given how often a nook table gets bumped or leaned on during regular use
- Refresh the arrangement every few weeks through the season, replacing anything that’s begun to fade, soften, or lose its shape
Cost breakdown
- Small gourds or mini pumpkins: $8–18
- Candle or votive set: $12–25
- Total: $8–43
The small bowl of gourds on the table, glimpsed every morning over coffee: the smallest detail on this entire list, and often the one that makes the nook feel genuinely lived in rather than simply furnished.
The Cozy Kitchen Nook Roadmap
The work, sequenced:
Phase One (the structural seating):
- The built-in banquette bench (#1) or the window seat nook (#2) or the curved banquette (#10) or the corner maximization layout (#11) — choose based on the space available
- The upholstered bench with hidden storage (#3), if not already incorporated into the structural choice above
Phase Two (the light and warmth systems):
- The pendant light over the nook (#5)
- The radiator or heated bench pairing (#13)
- The curtain or Roman shade (#8)
Phase Three (the comfort layers):
- The layered cushion and throw pillow system (#4)
- The faux fur or sheepskin throw layer (#9)
- The layered rug underfoot (#14)
Phase Four (the finishing and personality touches):
- The mismatched bench-and-chair combination (#6), if applicable to the layout
- The built-in shelving or display flanking the nook (#7)
- The art or display wall behind the bench (#12)
- The seasonal tablescape (#15)
Getting Started This Weekend
The immediate-impact nook refresh:
One afternoon, three changes:
- Add a thick seat cushion and a few throw pillows to the existing bench or chairs (Idea #4)
- Drape a faux fur or knit throw over one end of the seating (Idea #9)
- Set a small seasonal centerpiece on the table (Idea #15)
Total cost: $170–400. Time: about an hour. The nook will already feel like a genuine destination by the time the work is done, without a single structural change.
The structural investment (the next big project):
The built-in banquette bench (Idea #1) is the single most transformative project on this list, if the kitchen doesn’t already have one. Once it’s in place, every other idea — the cushions, the pendant, the rug, the throw — has a defined structure to layer onto, rather than working around a generic table-and-chairs setup that was never quite built to feel like its own space.
What a genuinely cozy fall kitchen nook provides that a quick-use breakfast spot can’t:
The comfort that invites a long sit, not just a fast meal:
- A bench deep and cushioned enough to actually settle into
- A heated seat or radiator pairing solving the cold that comes with sitting near a window
- A throw and rug layering warmth from the shoulders down to the floor
The sense of a defined space within the larger kitchen:
- A built-in bench or curved banquette creating real enclosure
- A dedicated pendant light separating the nook from the kitchen’s main task lighting
- Flanking shelving and wall art giving the spot a finished, considered identity
The seasonal connection that makes the nook feel current, not static:
- A window seat framing fall’s changing light and color directly at eye level
- A swappable tablescape keeping the surface feeling fresh through the season
- A faux fur throw and a few cushion covers updating the whole feel of the spot in under an hour
A kitchen nook was never meant to be just the place breakfast happens before everyone scatters for the day. Built and layered with real comfort in mind, it becomes the spot people actually choose to sit in, long after the plate’s been cleared. The bench built on a weekend is still the first place anyone reaches for a coffee on a cold morning months later. The throw draped over its arm on a quiet afternoon is the reason no one’s in a hurry to get up.