14 Fall Herb and Plant Display Ideas for Kitchens
Most kitchen herb gardens live outside, in a raised bed or a few pots by the back door, and get checked on the way to somewhere else. Through summer, that arrangement works fine — a quick trip outside for basil or rosemary costs nothing more than a few extra steps.
That setup stops working the moment the weather turns. Once frost is a real possibility and the walk outside means a coat instead of bare feet, the herbs that were so convenient all summer become a genuine inconvenience, or worse, they’re simply lost to the first hard freeze before anyone thought to bring them in. A kitchen herb garden that survives fall has to actually live in the kitchen, not just be referenced from it.
A fall kitchen plant display isn’t a smaller, sadder version of a summer garden. It’s a different kind of growing and styling project entirely — one built around a window’s actual light, a counter’s actual space, and a level of display intention an outdoor bed never had to bother with. Done well, the kitchen’s indoor greenery can look better and serve the cook more directly than the outdoor garden ever did.
Here are 14 ideas for displaying herbs and plants in a kitchen specifically built for fall, when the garden comes inside.
Why Fall Kitchen Plant Display Plays by Different Rules Than Summer
The rules are not the same for every season of kitchen greenery:
Summer Kitchen Plant Advantages:
- An outdoor garden doing most of the actual growing work, with the kitchen only hosting what’s freshly cut
- Abundant, reliable natural light requiring no real planning or supplementation
- Minimal display pressure, since most herbs are used quickly and replaced from the garden rather than maintained as a long-term indoor feature
The summer kitchen comparison: the kitchen as a brief stopover, not the growing space itself
Fall Kitchen Plant Advantages and Realities:
- The kitchen becomes the primary growing environment, not just a place herbs pass through on the way to a meal
- Available light shifts and often decreases, requiring real thought about window orientation and possible supplementation
- Plants displayed indoors are seen constantly, all day, making their arrangement matter far more than it did scattered outside
The key insight:
- Summer kitchen plant care rewards convenience and quick harvesting
- Fall kitchen plant care rewards real display planning, since the same plants are now a permanent part of the room’s daily visual experience
- These are different relationships with kitchen greenery, not the same herbs simply moved a few feet indoors
The Light and Placement Reality
The most important decision in fall kitchen plant display:
The window orientation:
- A south-facing window provides the most consistent, strongest light for actively growing herbs through fall and into winter
- East-facing windows offer gentler morning light, suited to lower-light herbs and foliage plants rather than the most sun-hungry varieties
- Know this before choosing what to display where — the prettiest spot in the kitchen isn’t always the spot with enough light to keep a plant alive
The “growing versus styling” calculation:
- Some kitchen greenery is there to be actively used and regrown — basil, mint, parsley harvested regularly
- Some is there primarily for visual texture and color — a trailing pothos, a dried bundle, a foliage plant that rarely gets touched
- Decide which category each plant falls into before placing it, since a actively-harvested herb needs the kitchen’s best light, while a purely decorative plant has more flexibility
Most fall kitchen plant displays build in layers, not all at once:
- The primary growing spot — the best-lit window or counter — gets established first, since it’s the hardest placement decision to undo later
- Secondary display spots — shelves, hanging planters, a counter cluster — come next, once the main growing location is settled
- The smallest finishing touches — a dried bundle, a single styled pot, a label — come last, filling in the kitchen’s remaining personality
1. The Windowsill Herb Row (The Most Classic Kitchen Plant Display)
A row of potted herbs lined up along the kitchen’s sunniest windowsill — the simplest, most universally recognized version of indoor kitchen greenery, and still one of the most effective.
Why this remains the default starting point for good reason
- The light-access logic: a windowsill is, by definition, the spot in the kitchen with the most direct access to whatever natural light is available, making it the natural home for herbs that need to actually keep growing through fall
- The reach-and-use convenience: herbs displayed at the sink or prep area get used far more consistently than ones tucked into a less convenient corner of the kitchen
- The low-footprint simplicity: this idea requires no new furniture or installation, just a windowsill that likely already exists
The options
- Basil, thyme, and rosemary in matching terracotta pots, the most traditional combination
- A single long planter box, rather than individual pots, for a more unified look along the sill
- Mismatched pots in a coordinated color family, for a more gathered, less uniform look
- A mix of culinary and trailing ornamental herbs, for variety in both use and appearance
The practical execution
- Choose herbs suited to the specific window’s actual light level rather than defaulting to whatever’s available at the store, since a north-facing sill supports a very different herb selection than a south-facing one
- Use pots with drainage and a small saucer underneath, protecting the sill from water damage over months of regular watering
- Rotate pots occasionally so growth stays even rather than leaning entirely toward the light source
Cost breakdown
- Terracotta pots, each: $3–10
- Herb plants or starts, each: $4–8
- A planter box with drainage: $20–40
- Total: $25–80 for a full windowsill row
The basil and rosemary lined up at the sink: the display every other idea on this list either complements or competes with for the kitchen’s best light.
2. The Hanging Herb Planters (Claiming the Window’s Vertical Space)

Small planters suspended from a window frame, a ceiling hook, or a simple rod above the windowsill — the display that adds a second growing tier above the standard sill row without using any additional counter or floor space.
Why hanging planters solve a problem the windowsill alone can’t
- The space-multiplying effect: a single window can support both a row of sill pots and a tier of hanging planters above them, roughly doubling the herb capacity in the exact same footprint
- The light-access advantage at a different height: plants hung closer to the top of the window sometimes receive different light intensity and duration than those at sill height, allowing for some natural variation in what thrives where
- The visual layering it adds: a hanging tier above a sill row creates the same kind of height variation that makes any display read as more intentional, the same principle used in styling a console table or a porch arrangement
The options
- Macramé-hung pots, adding woven texture alongside the greenery itself
- A tension rod with S-hooks, mounted inside the window frame for a simple, no-drill installation
- Small ceramic hanging planters, for a more polished, less rustic look than macramé
- A single long hanging planter box, suspended horizontally rather than several individual pots
The practical execution
- Confirm the mounting point — a tension rod, a ceiling hook, a curtain rail — can genuinely support the combined weight of soil, water, and the plant itself
- Position hanging planters high enough to clear anyone working at the sink or counter below, avoiding a constant bump into a swinging pot
- Water carefully, since a hanging planter is more prone to drips landing on the counter or floor below than a sill-based pot
Cost breakdown
- Macramé hanger, each: $8–18
- Small ceramic hanging planter: $12–25
- A full set of 3–4: $40–90
- Total: $40–90
3. The Tiered Plant Stand (A Dedicated Display Piece for Counter or Floor)
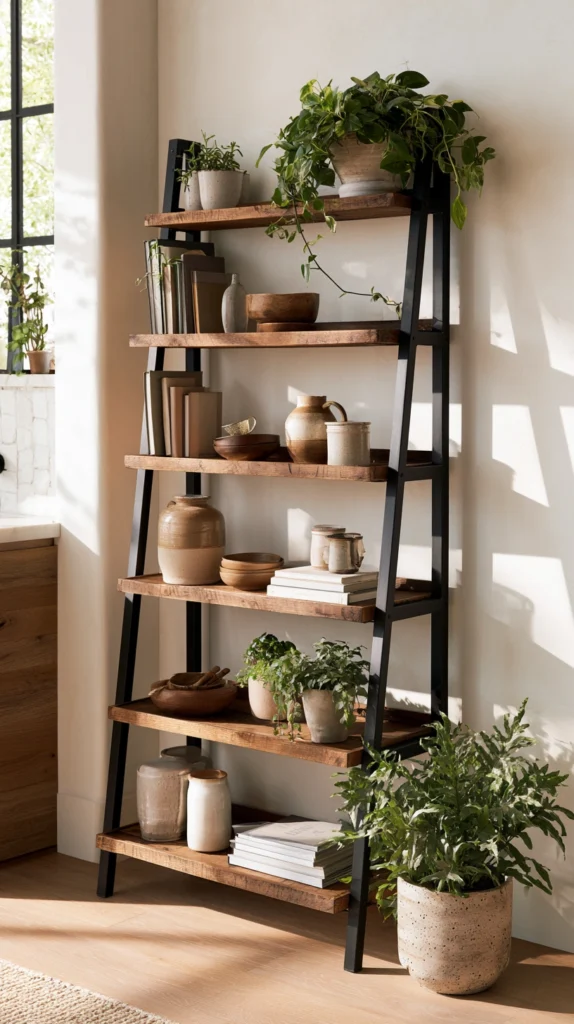
A multi-shelf plant stand, positioned in a kitchen corner or beside a window, holding several pots at staggered heights — the furniture piece that gives kitchen greenery its own dedicated spot rather than competing for space on an already-busy counter.
Why a dedicated stand earns its place beyond just convenience
- The height variation it builds in automatically: a tiered stand creates the same kind of visual layering a hanging planter and a sill row achieve together, but in a single self-contained piece
- The counter space it frees up: kitchens are already crowded with appliances, dishware, and prep space, and a dedicated stand keeps the plant collection from eating into space the kitchen genuinely needs for its primary function
- The flexible placement it allows: unlike a windowsill, which is fixed wherever the window happens to be, a stand can be positioned anywhere in the kitchen with adequate light, including a spot near, but not directly on, the busiest work surfaces
The options
- A wooden ladder-style plant stand, with three or four graduated shelves
- A wrought iron or metal tiered stand, for a more compact footprint
- A corner stand, sized specifically to fit an awkward kitchen corner that would otherwise go unused
- A rolling plant stand, allowing the whole collection to be moved toward better light as the season’s sun angle shifts
The practical execution
- Position near, but not directly in, a window, balancing the stand’s light access against keeping it out of the kitchen’s main traffic path
- Place the most light-hungry plants on the top shelf, where they’re closest to a window’s direct light, and more shade-tolerant varieties on lower shelves
- Use saucers under every pot, since a tiered stand multiplies the number of individual watering points that could drip onto the shelf below
Cost breakdown
- Small tiered plant stand: $30–70
- Larger or more substantial stand: $80–180
- Total: $30–180
4. The Mason Jar Propagation Display (Growth You Can Actually Watch)
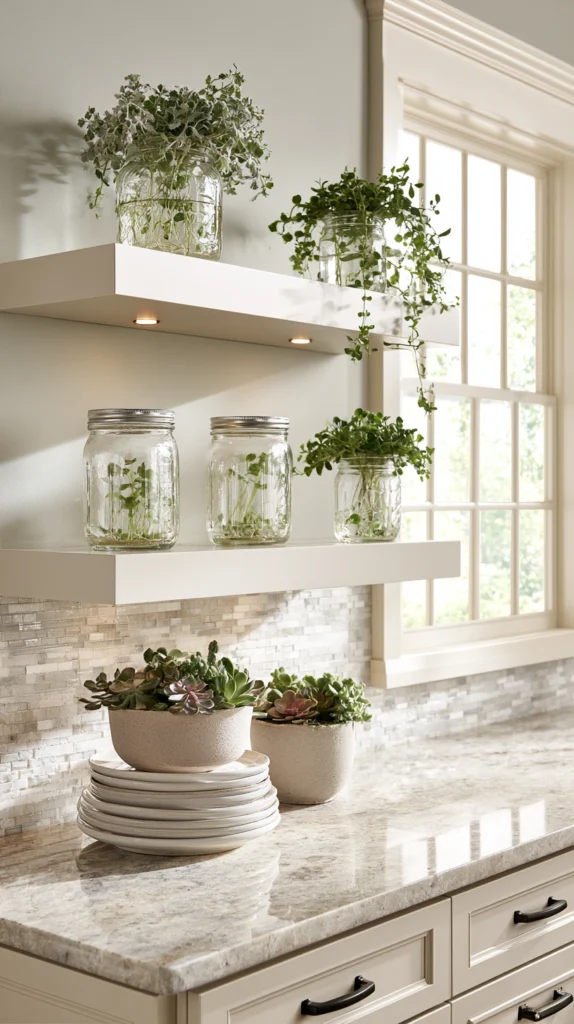
Herb cuttings — mint, basil, rosemary — rooting in water inside clear mason jars, displayed along a windowsill or open shelf — the display that turns the early stage of plant propagation into a genuine visual feature rather than a hidden step.
Why a propagation display earns its own spot on this list
- The visible-growth effect no potted plant offers: watching roots actually develop in clear water is a different kind of visual interest than a fully potted plant provides, adding a sense of ongoing change to the kitchen’s greenery
- The low-cost entry point into a larger herb collection: propagating from a single store-bought herb bunch costs far less than buying multiple established plants, making this one of the most budget-friendly ideas on the entire list
- The natural fall timing it offers: bringing in cuttings from an outdoor herb bed before the first frost, rather than trying to dig up and transplant a full root system, is often the more successful way to carry a summer herb garden into the colder months
The options
- Mint cuttings, among the easiest and fastest herbs to root in water
- Basil cuttings, similarly reliable for water propagation
- A mixed jar collection, with several different herb cuttings rooting side by side
- Rosemary or sage cuttings, slower to root but rewarding for a more patient display
The practical execution
- Change the water every few days, both for the cutting’s health and to keep the display itself looking clean and clear rather than cloudy
- Position in bright, indirect light rather than the most intense direct sun, which can heat the water and stress the developing roots
- Transition cuttings to soil once roots reach a couple of inches in length, moving the jar display to a more permanent potted arrangement elsewhere on this list
Cost breakdown
- Mason jars, a set of 4–6: $10–20
- Herb cuttings, often sourced free from an existing plant or a single store-bought bunch: $0–8
- Total: $10–28
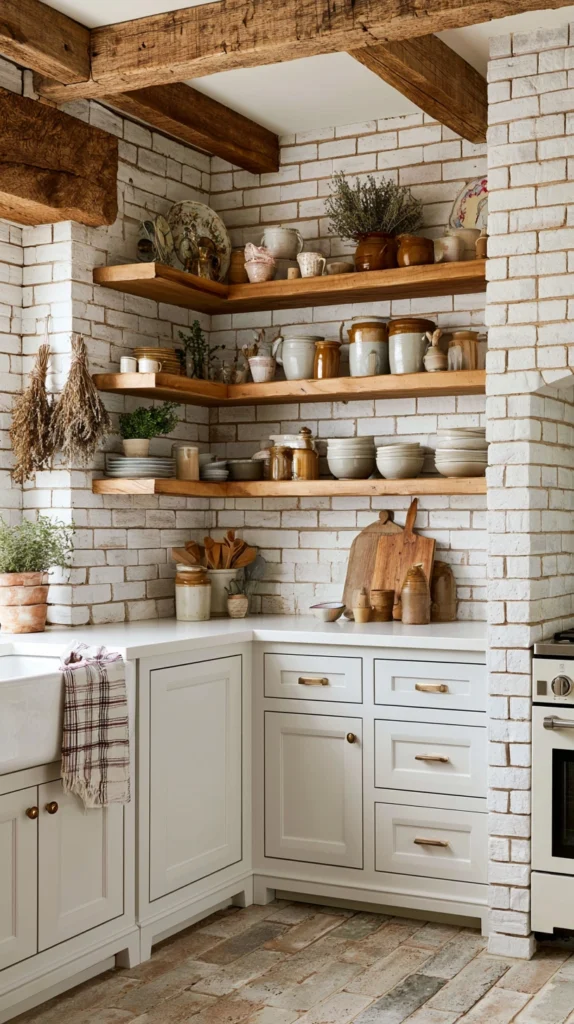
5. The Open Shelf Plant and Dishware Mix (Greenery as Part of the Kitchen’s Display Logic)
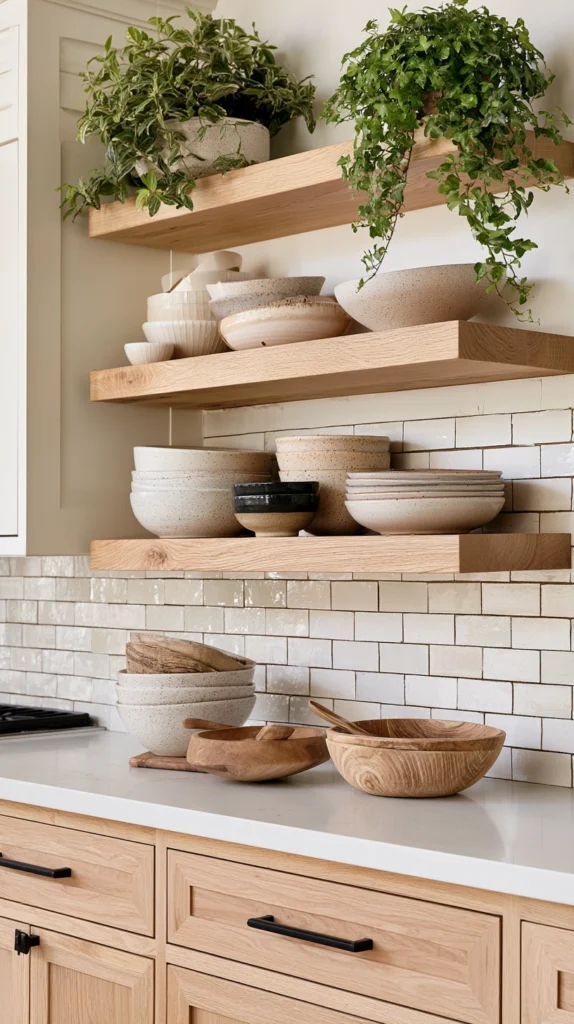
Potted plants integrated directly into open kitchen shelving, displayed alongside dishware, glassware, and cookbooks rather than isolated in a single dedicated plant zone.
Why mixing plants into existing shelving works better than a separate display
- The cohesive styling it creates: rather than treating greenery as a separate category, this approach folds plants into the same open-shelf display logic already used for dishware, the same vignette-building principle used on a console table or entryway shelf
- The texture variety plants add to an otherwise hard-surfaced shelf: ceramic, glass, and wood dominate most open kitchen shelving, and a trailing or upright plant introduces a softer, organic texture among those harder materials
- The flexible placement it allows across multiple shelves: rather than needing one dedicated growing spot, this idea distributes greenery in smaller amounts across several shelves, which can work even in a kitchen without one single great light source
The options
- A trailing pothos or ivy, draping over the edge of an upper shelf
- A small upright herb pot, tucked among stacked plates or bowls on a lower shelf
- Foliage plants chosen for lower-light tolerance, suited to shelving that doesn’t sit directly beside a window
- A mix of real and high-quality faux plants, for shelf positions too far from natural light to support an actual living plant
The practical execution
- Reserve actively growing herbs for shelves closest to a light source, using foliage or faux plants on shelves further from any window
- Group plants with dishware of a complementary color or material, rather than treating the plant as a separate, disconnected object on the shelf
- Check soil moisture regularly for plants tucked among dishware, since these spots are sometimes checked on less often than a dedicated plant stand or windowsill
Cost breakdown
- Small trailing or potted plant, each: $10–25
- A few pieces integrated across existing shelving: $30–75
- Total: $30–75
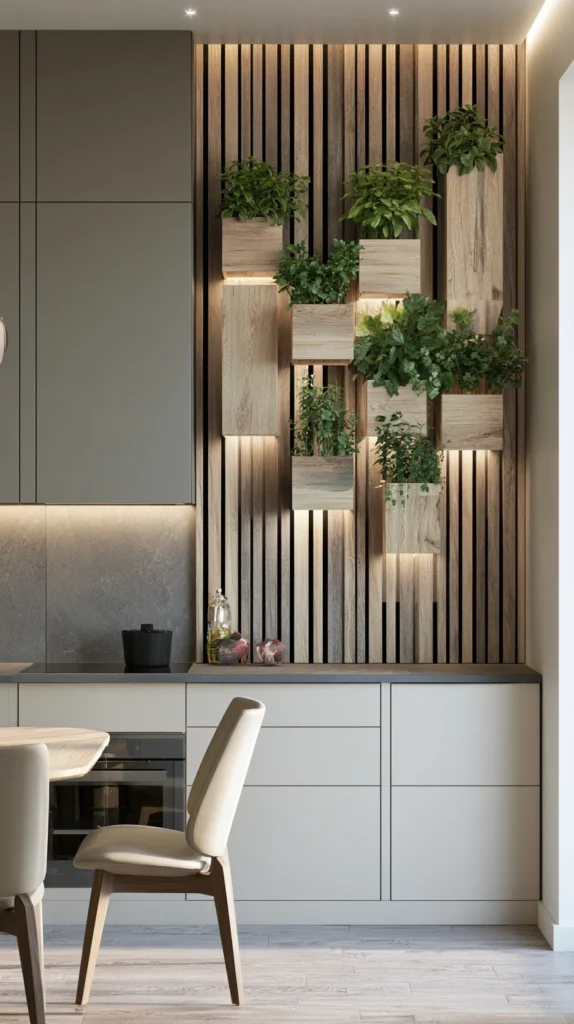
6. The Wall-Mounted Planter or Living Wall (Vertical Greenery Without Any Counter Footprint)
A wall-mounted planter system, ranging from a few individual pockets to a fuller living wall panel, installed on an underused kitchen wall — the display that adds genuine plant volume without claiming a single inch of counter or floor space.
Why a wall system solves the space problem more completely than any other idea on this list
- The zero-footprint advantage: unlike a stand, a hanging planter, or even a windowsill row, a wall-mounted system uses space that wasn’t being used for anything else at all
- The scalable display it allows: this idea works as a single small wall pocket holding one herb, or as a larger panel supporting a dozen or more plants, scaling to whatever wall space and ambition a kitchen actually has
- The visual statement it makes at a larger scale: a fuller living wall becomes one of the most striking, conversation-worthy features in the entire kitchen, well beyond what a simple potted plant collection achieves
The options
- Individual wall-mounted pocket planters, each holding a single herb or small plant
- A modular felt pocket panel, supporting several plants in a single connected unit
- A small living wall system with built-in irrigation, for a larger, lower-maintenance installation
- A simple peg rail with hanging pots, a lower-commitment version of the same vertical concept
The practical execution
- Choose a wall with adequate nearby light, since a wall-mounted system positioned far from any window severely limits which plants can actually thrive there
- Confirm the mounting hardware is rated for the combined weight of soil, water, and plant material, particularly for any larger or fuller panel system
- Plan for water management carefully, since a wall-mounted system positioned above flooring or cabinetry needs a clear plan for drainage or runoff
Cost breakdown
- Individual wall pocket planters, a set of 3–4: $25–60
- Modular felt pocket panel: $40–100
- Living wall system with irrigation: $150–500
- Total: $25–500, depending on scale
7. The Copper or Galvanized Trough Planter (A Single Substantial Container Instead of Several Small Pots)
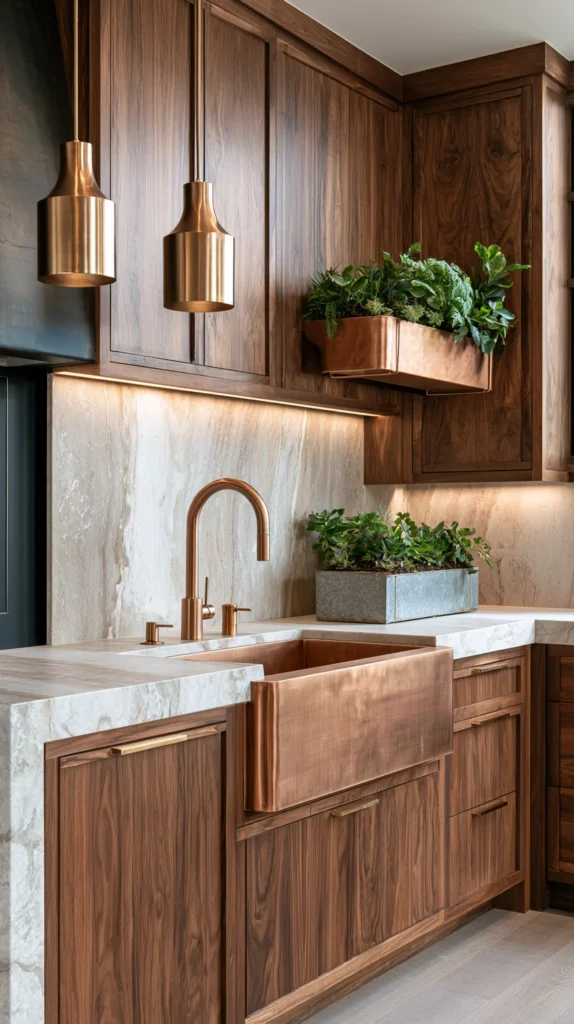
One long, substantial trough planter — in copper, galvanized metal, or a similar material — holding a full row of herbs in a single connected container, rather than several individual pots.
Why one larger container can read as more intentional than several small ones
- The unified, gallery-curated look it creates: a single trough holding multiple herbs together reads as a single deliberate display, where a row of individual mismatched pots can sometimes look more haphazard
- The material warmth it introduces: copper and galvanized metal both bring the same kind of farmhouse-adjacent texture and warmth covered elsewhere in kitchen styling, doing double duty as both planter and decor object
- The practical watering efficiency it offers: a single trough with proper drainage can be watered as one unit rather than checking and watering several individual pots separately
The options
- A galvanized metal trough, the most classic farmhouse-leaning material choice
- A copper trough, for a warmer, more polished metal tone
- A wood trough planter, for a softer material alternative to metal
- A trough divided into separate planting sections internally, allowing different herbs to be planted directly rather than in individual nested pots**
The practical execution
- Confirm the trough has genuine drainage, either built in or via nested individual pots set inside it, since metal containers without drainage can quickly become waterlogged
- Size the trough to the available windowsill or counter space precisely, since this is a less flexible container than a row of smaller, individually repositionable pots
- Line the trough’s interior with a protective layer if planting directly into it, particularly for a copper container, which can react with consistently moist soil over time
Cost breakdown
- Galvanized metal trough: $25–60
- Copper trough: $35–90
- Total: $25–90
8. The Indoor Herb Garden Kit With Grow Light (Solving Fall’s Light Problem Directly)

A self-contained indoor herb garden kit, combining a planter base with an integrated LED grow light — the display option built specifically for kitchens without a window offering enough natural light to keep herbs thriving through fall and winter.
Why a grow light kit earns its place even in a kitchen with a decent window
- The light-shortage problem it solves directly: as fall days shorten, even a previously adequate window may no longer provide enough light duration to keep actively growing herbs healthy, and a grow light removes that uncertainty entirely
- The placement flexibility it provides: because the kit supplies its own light, it can be positioned anywhere in the kitchen — an island, a counter away from any window — rather than being limited to the single best-lit spot in the room
- The consistent, reliable growth it supports: unlike natural light, which varies by weather and time of year, an integrated grow light provides a steady, predictable light source regardless of what’s happening outside
The options
- A compact countertop kit, combining a small planter base with a single adjustable LED arm
- A larger multi-pod system, supporting several different herbs simultaneously under one shared light
- A kit with an automated watering reservoir, reducing the daily maintenance required alongside the lighting solution
- A kit with a built-in timer, automatically running the light for a consistent daily duration without manual adjustment
The practical execution
- Position the kit somewhere it won’t compete visually with the rest of the kitchen’s styling, since the grow light itself is a more utilitarian object than most of the other ideas on this list
- Follow the manufacturer’s recommended light duration closely, since both too little and too much light can affect herb growth and flavor
- Use this option specifically for the herbs most actively harvested and depended on through the season, reserving natural-light spots for more decorative or lower-maintenance plants
Cost breakdown
- Compact countertop grow light kit: $40–90
- Larger multi-pod system: $100–250
- Total: $40–250
9. The Transitioned Outdoor Herbs (Bringing the Summer Garden Indoors Before the First Frost)
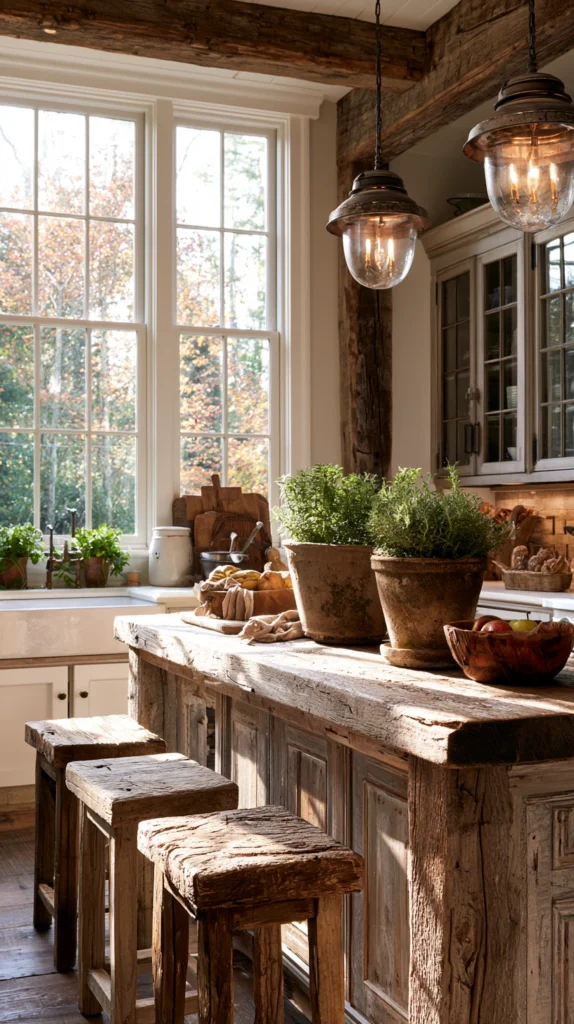
Established herb plants, dug up or repotted from an outdoor summer garden and moved indoors before the first hard frost — the display that extends an outdoor growing season directly into the kitchen, rather than starting over with new indoor plants entirely.
Why transitioning existing plants matters more than buying new ones
- The cost savings it offers over replacing an entire herb collection: plants already established outdoors carry real value, and moving them indoors preserves months of outdoor growth rather than discarding it at the first frost
- The continuity it provides for any herb used regularly through the summer: a transitioned rosemary or thyme plant continues exactly where it left off, rather than the kitchen needing to wait for a brand-new small plant to mature
- The deliberate timing it requires, distinct from every other idea on this list: unlike a purchased indoor herb, which can be brought in any time, this idea depends specifically on correct fall timing, moved before frost but not so early that the plant misses its last useful weeks outdoors
The options
- Rosemary and thyme, both well-suited to surviving the transition indoors given the right light
- Mint, which often transitions especially easily given how readily it roots and adapts
- Bay laurel or other shrub-like herbs, for a larger, more substantial transitioned specimen
- A partial transition, taking cuttings (see Idea #4) from a plant too large or established to move as a whole, rather than attempting to relocate the entire root system**
The practical execution
- Move plants indoors gradually if possible, acclimating them to lower indoor light over a week or two rather than an abrupt one-time transition
- Check thoroughly for pests before bringing any outdoor plant inside, since insects that were a minor outdoor nuisance can become a more serious indoor problem once relocated
- Expect some leaf drop or stress in the weeks immediately following the move, which is a normal adjustment period rather than a sign the transition has failed
Cost breakdown
- New pot and fresh soil for repotting, if needed: $10–25
- Total: $0–25, since the plants themselves are typically already part of an existing summer garden
10. The Dried Herb Bundle Display (A Complement to, Not a Replacement for, Living Plants)
Bundles of herbs hung to dry, or already dried, displayed alongside the kitchen’s living plants — the addition that brings a second texture and a practical cooking resource into the same overall display.
Why dried herbs belong next to live ones, not instead of them
- The complementary, not competing, function it serves: where living herbs cover daily fresh use, dried bundles serve as both a visual texture layer and a practical backup for cooking once a particular herb’s fresh supply runs low
- The low-maintenance contrast it offers: unlike every other idea on this list, dried bundles need no watering, no light management, and no ongoing care, providing a layer of greenery-adjacent display that requires zero daily attention
- The seasonal specificity it adds: drying and displaying herbs is itself an autumn-specific kitchen activity, tied directly to the season in a way a simple potted plant isn’t
The options
- Bundled bunches of rosemary, thyme, or oregano, hung upside down near a window or beam
- A small wall-mounted drying rack, holding both actively drying bundles and finished dried herbs
- Dried herbs displayed in open jars, rather than hanging, for a different visual presentation
- A mix of fresh and dried versions of the same herb, displayed side by side for a direct visual comparison
The practical execution
- Hang bundles stem-up, away from direct heat sources like the stovetop, which can scorch them or cause uneven drying
- Rotate in fresh bundles as older ones are used up or lose their color and scent, treating this as an ongoing seasonal practice rather than a single one-time display
- Keep dried bundles within reach of where cooking actually happens, since this idea is meant to be genuinely used, not just looked at
Cost breakdown
- Wall-mounted drying rack: $20–50
- Twine for bundling, if not already on hand: $3–8
- Total: $3–58, depending on whether a dedicated rack is added
11. The Kitchen Island Centerpiece Planter (Greenery as the Room’s Focal Point)
A single substantial potted plant or a styled herb arrangement, placed directly on a kitchen island, functioning the same way a centerpiece does on a dining table.
Why an island deserves a true centerpiece, not just clutter
- The focal-point function an island naturally invites: a kitchen island is often the room’s visual and functional center, and a deliberate centerpiece reinforces that role rather than leaving the space empty or cluttered with daily-use items
- The flexibility it offers for entertaining: a centerpiece planter can be easily moved aside during active cooking and returned once the island is clear again, unlike a fixed shelf or wall installation
- The scale opportunity an island provides: unlike a windowsill or narrow shelf, an island can support a genuinely large, substantial plant that would overwhelm a smaller display spot elsewhere in the kitchen
The options
- A single large foliage plant, in a striking pot, used purely for visual impact rather than active herb use
- A styled herb cluster, combining two or three different plants in coordinating containers
- A rotating seasonal centerpiece, swapped between an herb display and a more purely decorative arrangement depending on the occasion
- A low, wide planter, sized to avoid blocking sightlines across the island during meals or gatherings
The practical execution
- Choose a pot height that doesn’t block conversation or sightlines across the island, particularly if the island doubles as a dining or gathering spot
- Use a saucer or tray underneath to protect the island’s surface from water rings, especially important on a stone or wood countertop
- Move the centerpiece aside during heavy prep work rather than working around it, both for the plant’s protection and for genuine workspace
Cost breakdown
- A single substantial potted plant: $25–70
- A styled multi-plant cluster: $40–100
- Total: $25–100
12. The Vertical Pocket Herb Garden (A Smaller-Scale Living Wall for a Tighter Kitchen)
A compact vertical pocket planter, mounted on a smaller section of wall or even the side of a cabinet, holding several herbs in a narrow, space-efficient footprint — a smaller-scale alternative to the full living wall in Idea #6.
Why a smaller vertical system fits where a full living wall might not
- The tight-kitchen solution it offers: not every kitchen has a wall section large enough to support a full living wall installation, and a compact pocket system delivers a similar vertical-growing effect in a much smaller space
- The cabinet-side mounting option it allows: unlike most ideas on this list, a pocket system can sometimes mount to the end of a cabinet run rather than requiring open wall space, claiming an area that’s otherwise entirely wasted
- The modular scalability it provides: a small pocket system can start with just two or three pockets and expand later, making it a lower-commitment entry point into vertical kitchen gardening
The options
- A felt or canvas pocket planter, with 3–6 individual pockets
- A small modular tile system, with individual snap-in planting pods
- A single column of stacked pockets, for the narrowest possible footprint
- A pocket system mounted to a cabinet end panel, rather than open wall space**
The practical execution
- Choose a felt or canvas material specifically rated for repeated moisture exposure, since this material sits in direct, frequent contact with damp soil
- Position near a light source even at this smaller scale, since the same light requirements that apply to any other herb display still apply here
- Water individual pockets carefully, checking that excess moisture isn’t pooling at the bottom of the system rather than draining properly
Cost breakdown
- Small felt pocket planter, 3–6 pockets: $20–45
- Total: $20–45
13. The Terracotta Pot Cluster (Warmth and Texture From the Most Classic Material Available)
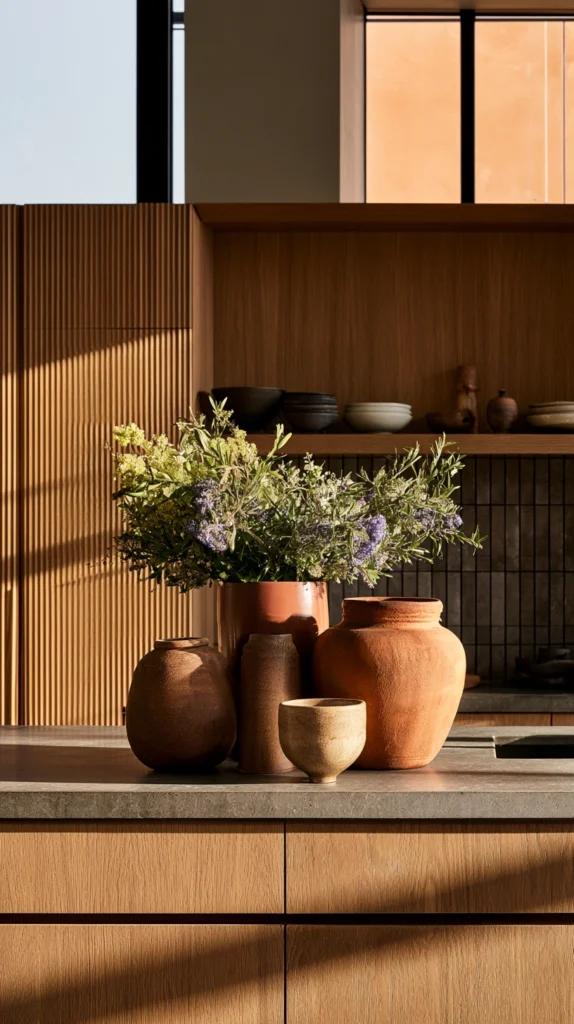
A grouped cluster of terracotta pots, varied in size, placed together on a counter or windowsill rather than spaced individually — the display that relies on a single classic, affordable material to create a cohesive look across an entire herb collection.
Why a single consistent material does more than a mismatched collection
- The cohesion a single material provides: terracotta’s warm, consistent color and texture ties together even a wide variety of plant types and pot sizes into a single visually unified group
- The affordability that allows for genuine quantity: terracotta is among the least expensive pot materials available, making it realistic to build a fuller, more abundant-looking cluster than a higher-cost material would allow on the same budget
- The natural aging it develops over time: terracotta absorbs moisture and develops a soft, weathered patina with use, which most gardeners consider an improvement rather than a flaw, reinforcing the same gathered, lived-in quality valued throughout kitchen styling
The options
- A cluster of varied pot sizes, grouped together rather than evenly spaced
- Painted or glazed terracotta, for a softer color variation within the same material family
- A mix of true terracotta and terracotta-look ceramic, for slightly more weather and moisture resistance where needed
- Terracotta pots paired with matching saucers, for a more finished, complete look
The practical execution
- Group in odd numbers for the most natural-looking cluster, the same composition principle used in pumpkin and other seasonal displays elsewhere in the kitchen
- Allow some natural weathering and water staining to develop on the pots over time, rather than scrubbing them back to a uniform, store-fresh appearance
- Vary height within the cluster by using a small stand, an upturned saucer, or simply pots of genuinely different sizes, rather than letting every pot sit at the same level
Cost breakdown
- Terracotta pots, assorted sizes: $3–12 each
- A full cluster of 6–8 pots: $25–60
- Total: $25–60
14. The Self-Watering Planter System (Consistency for the Kitchen’s Busiest Weeks)

A self-watering planter, using a built-in reservoir to maintain consistent soil moisture without daily manual watering — the system built specifically for the kitchen’s most heavily used stretches, when herb care is easy to forget.
Why consistency matters more for kitchen herbs than for plants elsewhere in the house
- The daily-use stress it relieves: herbs kept in active culinary use get watered inconsistently more often than purely decorative plants, since they’re handled, harvested, and sometimes simply forgotten amid actual cooking
- The travel and busy-week insurance it provides: a reservoir system continues supplying water even during a stretch when daily kitchen maintenance gets skipped, protecting the investment already made in the rest of this list’s display ideas
- The reduced risk of both over- and under-watering: a self-watering system delivers moisture more evenly than manual watering typically achieves, reducing the common mistakes that cause kitchen herbs to struggle in the first place
The options
- A single self-watering pot, for one specific high-priority herb
- A self-watering planter box, supporting a full row of herbs with one shared reservoir
- A self-watering insert, retrofitted into an existing decorative pot rather than requiring an entirely new container
- A self-watering system paired with the grow light kit from Idea #8, combining both the light and water consistency a fall kitchen herb garden benefits from most
The practical execution
- Check the reservoir level periodically even with a self-watering system, since “self-watering” reduces but doesn’t eliminate the need for any oversight
- Use a potting mix specifically suited to self-watering systems, since standard soil can sometimes wick moisture unevenly in this kind of setup
- Reserve this system for the herbs most central to regular cooking, where consistent care has the most direct payoff, rather than every single plant in the kitchen
Cost breakdown
- Self-watering pot, single: $15–35
- Self-watering planter box: $30–80
- Self-watering insert for an existing pot: $10–20
- Total: $10–80
The self-watering herb box still thriving after a genuinely busy week: the quiet insurance policy behind every other idea on this list actually surviving the season.
The Fall Kitchen Plant Display Roadmap
The work, sequenced:
Phase One (the primary growing spot):
- The windowsill herb row (#1)
- The indoor herb garden kit with grow light (#8), if natural light is limited
- The transitioned outdoor herbs (#9), timed before the first frost
Phase Two (the secondary display layers):
- The hanging herb planters (#2)
- The tiered plant stand (#3)
- The copper or galvanized trough planter (#7)
Phase Three (the styling integration):
- The open shelf plant and dishware mix (#5)
- The terracotta pot cluster (#13)
- The kitchen island centerpiece planter (#11)
Phase Four (the finishing and supporting layers):
- The mason jar propagation display (#4)
- The dried herb bundle display (#10)
- The wall-mounted planter or living wall (#6)
- The vertical pocket herb garden (#12)
- The self-watering planter system (#14)
Getting Started This Weekend
The immediate-impact plant display refresh:
One afternoon, three changes:
- Take cuttings from the outdoor herb garden before the first frost and start them in mason jars (Idea #4 and #9)
- Cluster the kitchen’s existing pots together on the windowsill rather than leaving them scattered (Idea #13)
- Hang a small dried herb bundle near the stove (Idea #10)
Total cost: $20–60. Time: about thirty minutes. The kitchen will already feel like it’s holding onto the season’s herbs rather than losing them to the first cold night.
The structural investment (the next big project):
The indoor herb garden kit with a grow light (Idea #8) is the single most important investment for anyone serious about keeping fresh herbs genuinely productive through the darkest months of fall and winter. Once it’s in place, every other display idea on this list — the trough, the tiered stand, the island centerpiece — can be chosen primarily for looks, since the grow light kit is already handling the kitchen’s actual growing needs.
What a well-displayed fall kitchen plant collection provides that a summer garden left outside can’t:
The greenery that survives the season instead of ending with the first frost:
- Transitioned plants carrying real summer growth straight through the colder months
- A grow light solving the light shortage a window alone can’t always handle
- A self-watering system protecting the whole collection through the kitchen’s busiest, most distracted weeks
The display that earns its place in the room, not just on the counter:
- A tiered stand or trough turning a loose collection of pots into a single considered arrangement
- Open shelving folding plants into the same styling logic already used for dishware
- A terracotta cluster relying on one material to unify a whole windowsill
The texture and use that go beyond a single row of basil:
- Dried bundles adding a second layer of texture and a practical cooking backup
- A propagation jar turning the earliest stage of plant growth into its own small display
- An island centerpiece giving the kitchen’s most central surface a genuine focal point
A kitchen herb garden was never meant to disappear the moment the weather turned. The plants that make it through fall aren’t surviving by accident — they’re the ones given the kitchen’s best light, a consistent watering system, and a display considered enough to actually want to look at every day. The windowsill row started in September is still producing in December. The dried bundle hung near the stove on a quiet afternoon is the reason there’s still rosemary on hand long after the last fresh sprig from the garden outside is gone.