Dazzling Gem-Encrusted Nail Designs That’ll Make Everyone Stare
Let’s be real – nothing grabs attention quite like nails that sparkle and shine. Gem-adorned manicures have blown up lately, and I’m here to walk you through the absolute best designs that’ll have people doing double-takes.
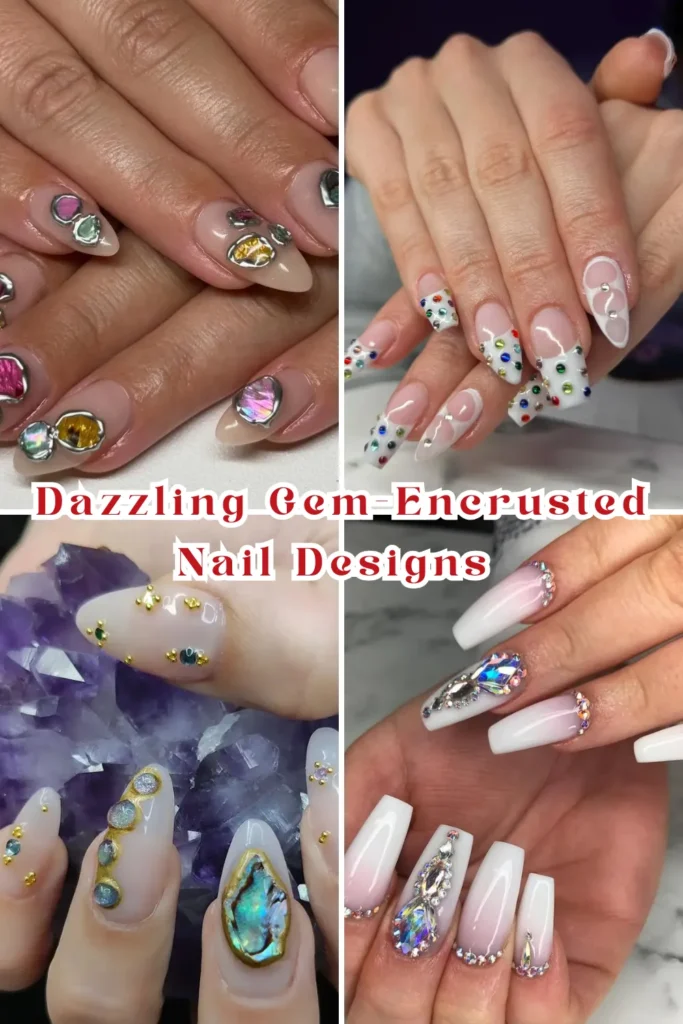
From subtle sparkle to full-on bling, these 23 gem nail looks will seriously upgrade your style game.
Photo credit can be found via the Instagram link beneath each image.
The “Solitary Duchess” Statement Gem
https://www.instagram.com/bees.knees.nails
Sometimes less is absolutely more. Placing just one perfectly-sized gem at the base of each nail creates an elegant impact without going overboard.
This minimalist approach works best with oval-cut crystals or pearls positioned right at the cuticle line. The simplicity makes it perfect for the office while still catching light as you type.
Try matching the gem color to your outfit or go with classic clear crystals against a nude base for a look that goes with everything.
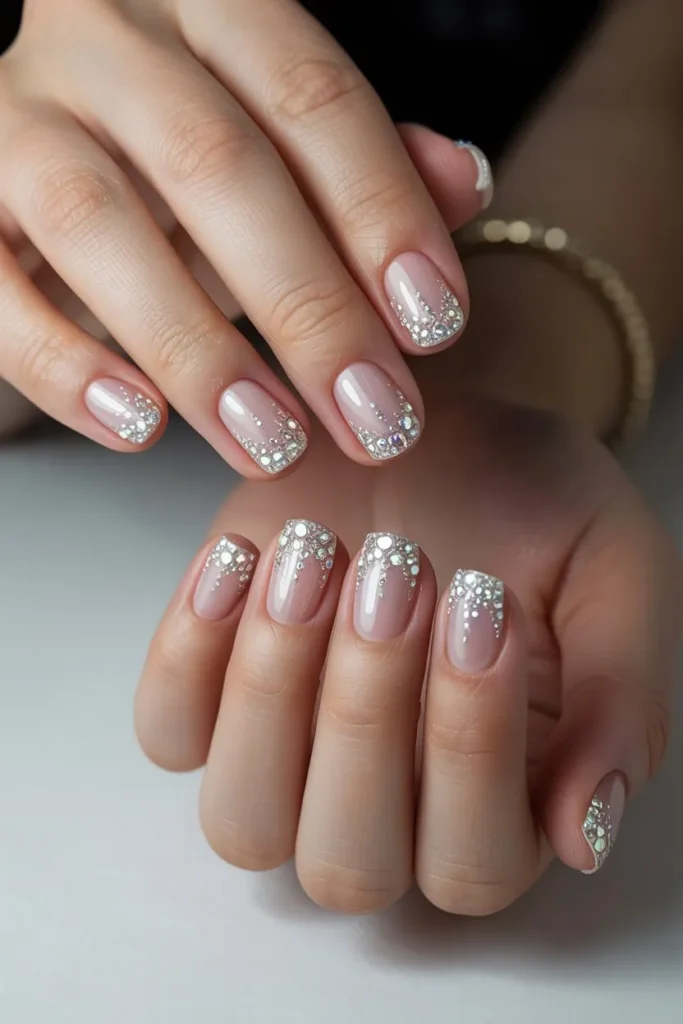
“Diamond Horizon” Crystal French Tips

https://www.instagram.com/the_nail_effect_jade
Give the classic French manicure a major upgrade by lining the tips with a row of tiny crystals instead of the traditional white polish.
The gems create a delicate sparkle line that defines your nail shape while adding just the right amount of glamour for special occasions.
For maximum impact, use crystals that are no larger than 1.5mm and place them precisely along the smile line of your nail tip.
“Crystal Waterfall” Cascade
https://www.instagram.com/annznailz916
This eye-catching design features gems “flowing” from one corner of your nail down toward the opposite side, creating movement and dimension.
Start with larger stones at one corner (usually the cuticle), then gradually decrease the gem size as they trail across the nail. This creates the illusion of gems literally cascading across your fingertips.
Clear crystals work beautifully for this, but try ombre-toned gems (gradually shifting from one color to another) for a next-level effect.
“Royal Regalia” Cuticle Crown
https://www.instagram.com/nailtrixcliftonpark
Frame your cuticle area with an arc of carefully placed gems to create a crown-like effect at the base of each nail.
This regal design elongates the appearance of your nail bed while drawing attention to well-maintained cuticles.
Mix different sized gems in your arc for dimensional interest – smaller ones at the edges and slightly larger ones at the center point.
“Celestial Cartography” Constellation Nails
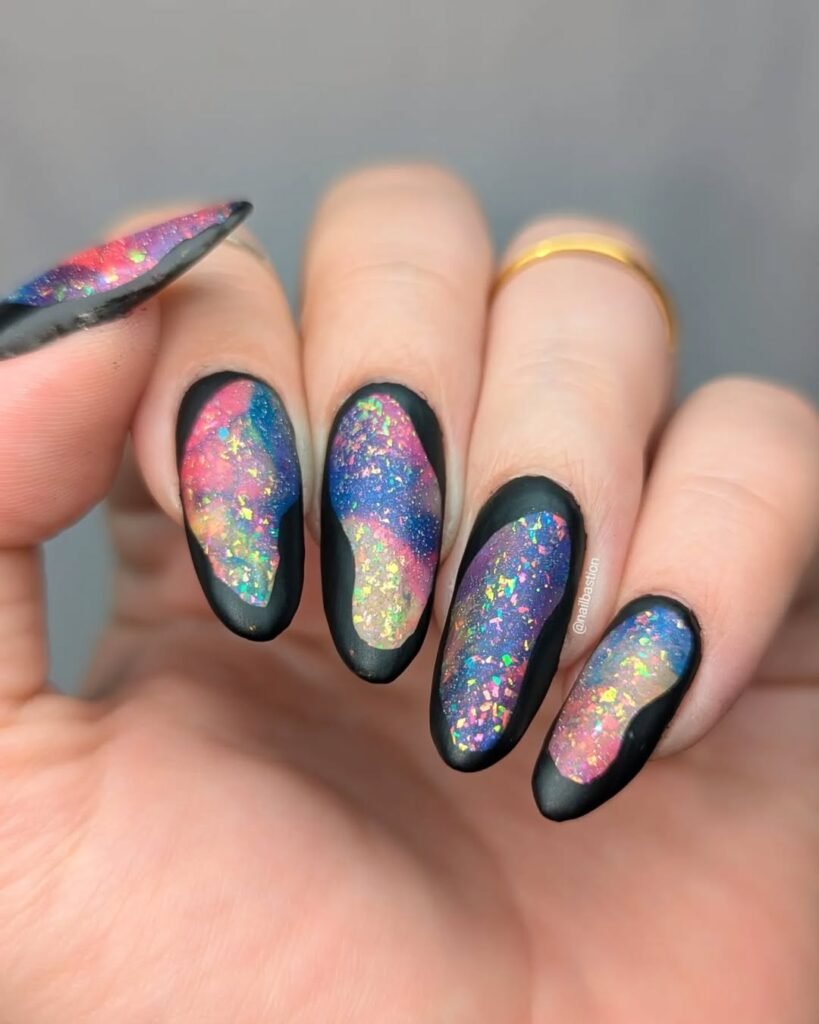
https://www.instagram.com/nailbastion
Transform your nails into a miniature night sky by placing gems in patterns that mimic actual star constellations.
Set these sparkly star points against deep navy, purple, or black polish for the most realistic cosmic effect. Some nail techs even add tiny gold connecting lines between the gems.
Choose constellations that mean something to you – your zodiac sign, the Big Dipper, or create your own personal star map that tells your story.
“Diamond District” Gem Outline
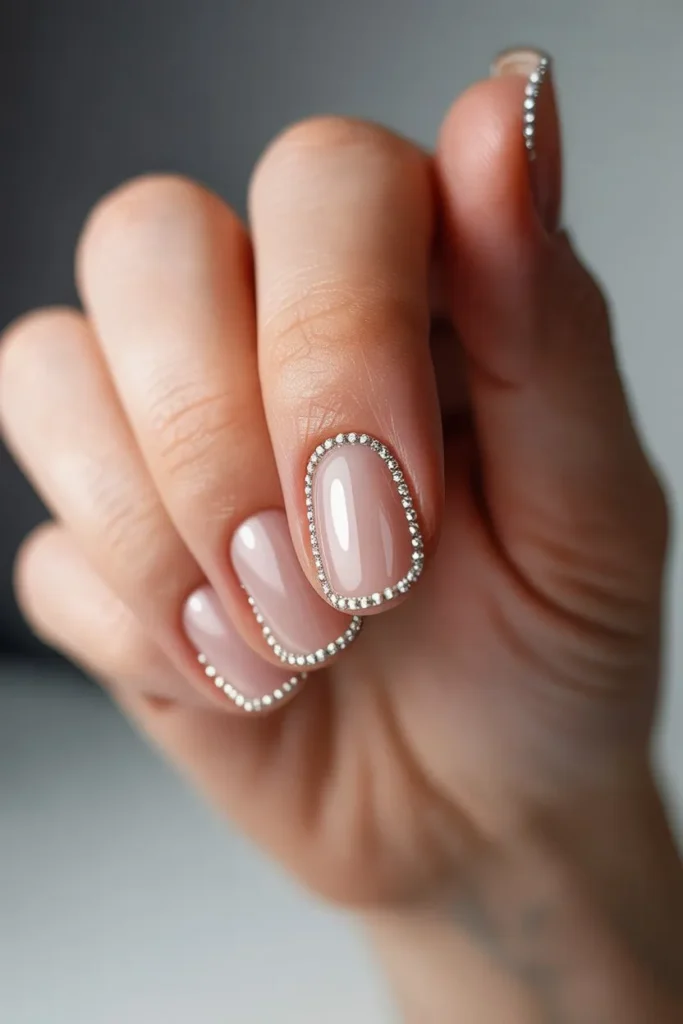
Create a stunning frame effect by placing a single line of tiny gems around the entire perimeter of your nail.
This architectural approach to gem placement draws attention to your nail shape while creating maximum sparkle with minimal stones.
Keep the inside of the outline clean with clear polish or a nude shade to let the gem border truly stand out.
“Manhattan Luxury” Diamond Grid
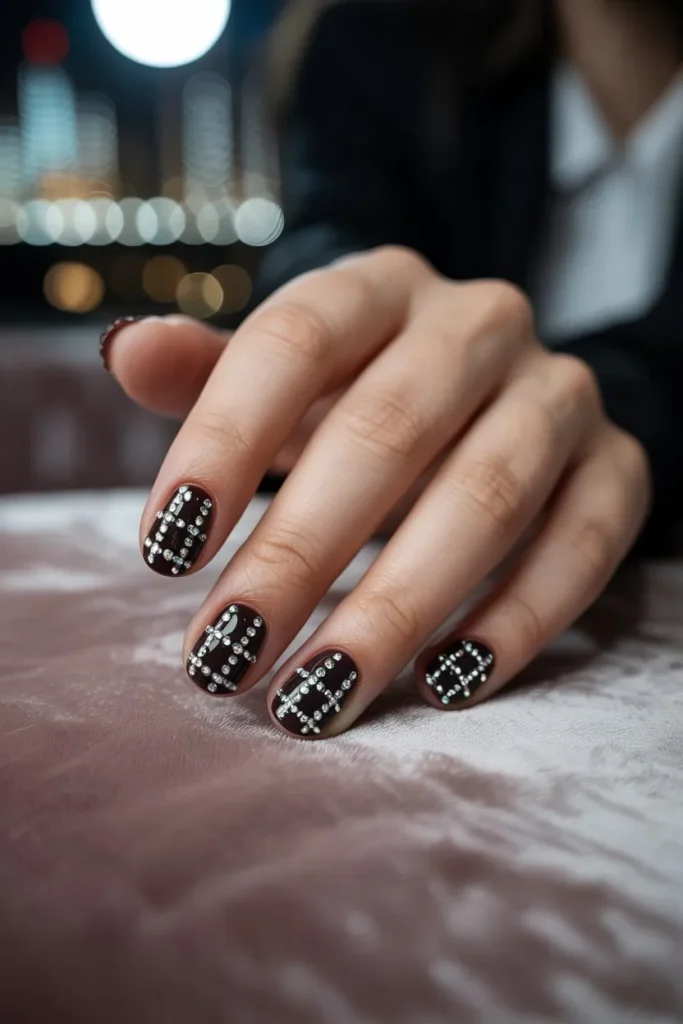
Channel luxury quilted handbags with a precise grid pattern formed by strategically placed gems.
Create straight lines of equally-spaced tiny crystals forming perfect diamonds or squares across the nail surface. The geometric precision makes this look particularly sophisticated.
For extra impact, place a slightly larger gem at each intersection point in the grid.
“Secret Treasure” Hidden Gem

https://www.instagram.com/jazzynails.x
This subtle approach places gems underneath the free edge of your nail, creating unexpected flash only visible when you gesture or type.
The hidden placement works best with vibrant colored gems that will catch attention when they peek out from beneath your nail tip.
It’s perfect for conservative environments where you want a bit of personality without obvious bling.
Crystal Gradient
Create a gradient effect using crystals that gradually increase in density from cuticle to tip (or vice versa).
Start with just a few scattered gems near the base, then progressively add more until you have tight clusters at the tips. The visual effect mimics ombre polish but with dimensional sparkle.
This works beautifully with gems in the same color family (like varying shades of pink) or with crystal clear gems against a color-gradient polish base.
“Zero Gravity” Floating Gems
This modern approach embeds gems within layers of clear gel to create the illusion of crystals suspended within your nail.
The three-dimensional floating effect gives depth and visual interest beyond standard surface gem application. It’s like wearing tiny snow globes on your fingertips.
This technique works best with varied sizes and even mixed elements – try combining tiny gems with glitter pieces or metallic flakes.
“Supernova Sparkle” Starburst Pattern
https://www.instagram.com/thenailshed_wirral
Create an explosive radial pattern with gems emanating outward from a central point on each nail.
Place one larger statement gem at the center (usually near the cuticle or in the middle of the nail), then arrange increasingly smaller gems in rays extending outward.
The starburst creates a focal point that catches light from every angle as you move your hands.
“Architectural Void” Negative Space Gems
https://www.instagram.com/nailacarte
Instead of placing gems on top of polish, this trend incorporates them into creative negative space designs.
Create geometric cutouts in your polish , then place gems strategically within just these bare areas.
The contrast between the unpolished nail showing through, the polish color, and the sparkling gems creates visual interest that’s both artistic and eye-catching.
“Tiffany Setting” Sculptural Gem Mounts
https://www.instagram.com/colorsconpalomitaa
Take gem nails to the next level by setting your crystals in sculptural metal frames or raised gel settings.
These elevated settings lift the gems away from the nail surface, creating more dramatic light reflection and adding serious dimension.
The technique mimics fine jewelry design and works best for special occasions since the raised elements require careful handling.
“Winged Victory” Gem French Corners
https://www.instagram.com/nailgrabbers.gems
This modern twist on French tips places gem clusters just at the corners of your nail tips rather than straight across.
The angular placement creates a winged effect that’s both elegant and unexpected. It works beautifully on both squared and almond nail shapes.
Try clear crystals against white tips for a bridal look, or match gem colors to your outfit for coordinated style.
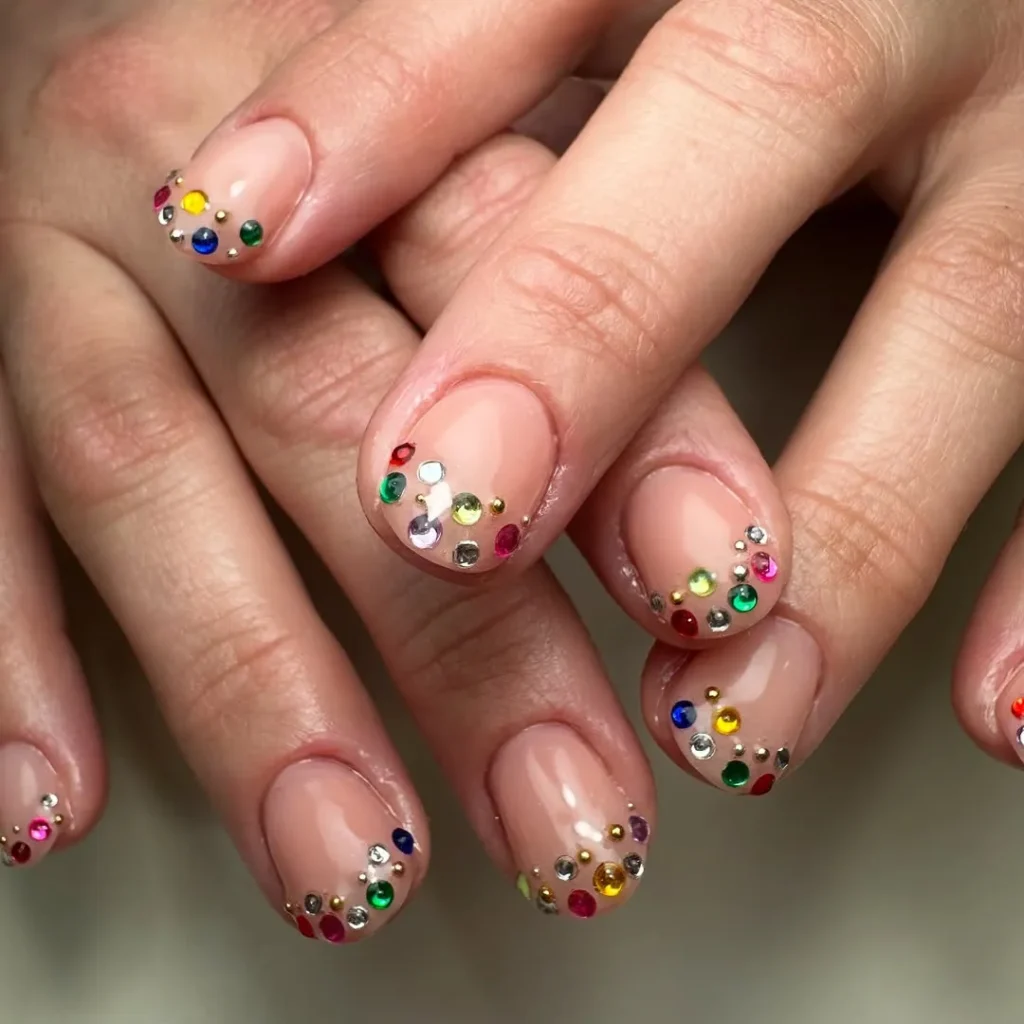
“Celebration Sparkle” Scattered Gem Confetti
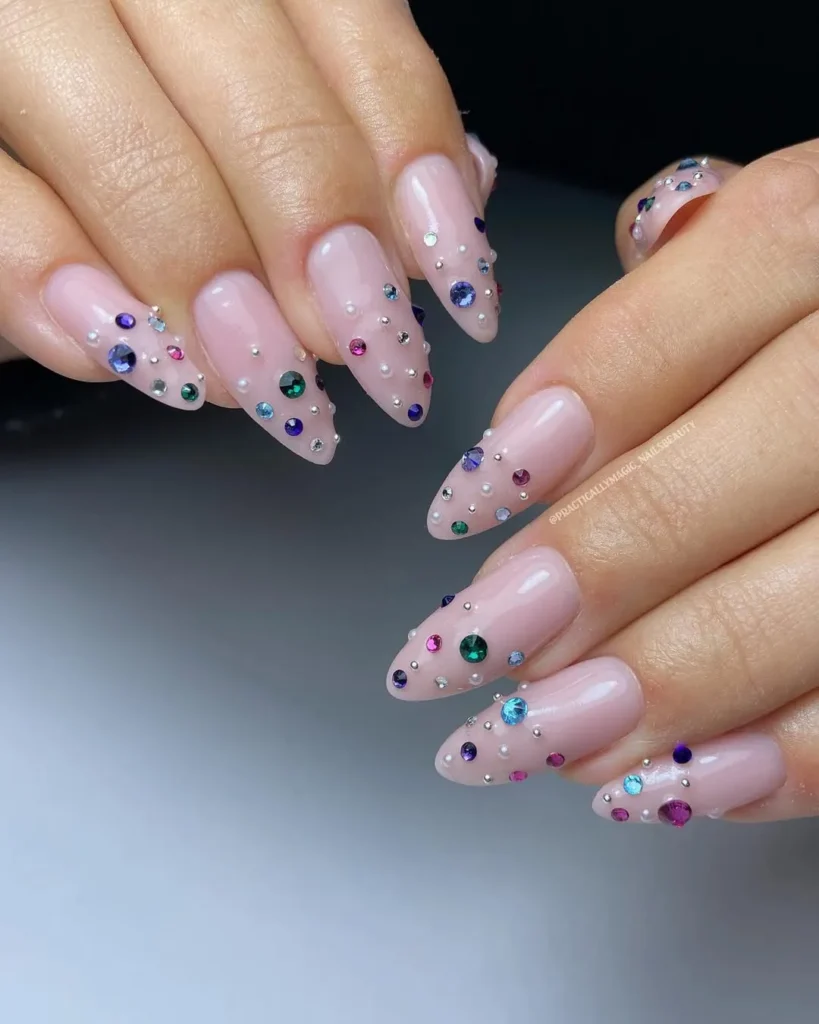
https://www.instagram.com/practicallymagic_nailsbeauty
Channel celebration vibes with randomly scattered gems that mimic confetti across your nails.
The key is truly random placement in varying sizes and even colors – this carefree arrangement creates a festive, playful look perfect for birthdays and special events.
Keep the background a neutral shade to let your gem confetti take center stage.
“Luna Phase” Gem Crescents
Create elegant curves with precisely placed gems forming perfect arcs across your nails.
Position crescent shapes strategically – at the base, diagonally across the nail, or paralleling the natural curve of your nail’s free edge.
Use uniformly sized small gems for the cleanest crescent lines. The simple curve creates maximum impact with minimal complexity.
“Asymmetrical Allure” Border Detail
https://www.instagram.com/gilded.pensacola
Place gems strategically along just one side of each nail to create an asymmetrical border that’s both elegant and unexpected.
This side-placement technique draws the eye across your hand in a flattering way while using fewer games than full-coverage designs.
Try running the gem border down different sides on different fingers for a coordinated but non-identical look across your hand.
“Monochromatic Dimension” Tone-on-Tone Gems
Match your crystal color exactly to your polish color for a sophisticated, textured effect without contrast.
Baby pink crystals on pink polish or emerald gems on green create dimension through texture rather than color contrast. The result is elegant and cohesive.
This subtle approach works perfectly for professional environments where you want refined sparkle without flashiness.
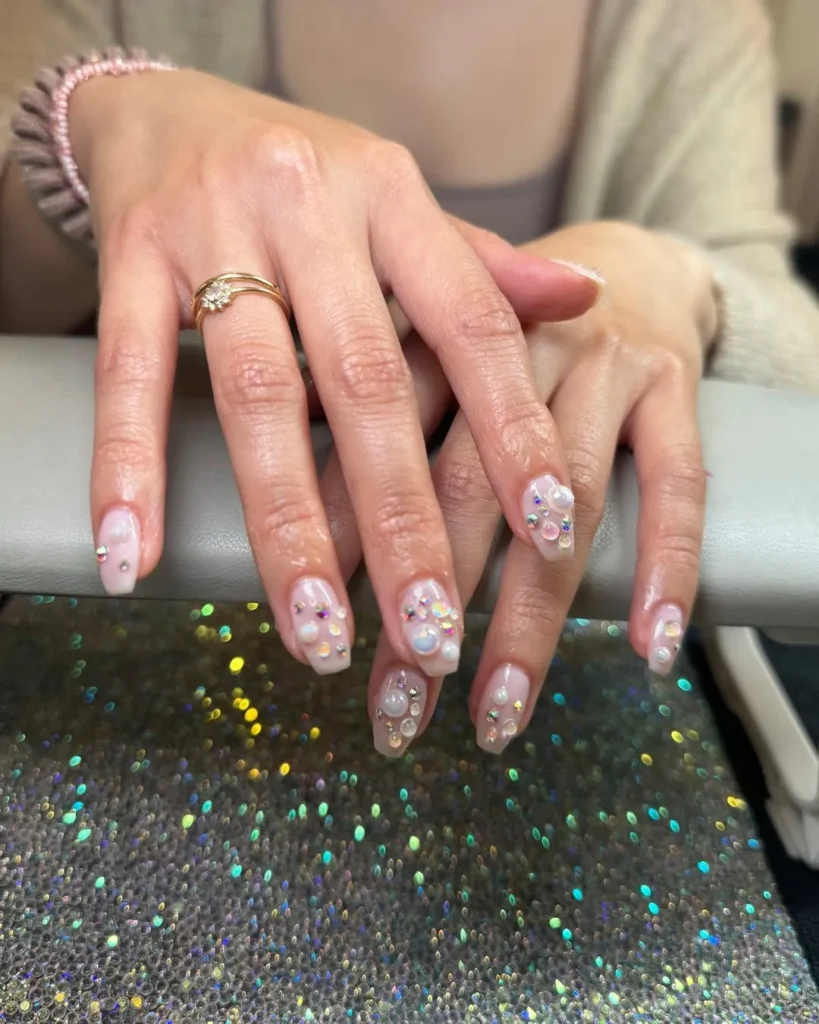
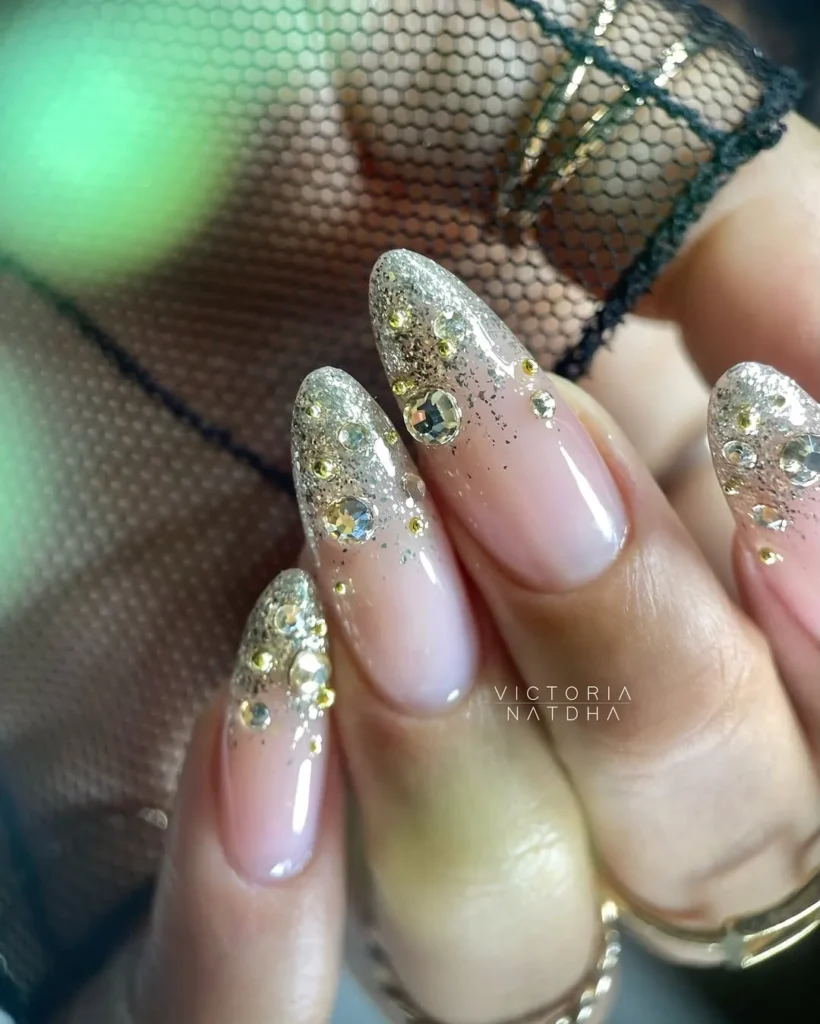
“Beluga Luxe” Crystal Caviar
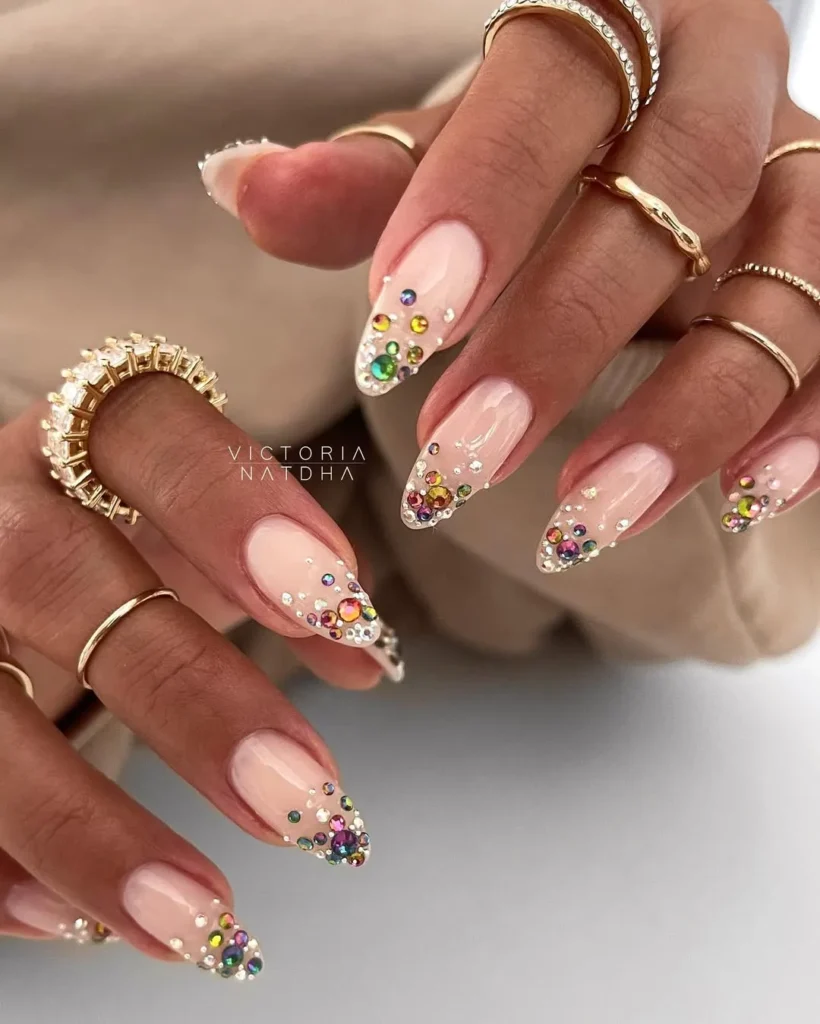
https://www.instagram.com/victorianatdha
This luxe technique clusters hundreds of micro-sized caviar beads or the tiniest crystal pixie gems to create texture like no other.
Use clear nail glue to adhere these miniature gems in tight clusters, creating a textured surface that catches light from countless tiny facets.
The effect resembles sugar or crushed glass – absolutely stunning for evening events but definitely not for everyday wear due to the texture.
“Flowing Opulence” Curved Lines
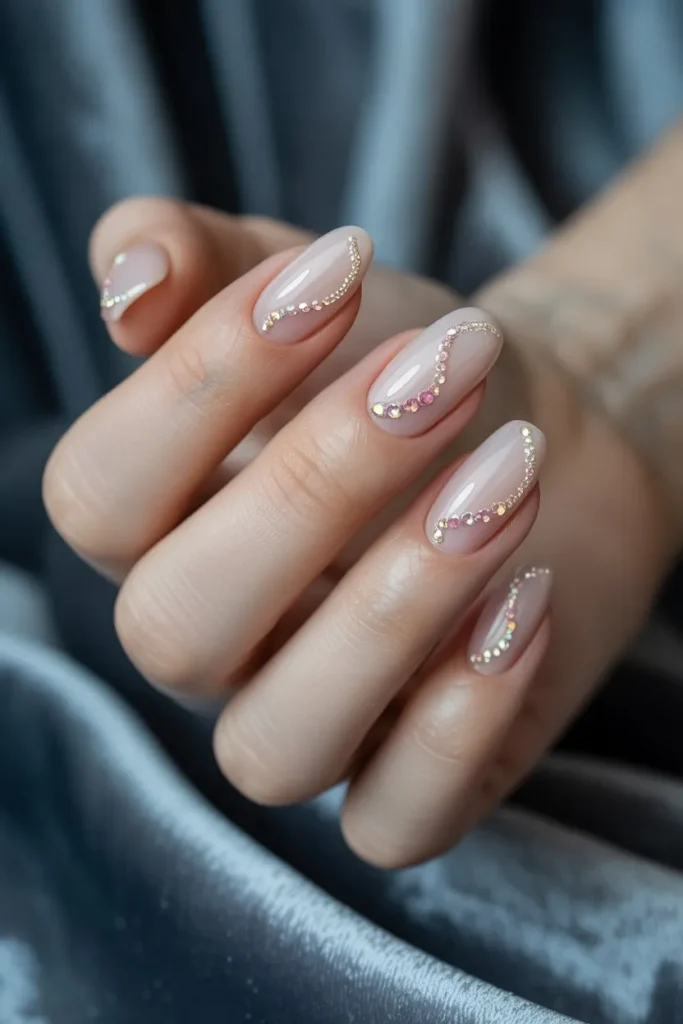
Create movement across your nails with flowing curved lines formed by precisely placed gems.
These can form wave patterns, S-curves, or spiral designs that lead the eye across your nail in a fluid motion. The curved placement feels more organic than geometric designs.
Try varying the crystal sizes slightly along your curved line – slightly larger in the middle and tapering to smaller at the ends creates a natural-looking flow.
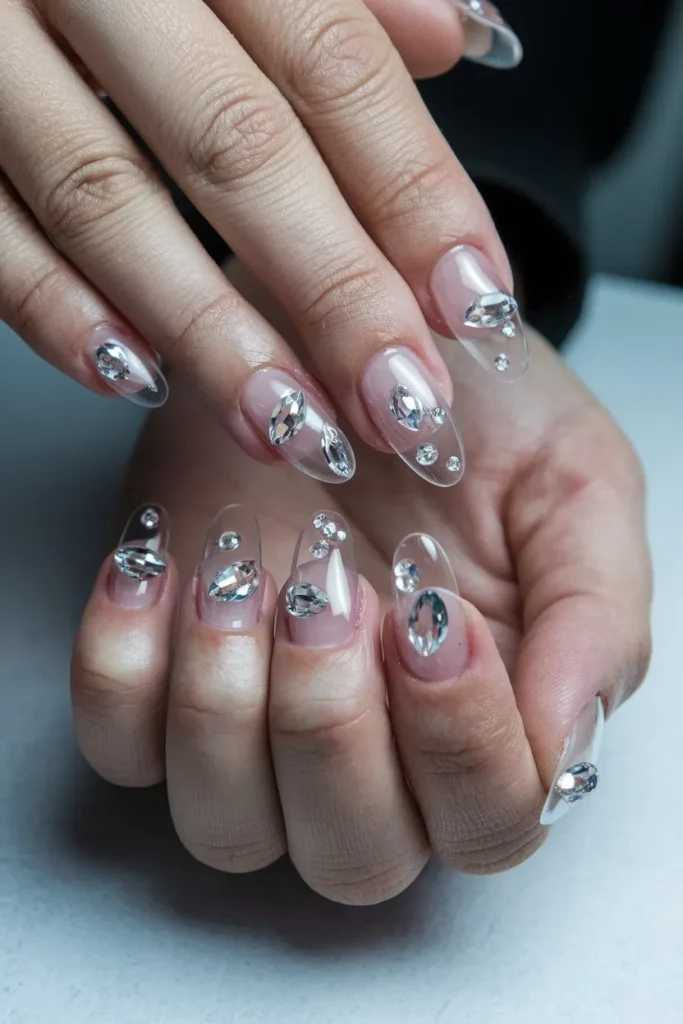
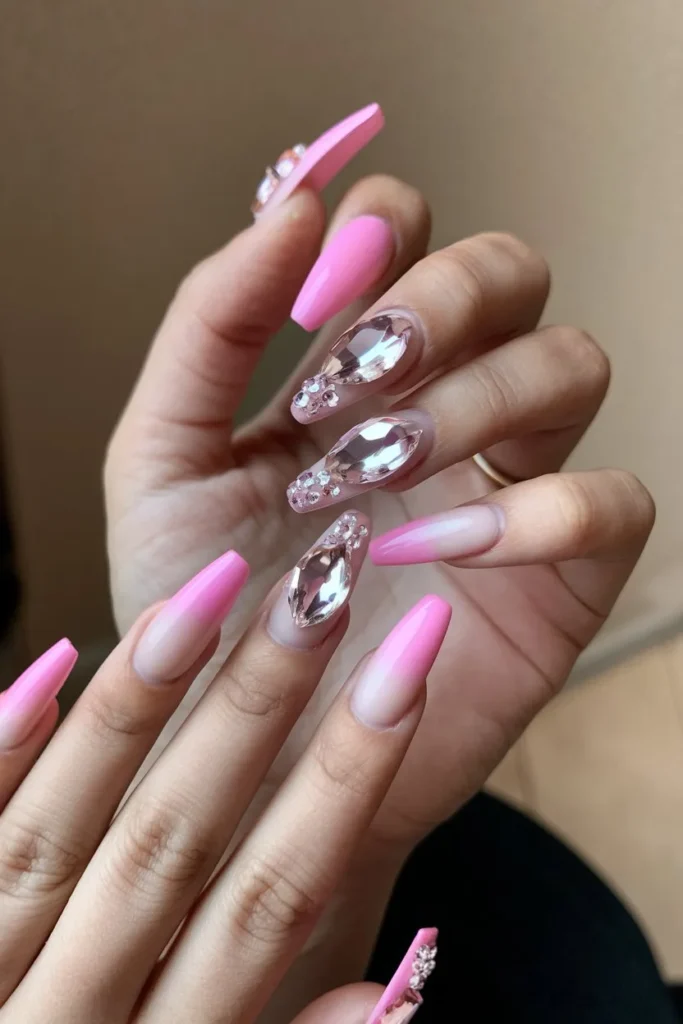
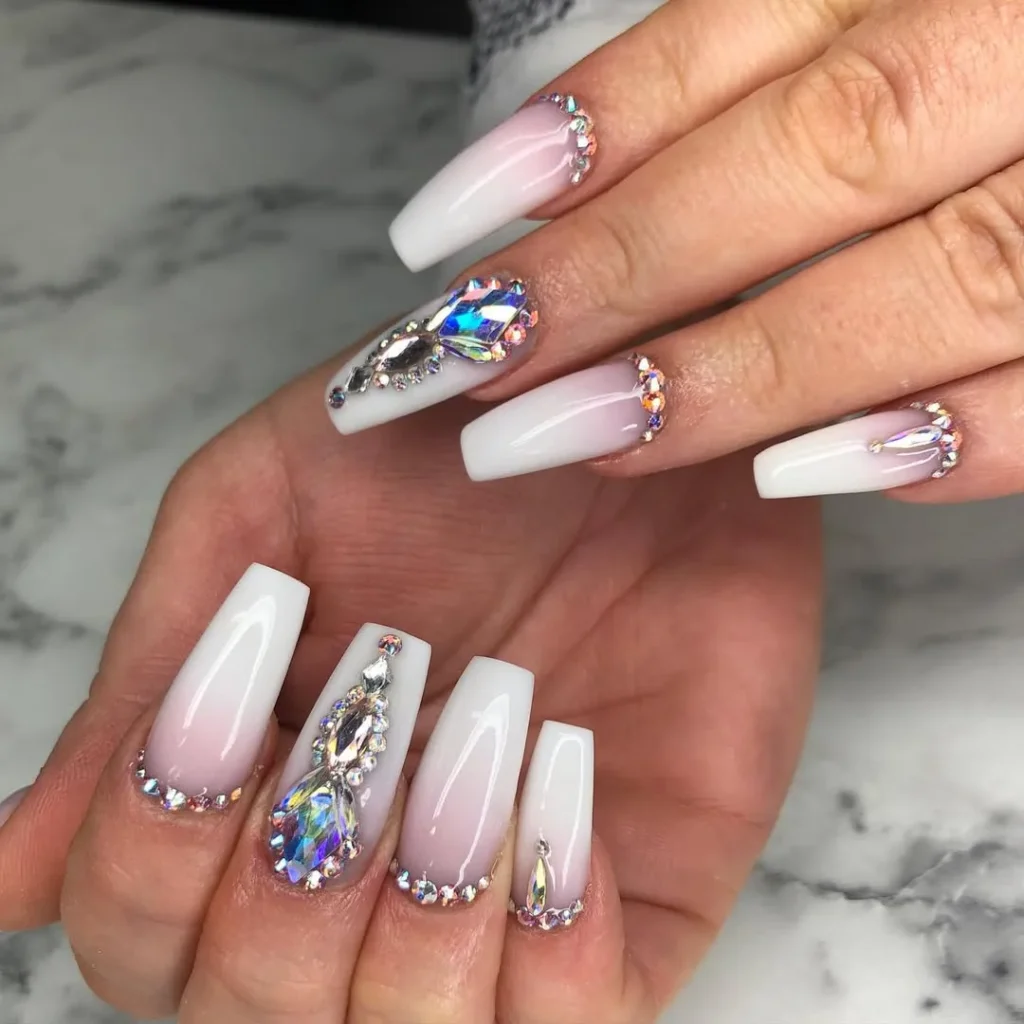
“Red Carpet Focal” Framed Feature Gem
https://www.instagram.com/victorianatdha
Create a spotlight effect by surrounding one larger statement gem with a frame of smaller crystals or pearls.
This technique draws focus to your feature stone while adding dimensional interest. It works beautifully on accent nails or as the focal point of a full manicure.
Try contrasting stone types – a pearl center with crystal surrounds, or an opal surrounded by clear crystals – for maximum visual impact.
“Byzantine Beauty” Modern Mosaic
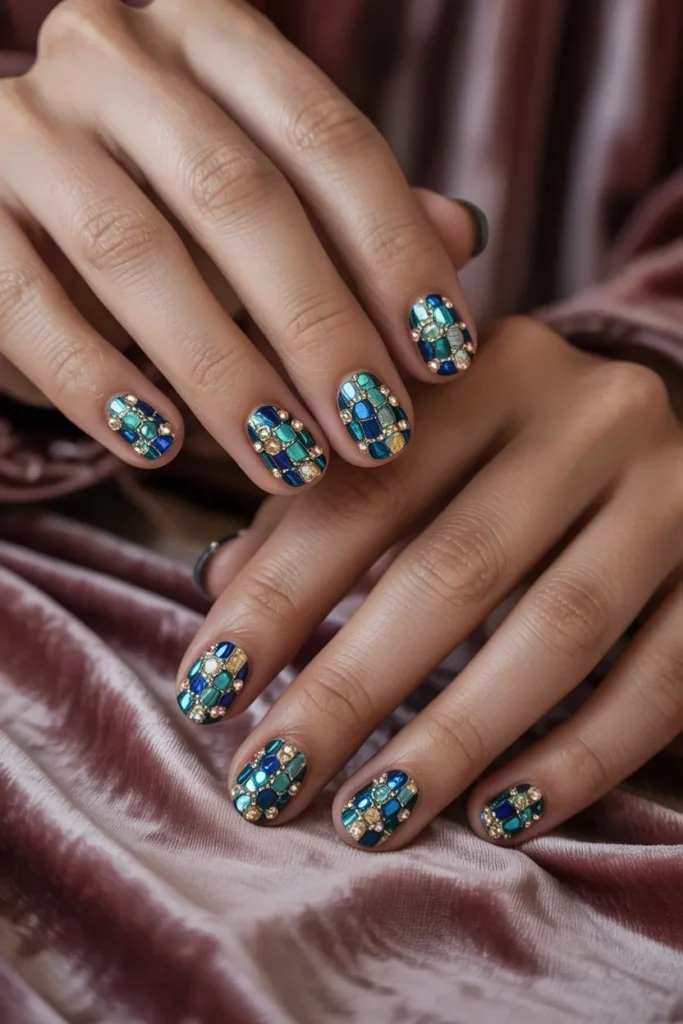
Channel ancient art with gem placement that mimics mosaic tile patterns across your nails.
Unlike random placement, this technique arranges similarly sized small gems in organized rows or patterns with minimal spacing between them.
Choose a color theme – like blues and greens for a peacock effect or varying skin tones for a neutral mosaic – and carry it across all nails for cohesion.
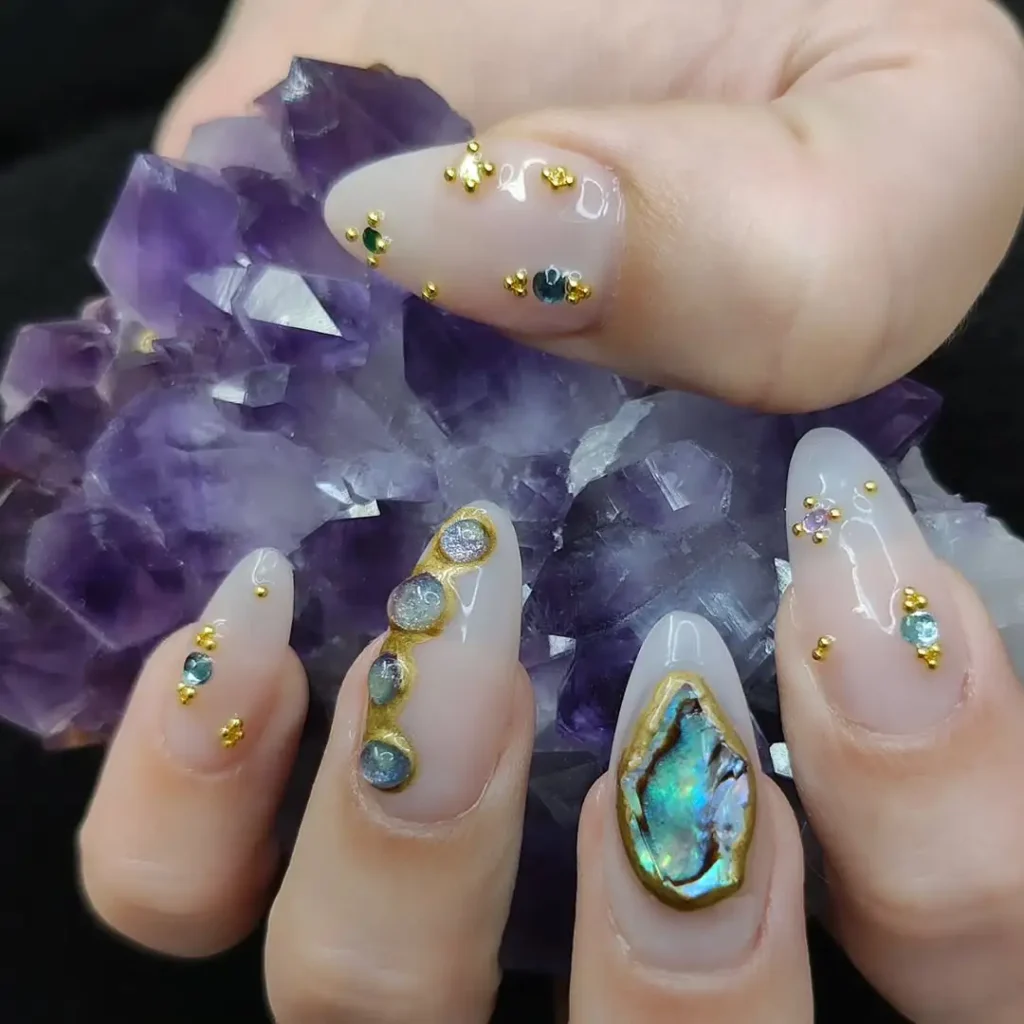
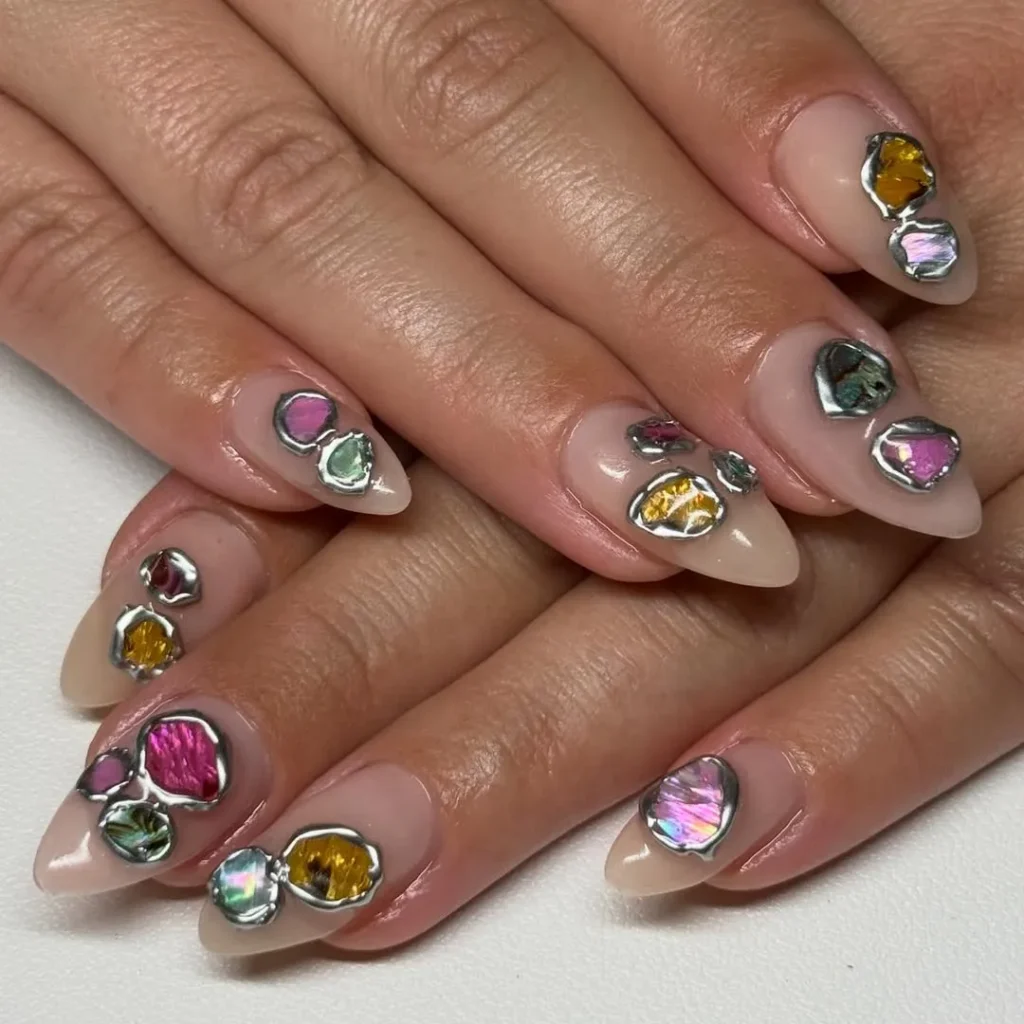
“Diamond Geode” 3D Crystal Clusters
https://www.instagram.com/nailzbysadesimm
Go all-out with three-dimensional crystal formations that truly elevate gem nail art to sculpture status.
This show-stopping style uses builder gel to create raised platforms where crystals cluster together in organic formations like actual crystal growth.
Save this dramatic style for special events – the raised elements require careful handling but create unmatched dimensional sparkle.
Whether you’re a minimalist who prefers just a hint of sparkle or someone who believes more is definitely more, there’s a gem nail design here that’ll match your style perfectly. The best part? These crystallized creations work for everything from weddings to weekends, just by adjusting the placement and intensity of your gem game. Which sparkly style will you try first?
Whether you’re a minimalist who prefers just a hint of sparkle or someone who believes more is definitely more, there’s a gem nail design here that’ll match your style perfectly. The best part? These crystallized creations work for everything from weddings to weekends, just by adjusting the placement and intensity of your gem game. Which sparkly style will you try first?