15 DIY Plant Supports and Cages for a Thriving Garden
Every gardener reaches the moment when a beloved plant begins to flop, sprawl, or collapse under its own weight. Peonies bowing to the ground after rain. Tomatoes pull their stems sideways with the weight of developing fruit. Sweet peas with nowhere to climb. The right plant support at the right moment is the difference between a plant that thrives and one that struggles through the season looking perpetually defeated.
The good news is that plant supports do not need to come from a garden centre. Some of the most effective and genuinely beautiful supports are the ones made from materials already available in the garden or sourced cheaply from a hardware store. Handmade supports have a natural, considered quality that wire and plastic alternatives rarely match — and they can be built precisely to the size and shape each plant actually needs.
Here are 15 DIY plant supports and cages that are practical, affordable, and genuinely good to look at.
1. Bamboo Teepee Support
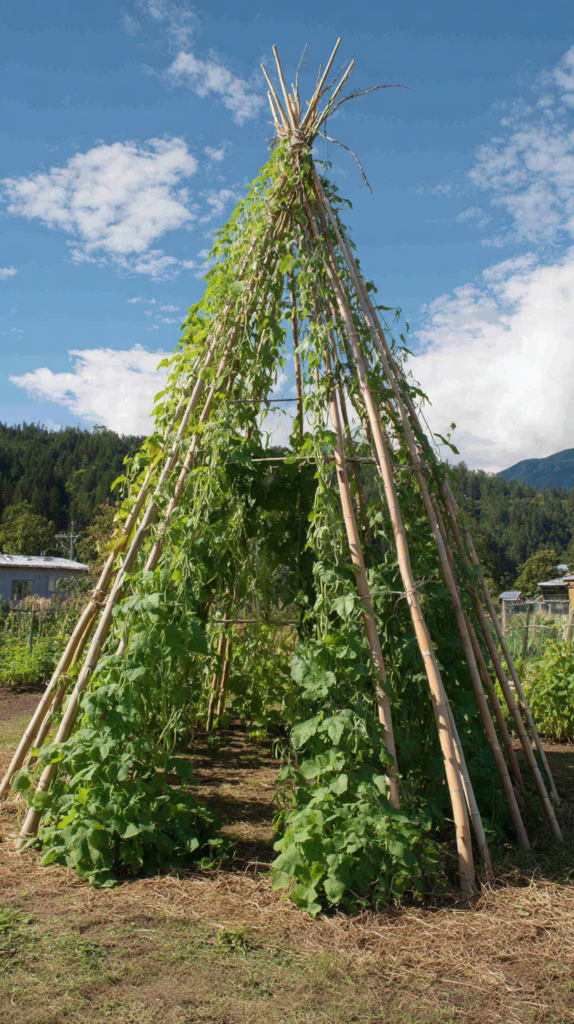
A bamboo teepee — five or six bamboo canes pushed into the soil in a circle and tied together at the top with natural twine — is the most versatile and widely useful DIY plant support available. It suits climbing beans, sweet peas, cucumbers, and any other climbing or scrambling plant that needs a framework to ascend.
Push the canes into the soil at a slight inward angle so they lean naturally toward each other at the top, tie firmly at the apex with several wraps of natural jute twine, and add a spiral of horizontal twine wrapped around the outside of the canes at 20 centimetre intervals to give climbing plants additional grip points as they ascend the structure.
Pro Tip: Soak bamboo canes in water for several hours before pushing them into hard or dry summer soil. Dry bamboo canes pushed forcefully into compacted soil split at the base rather than penetrating cleanly — a frustrating waste of a good cane. Soaked canes are more flexible, more resistant to splitting, and push into firm ground with significantly less effort and damage.
2. Wire Tomato Cage
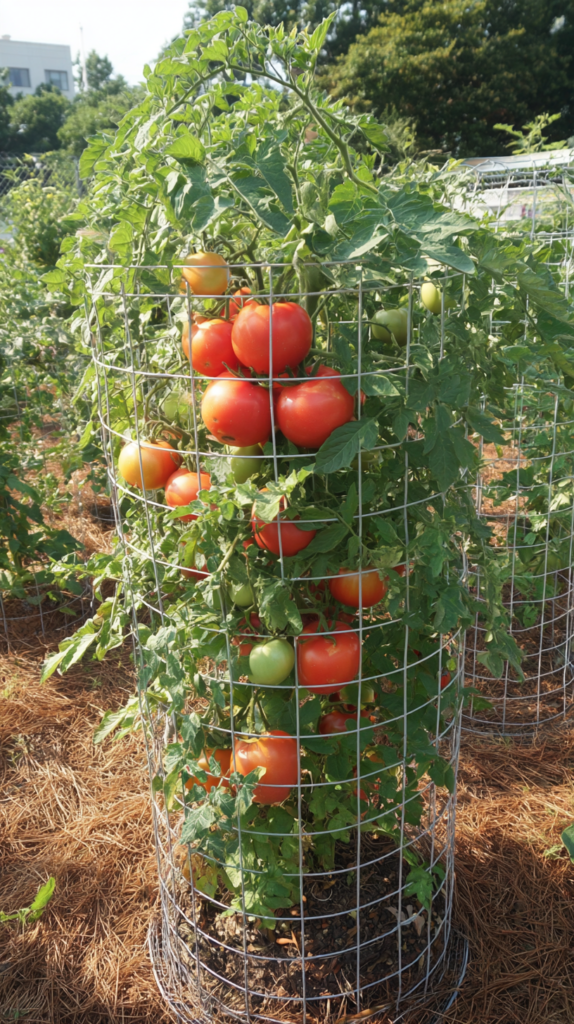
A tomato cage made from a length of concrete reinforcing wire mesh — available from builders merchants in rolls — is stronger, taller, and more durable than any purchased tomato cage and costs a fraction of the price per cage when bought in bulk. The large grid openings of concrete mesh make harvesting tomatoes through the cage walls simple and damage-free.
Cut a length of mesh approximately 150 centimetres long — enough to form a cylinder of about 45 centimetres in diameter — and bend it into a circle, hooking the cut wire ends through the opposite side of the mesh to close the cylinder. Push the protruding wire ends at the base of the cylinder into the soil around the tomato plant for stability.
Pro Tip: Make tomato cages from concrete mesh in two height variants — a shorter 90 centimetre version for determinate bush varieties and a taller 150 centimetre version for indeterminate climbing varieties. Having both sizes available prevents the common problem of using an undersized cage for a vigorous indeterminate variety that quickly outgrows it and becomes top-heavy and unstable before the end of the season.
3. Twiggy Branch Pea Support
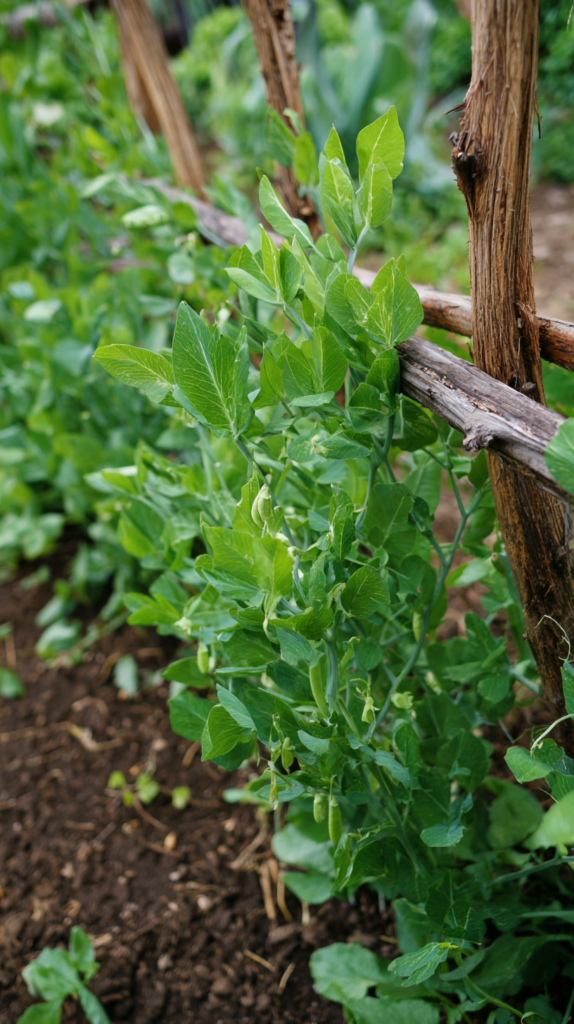
Pea sticks — short, branching twigs pushed into the soil around young pea plants — are one of the oldest and most naturally effective plant support methods in existence. The multiple branching points of a twiggy stick provide exactly the kind of irregular, multi-directional grip that pea tendrils evolved to find, and the natural material disappears into the planting as the season progresses.
Collect twiggy branches from garden pruning throughout winter and early spring — hazel, birch, and beech all produce ideal pea stick material. Push the sticks into the soil at a slight angle around the pea row, overlapping the branches slightly so the tendrils can travel from one stick to the next without any gaps.
Pro Tip: Collect and store pea sticks in a dry location over winter for use the following spring. Fresh green twigs pushed into soil during the growing season root and sprout — particularly hazel, which is remarkably vigorous. Dried stored sticks are inert, remain effective as supports throughout the season, and can be composted cleanly at the end of the year without any risk of unwanted sprouting in the bed.
4. Wooden Stake and String Grid
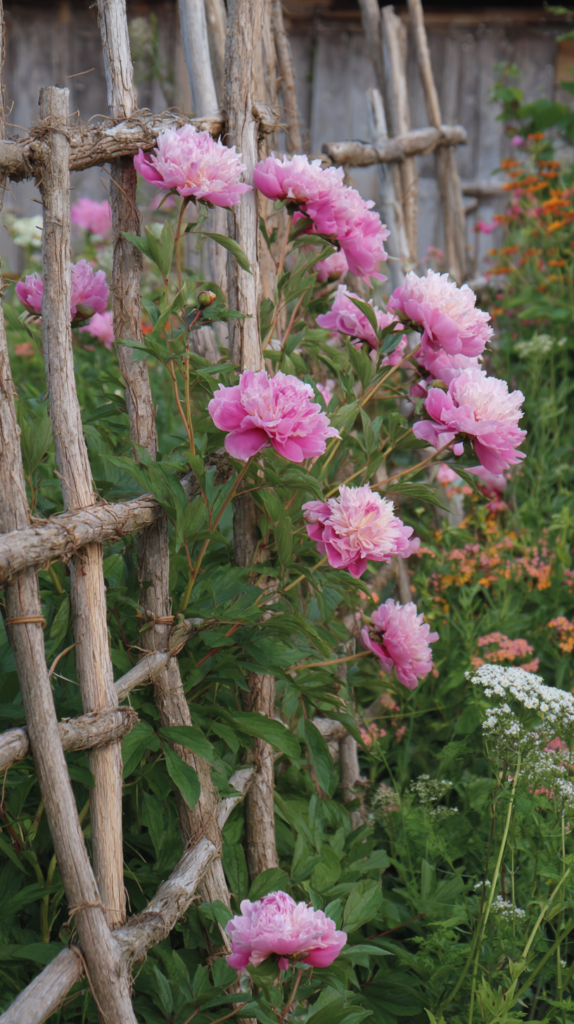
A grid of natural twine stretched between a series of wooden stakes driven into the soil creates a horizontal support network for floppy perennials — peonies, dahlias, delphiniums, and herbaceous plants that need support from below as they grow through the grid rather than from above with individual ties.
Drive four corner stakes into the soil around the plant in early spring before growth begins, then stretch twine between the stakes in a grid pattern at 15 centimetre spacing and approximately 30 centimetres above the soil. As the plant grows up through the grid the stems are supported individually by the twine intersections and stand upright naturally without any individual tying.
Pro Tip: Install the stake and string grid when the plant is still low — no more than 10 centimetres of growth above the soil — so the emerging stems grow up through the grid naturally from the beginning of the season. Installing the grid over established growth that is already flopping requires lifting and threading stems through the grid individually, which is time-consuming and risks stem damage. Early installation makes the process effortless.
5. Copper Pipe Plant Stakes
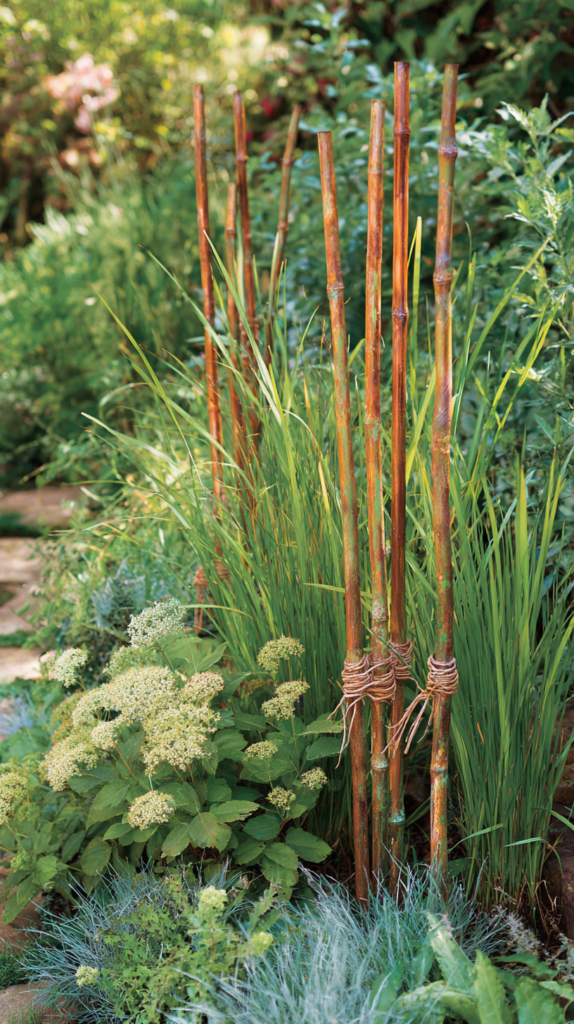
Copper pipe cut into lengths and used as plant stakes creates supports of genuine beauty — the warm metallic tone of copper complements garden planting beautifully and the material weathers over time to a soft verdigris patina that looks even more beautiful than the original bright copper. Copper stakes suit a formal or contemporary garden aesthetic particularly well.
Cut lengths of 15 millimetre copper pipe to your desired stake height using a pipe cutter — available from any plumbing supplier. Push the hollow end of the pipe directly into the soil and tie plant stems to the stake with natural twine or soft plant ties. The hollow pipe end penetrates soil easily and the weight of the copper keeps the stake stable even in loose or sandy soil.
Pro Tip: Cap the top of each copper pipe stake with a small copper end cap — available from plumbing suppliers for a few pence each — to prevent rain from entering and pooling inside the hollow stake where it can cause internal corrosion and freeze-expansion damage in winter. Capped stakes last indefinitely and remain beautiful through multiple seasons of garden use.
6. Hazel Hoop Supports
Flexible hazel rods bent into hoops and pushed into the soil on either side of a plant create elegant, arching supports that hold floppy plants upright while maintaining a natural, unobtrusive appearance within the planting. A series of hazel hoops around a large herbaceous perennial creates a support cage of genuine organic beauty.
Cut hazel rods of approximately 150 to 180 centimetres in length — collected during winter coppicing — and push both ends firmly into the soil on either side of the plant, bending the rod into a smooth arch above the plant’s crown. Multiple hoops placed at different angles around a single plant create an interlocking dome of support that holds the plant from multiple directions simultaneously.
Pro Tip: Use freshly cut green hazel rods rather than dried ones for bent hoop supports. Green hazel is remarkably flexible and bends smoothly into an arch without cracking or splitting. Dried hazel is brittle and will snap at the point of maximum bend rather than forming a clean arch. Freshly cut rods in late winter and early spring — when the sap is still low and the wood is at its most flexible — produce the best and most durable hoop supports.
7. Repurposed Bicycle Wheel Trellis
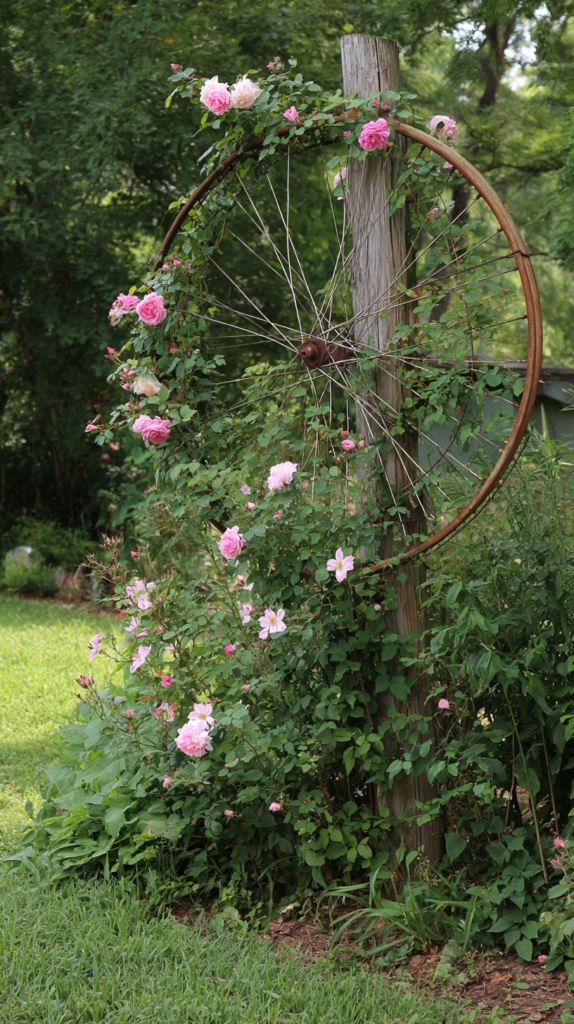
An old bicycle wheel fixed to a wall, fence, or post creates a circular trellis of genuine originality — the radiating spokes provide multiple climbing lines for plants and the circular form creates a beautiful focal point in the garden even before any plant has climbed it. Clematis, climbing roses, and annual climbers all use bicycle wheel trellises enthusiastically.
Fix the wheel to a wall using two or three coach bolts through the rim into wall plugs, or mount it on top of a timber post sunk into the ground for a freestanding version. Leave the tyre on for additional visual interest or remove it for a cleaner, more minimal look. Train climbing stems along individual spokes and tie in loosely as growth develops.
Pro Tip: Spray a repurposed bicycle wheel with rust-inhibiting metal primer before installing it as a garden trellis, even if the wheel appears to be in good condition. Outdoor moisture accelerates rust formation on unpainted metal significantly and an untreated wheel can develop heavy surface rust within a single growing season. A coat of primer followed by a coat of outdoor metal paint in a chosen color protects the wheel for many years and allows it to be painted to suit the garden palette.
8. Bamboo and String Fan Trellis
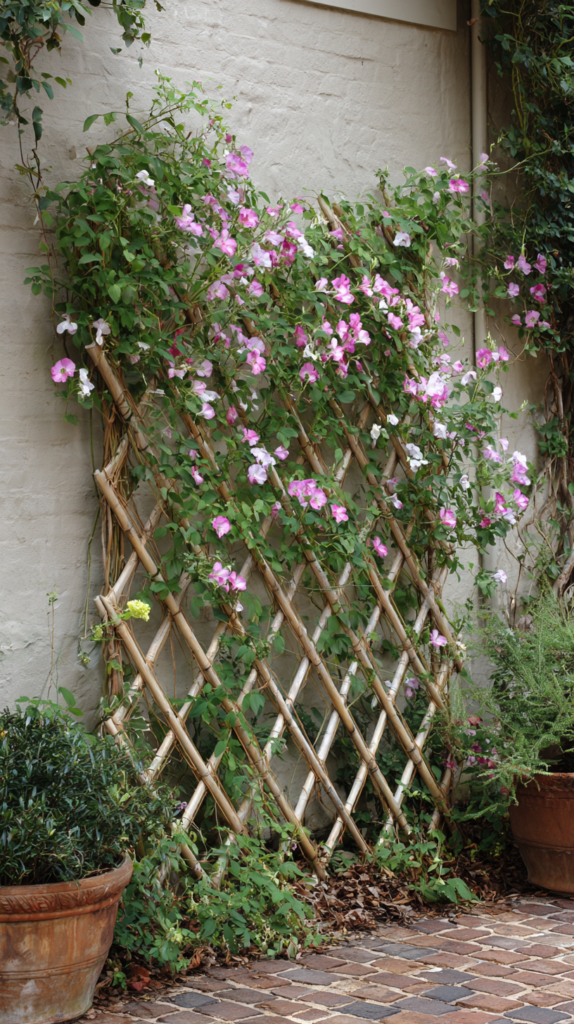
A flat fan trellis made from bamboo canes tied together with natural twine — the canes arranged in a spreading fan shape and tied at each intersection point — creates a wall-mounted climbing support of natural beauty that suits cottage gardens and informal planting schemes beautifully. The hand-tied quality of a bamboo fan trellis gives it a considered, artisan character that manufactured trellis panels lack.
Fix the outermost canes to the wall or fence using vine eyes and wire and allow the fan to sit slightly away from the wall surface — a gap of at least five centimetres between the trellis and the wall allows climbing plant stems to twine behind the canes and grip the structure naturally rather than being tied flat against the wall surface.
Pro Tip: Seal all bamboo cane ends with a small dab of exterior wood glue or clear varnish before assembling a bamboo trellis that will live permanently outdoors. The hollow open ends of bamboo canes absorb moisture readily and the freeze-thaw cycle of winter causes the cane walls to split from the inside outward over multiple seasons. Sealed ends prevent moisture entry and extend the structural life of the bamboo trellis significantly.
9. Cattle Panel Arch
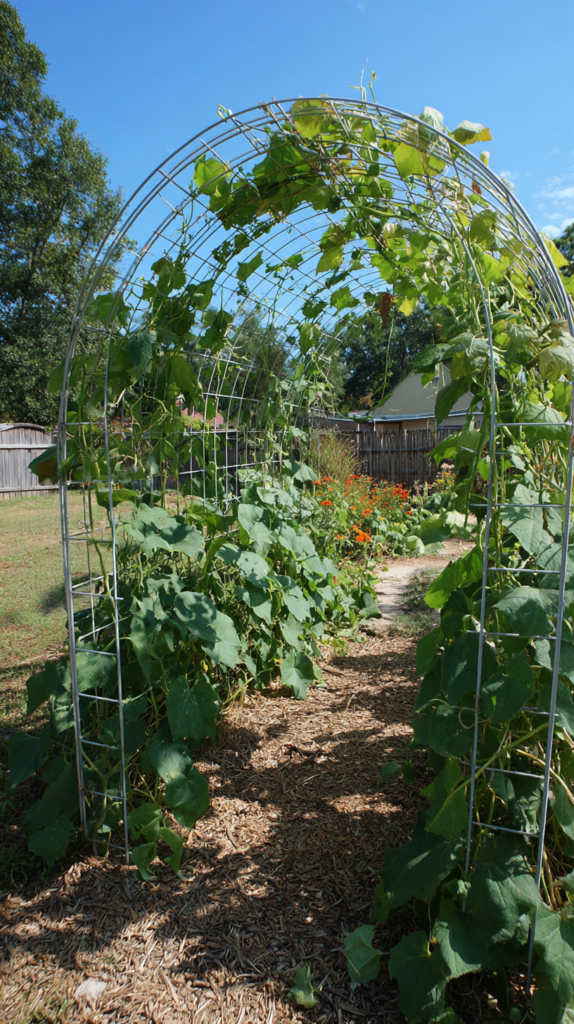
A single panel of galvanised cattle grid fencing — bent into an arch and pushed into the soil on both sides of a garden path or bed — creates a robust, long-lasting climbing structure of impressive scale that suits vigorous climbers like pumpkins, squash, cucumbers, and climbing roses. Cattle panels are inexpensive, extremely strong, and last for decades in outdoor garden use.
Bend the panel gradually into an arch shape — working from one end to the other in small increments rather than attempting to bend the full arch in a single movement — and push the protruding wire ends firmly into the soil on both sides of the path or bed. The arch height and width can be adjusted by varying the degree of bend in the panel before installation.
Pro Tip: Wear heavy leather gloves when handling and bending cattle panels — the cut wire ends at the panel edges are extremely sharp and capable of causing serious lacerations through unprotected skin. The panels are also under significant tension when being bent and can spring back unexpectedly. Taking proper safety precautions when handling this material prevents injuries that are entirely avoidable with appropriate protection.
10. Wooden Obelisk
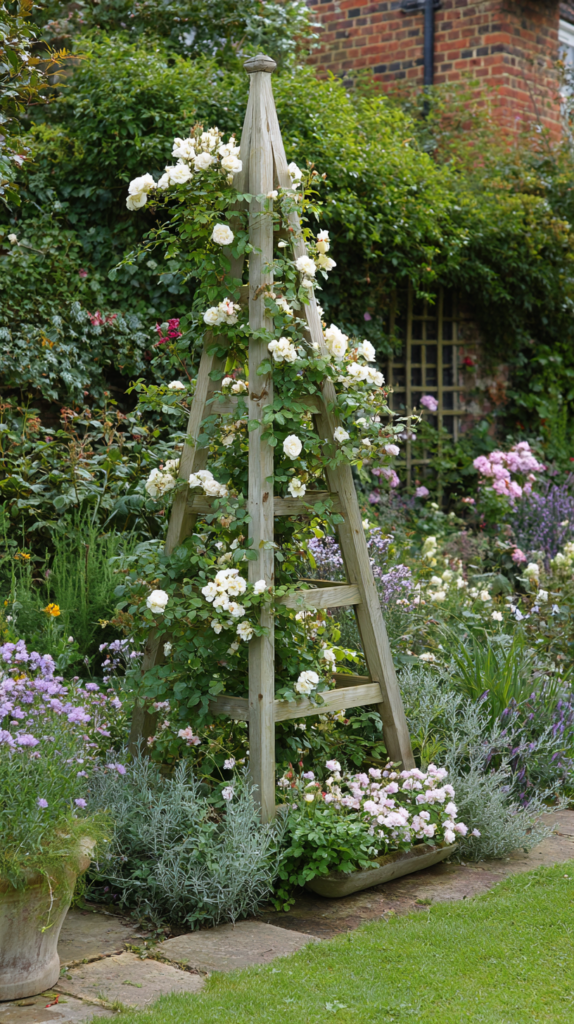
A timber obelisk — a four-sided tapering tower built from timber battens and dowels — creates the most elegant and architecturally beautiful of all DIY plant support structures. A well-made wooden obelisk is as much a garden ornament as a functional support and looks beautiful even in winter when the climbing plant has died back and the structure stands alone.
Build the four corner posts from 25 millimetre square timber batten, tapering from a wider base to a narrower apex, and connect them with horizontal and diagonal crossbars of the same or slightly smaller batten at regular intervals up the height of the structure. Fix all joints with exterior screws and finish with exterior wood stain or paint in a color that suits the garden palette.
Pro Tip: Fit the base of each obelisk leg with a metal spike connector — the type used for fence posts — rather than pushing the bare timber ends directly into the soil. Timber posts in direct ground contact absorb moisture and begin to rot at soil level within two to three seasons regardless of preservative treatment. Metal spike connectors hold the timber legs above soil level and eliminate ground contact entirely, extending the life of a well-made obelisk from a few seasons to many years.
11. Repurposed Ladder Plant Support
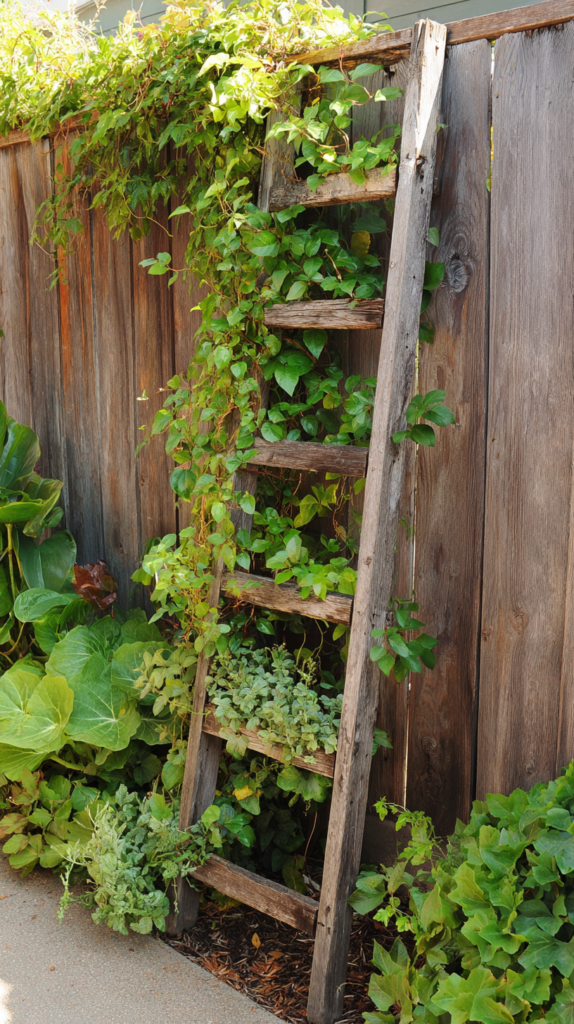
A redundant timber or metal ladder laid flat on the soil or leaned against a wall creates a ready-made plant support of considerable charm and genuine practical effectiveness. Horizontal rungs spaced at regular intervals provide natural support points for climbing and scrambling plants, and the slightly industrial quality of a repurposed ladder adds an unexpected and interesting visual element to garden planting.
Lay a short stepladder flat on the soil surface over a bed of sprawling plants — the rungs support individual stems at the correct height with no tying required. Lean a longer ladder against a wall or fence and train climbing plants up the rungs as a vertical support. Paint the ladder in a complementary color for a more intentional, designed appearance.
Pro Tip: Stabilise a leaning ladder plant support with two ground stakes — one on each side of the ladder base — to prevent the feet from sliding outward on wet soil under the weight of established climbing plants. An unstabilised ladder can slide and fall in wet weather or when a vigorous climber adds significant weight to the upper section, potentially damaging both the plants it was supporting and anything in the immediate vicinity of the fall.
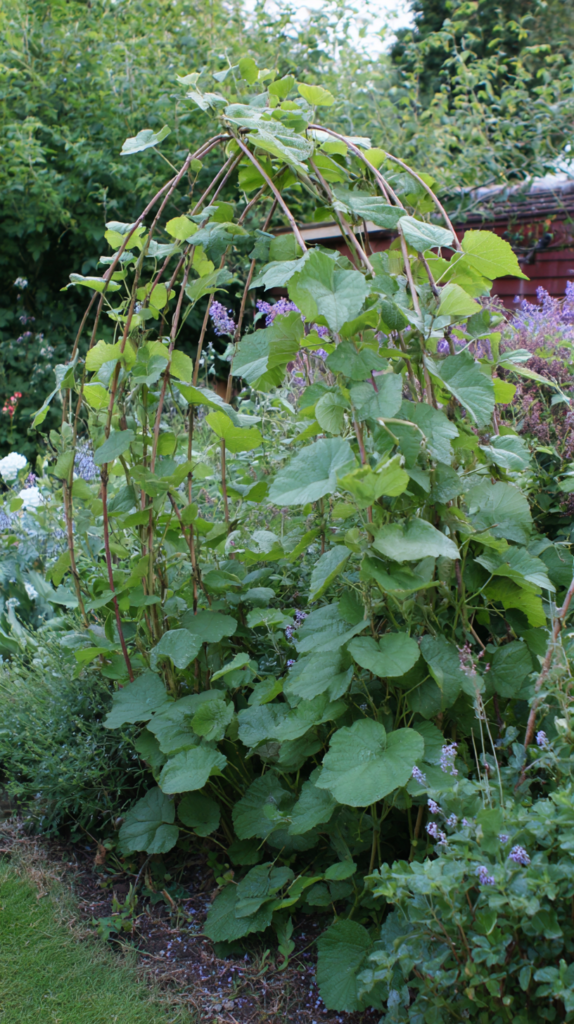
12. Willow Woven Dome
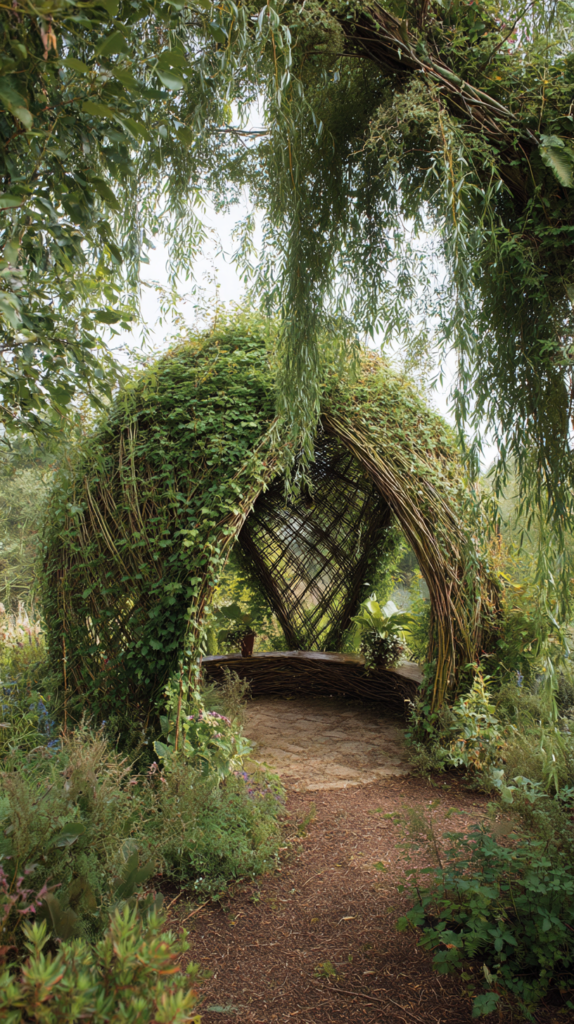
A woven willow dome — living willow rods pushed into the soil in a circle and woven together as they grow, creating a living green structure — is the most magical and organically beautiful of all DIY plant supports. The willow roots from the pushed-in rods, leafs out in spring, and creates a genuinely living garden feature that improves every season as the weave thickens and fills.
Push freshly cut willow rods at 20 centimetre intervals around a circle of approximately one metre diameter, weaving adjacent rods over and under each other as they rise from the soil. Bend the tops toward the centre and weave them together to form the dome apex. Water regularly during the first season to encourage rooting and subsequent vigorous growth.
Pro Tip: Use freshly cut willow rods collected between November and March — during the dormant season — for a living willow dome that will root successfully. Willow cut during the growing season has significantly lower rooting success and the rods are more likely to die in the soil than establish. Dormant season cuttings root vigorously from the cut base and establish a strong root system before the demands of spring growth begin.
13. PVC Pipe Tomato Stake
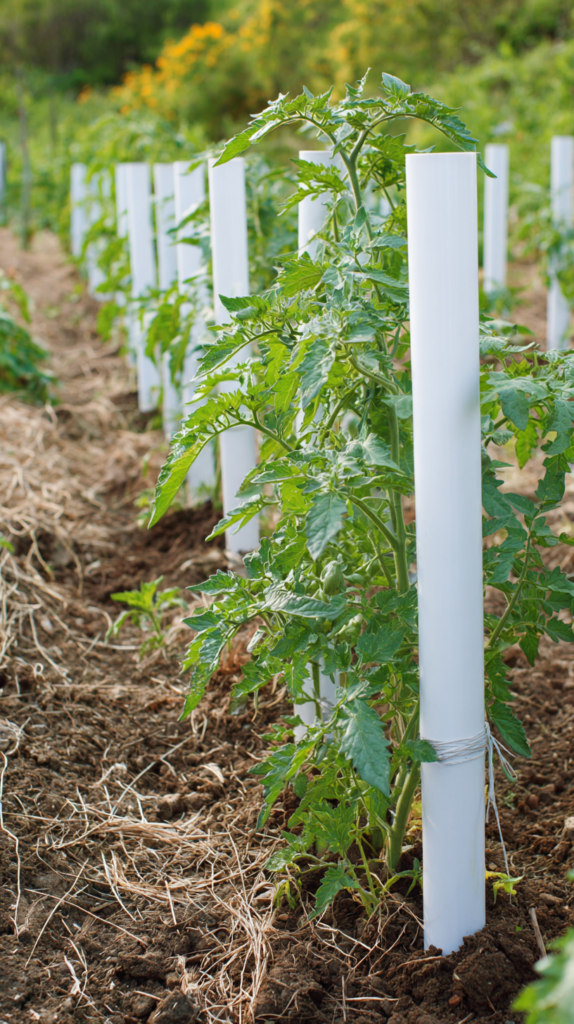
Short lengths of PVC waste pipe — the same material used for domestic plumbing — cut to length and pushed into the soil make extremely durable, lightweight, and completely weatherproof plant stakes that last indefinitely without rotting, rusting, or degrading in any outdoor condition. White PVC can be painted with exterior paint in any color for a more garden-appropriate appearance.
Cut 40 millimetre diameter PVC waste pipe into 90 or 120 centimetre lengths using a hacksaw or pipe cutter, push 30 centimetres of each stake into the soil beside the plant to be supported, and tie stems to the exposed section with soft plant ties or natural twine. The slight flexibility of PVC provides a small degree of movement that rigid metal stakes do not — reducing the risk of stem damage at the tie point during wind.
Pro Tip: Drill a series of small drainage holes near the base of each PVC stake before pushing into the soil. Without drainage holes the hollow stake traps water and creates a standing water column in the soil that can contribute to root rot around the base of sensitive plants. Small drainage holes allow water to escape freely while maintaining the structural integrity of the stake entirely.
14. Wooden Trellis Panel from Reclaimed Timber
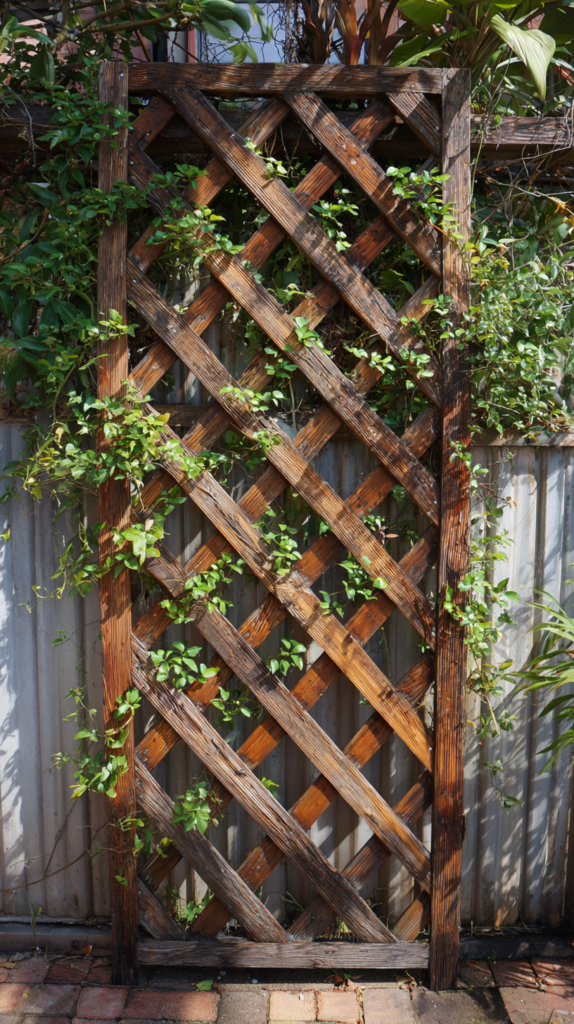
A trellis panel built from reclaimed timber — old fence boards, pallet wood, or salvaged timber cut into strips and assembled in a diagonal grid pattern — creates a wall-mounted climbing support with genuine rustic character and a completely individual quality that manufactured trellis panels cannot replicate. Every reclaimed timber trellis is unique.
Cut the reclaimed timber into strips of consistent width — 25 to 35 millimetres is ideal — and assemble them in a diagonal grid pattern, overlapping at each intersection and fixing with a single exterior screw at every crossing point. The diagonal orientation is structurally stronger than a square grid and creates a more visually dynamic pattern that suits both traditional and contemporary garden aesthetics.
Pro Tip: Check all reclaimed timber for protruding nails, staples, and fixings before cutting and assembling a trellis panel. Hidden fixings in reclaimed timber damage saw blades, create dangerous projectiles during cutting, and create sharp protrusions in the finished trellis that can injure hands during planting and maintenance. A thorough check and removal of all fixings before any cutting begins is a simple safety step that prevents entirely avoidable accidents.
15. Grow-Through Ring on a Single Stake
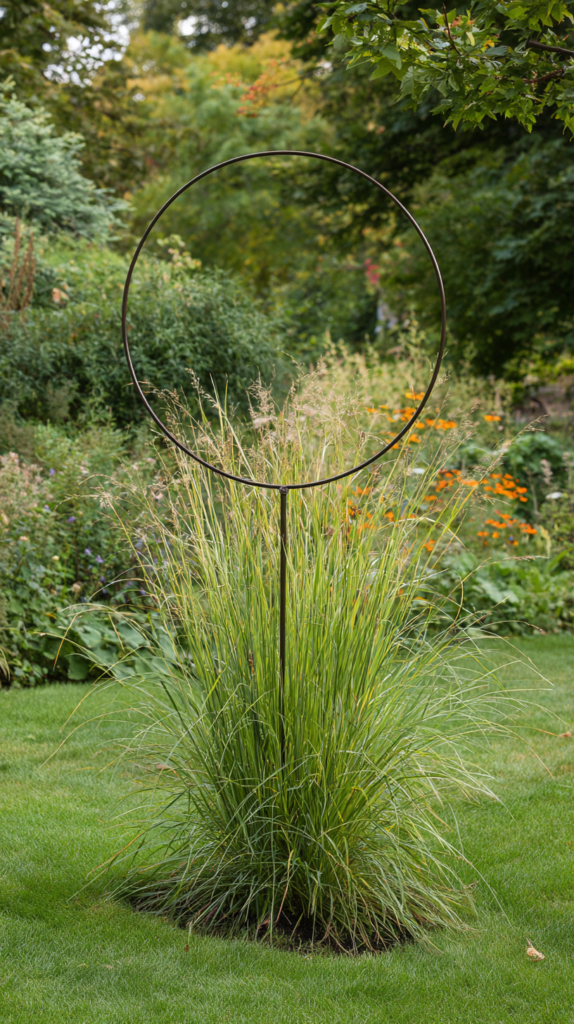
A grow-through ring — a circle of heavy wire or a purpose-bent metal hoop mounted on a single central stake — provides targeted support for individual floppy perennial plants without the visual bulk of a full cage or the complexity of a multi-stake string grid. The ring is positioned above the plant crown in early spring and the plant grows up through the circle naturally, supported around its perimeter.
Bend a length of 4 millimetre galvanised wire into a circle of the appropriate diameter for the plant being supported and twist the ends together securely. Attach the circle to a single central stake at the appropriate height using wire ties, push the stake into the centre of the plant crown, and allow the plant to grow up through the ring as the season progresses.
Pro Tip: Make grow-through rings in several standard diameters — 30, 45, and 60 centimetres — and store them at the end of each season for reuse the following year. Having a range of sizes immediately available in spring means the right support goes onto each plant at exactly the right moment without any delay for fabrication. Early installation — before the plant needs support rather than after it has already flopped — is the single most important factor in the effectiveness of any grow-through ring.
Support Your Plants and Watch Them Thrive
The best plant support is the one that goes on early, fits the plant properly, and disappears into the planting as the season progresses. Whether you choose the rustic charm of hazel hoops, the elegant geometry of a timber obelisk, or the practical strength of a wire tomato cage, the principle is the same — give your plants the structure they need and they will reward you with a season of growth that justifies every minute spent making the support.
Build a collection of supports across these 15 designs and you will never reach midsummer wishing you had done something earlier. Your garden will be tidier, your plants healthier, and the whole growing season significantly more satisfying from the first warm day to the last.