15 Fresh Butterfly Nail Designs You’ll Adore
Transform your nails into a canvas of delicate beauty with these stunning butterfly designs that capture the essence of spring and summer.

From subtle accents to bold statements, these nail art ideas will have you floating on cloud nine with their ethereal charm.
Photo credit can be found via the Instagram link beneath each image.
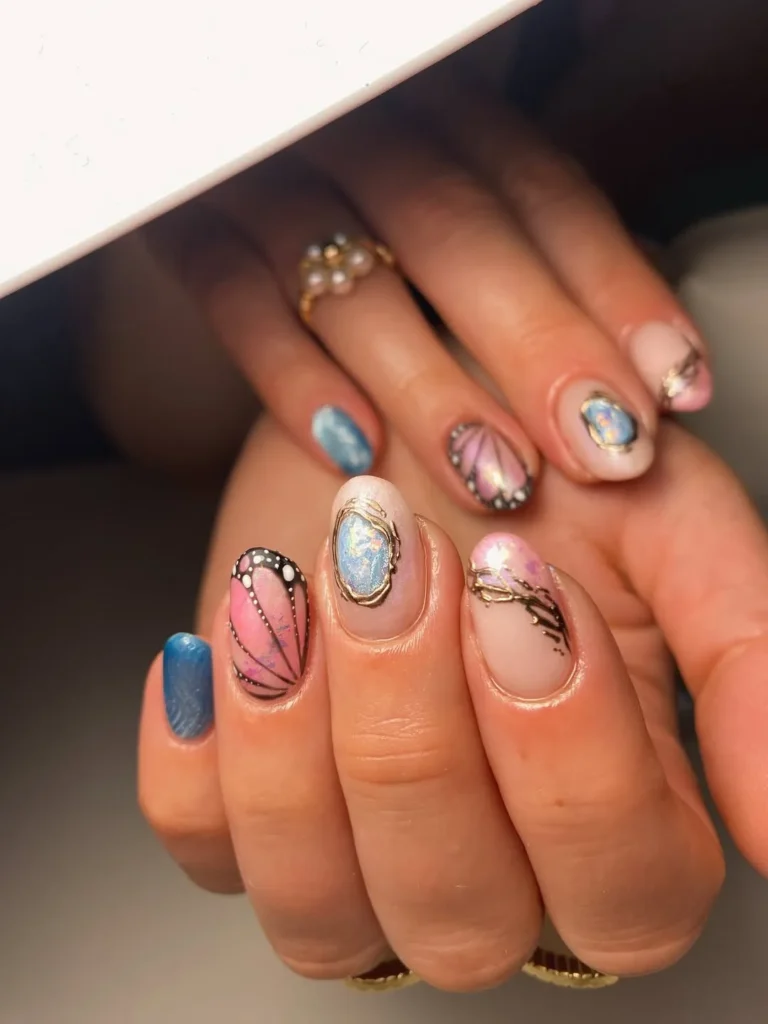
Delicate Watercolor Butterflies
https://www.instagram.com/jazzynails.x
Watercolor butterfly nails create a dreamy, artistic effect using soft, blended colors that flow into each other. This technique uses a damp brush to blend shades of pink, purple, and blue while the polish is still wet.
The beauty lies in their imperfection – no two butterflies need to look exactly alike. You can vary the size and position of each butterfly across your nails, creating a natural, organic feel.
Start with a clear or nude base coat, then drop small amounts of colored polish onto each nail. Use a thin brush or toothpick to gently blend the colors outward, creating wing shapes.
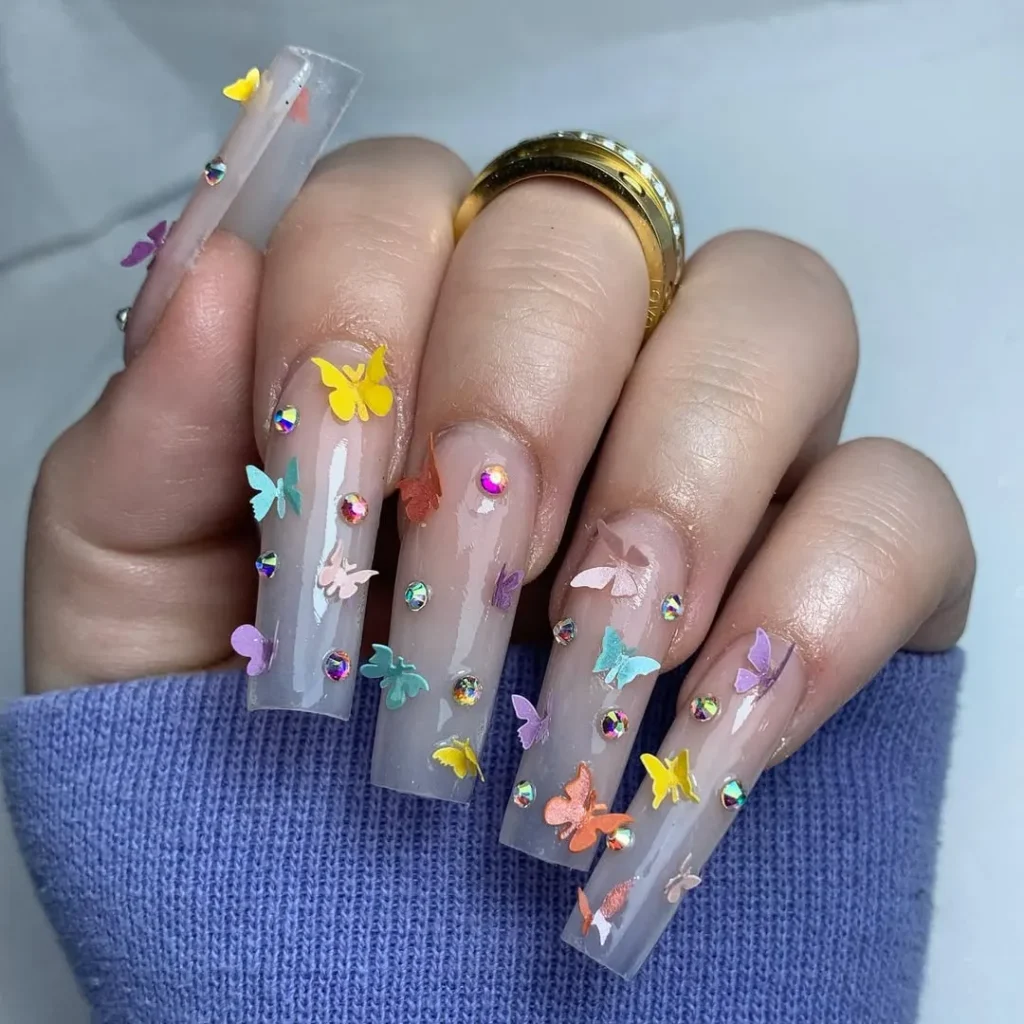
3D Butterfly Accent Nails
https://www.instagram.com/nailswithmelissa_x
Three-dimensional butterfly nails add texture and drama with raised elements that literally make your butterflies come to life. These designs typically feature one or two accent nails with sculpted butterflies while the remaining nails sport complementary colors.
The sculptural quality makes them perfect for special occasions or when you want to make a bold fashion statement. The raised wings catch light beautifully, creating shadows and highlights that enhance the realistic appearance.
Creating 3D butterflies requires patience and practice, but the results are worth the effort. Start by building up layers of gel polish or acrylic to form the wing shapes, then use a dotting tool to create texture.
Minimalist Line Art Butterflies
https://www.instagram.com/deco.beauty
For those who prefer understated elegance, minimalist line art butterflies offer a sophisticated take on the trend. These designs feature simple, clean lines that outline butterfly shapes using thin black or metallic polish.
This style works beautifully on short nails and is perfect for professional settings where you want stylish but not overwhelming nail art. The simplicity makes them versatile enough to pair with any outfit.
The technique requires a steady hand and a good quality thin brush or nail art pen. Start with a neutral base color, then carefully draw the butterfly outline in one continuous motion when possible.
Holographic Butterfly Wings
https://www.instagram.com/deco.beauty
Holographic butterfly nails create a magical, iridescent effect that shifts colors as you move your hands. This futuristic take uses holographic polish or chrome powder to create wings that seem to shimmer and change from every angle.
The holographic finish adds depth and dimension to butterfly designs, making them appear almost otherworldly. You can create full holographic butterflies or use the effect selectively on just the wings while keeping the body matte.
Apply your base color first, then use a sponge or brush to apply holographic polish or powder over butterfly stencils. Seal with a high-gloss top coat to protect the holographic finish and enhance the color-shifting effect.
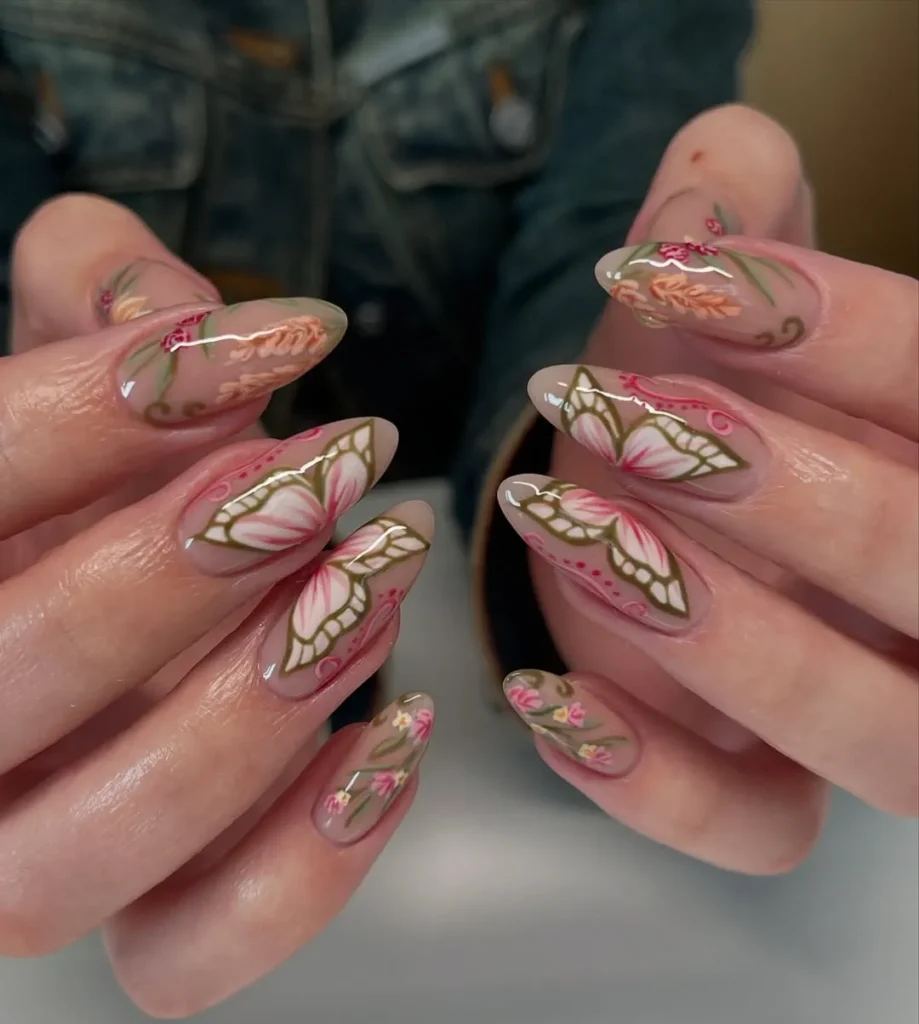
Vintage-Inspired Butterfly Motifs

https://www.instagram.com/nailsbyimi_x
Vintage butterfly nail designs draw inspiration from classic illustrations and antique botanical prints. These designs often feature muted colors like dusty rose, sage green, and cream, with intricate details reminiscent of Victorian-era artwork.
This style is perfect for those who appreciate timeless elegance and want nail art that feels both nostalgic and sophisticated. The vintage aesthetic works well with earth tones and muted pastels, making it suitable for fall and winter wear.
Creating vintage-inspired butterflies requires attention to detail and often involves multiple colors and techniques. Start by researching actual vintage butterfly illustrations for inspiration, then use thin brushes to recreate the intricate wing patterns.
Neon Butterfly Brilliance

Neon butterfly nails bring electric energy to your fingertips with bright, fluorescent colors that practically glow. These designs use vibrant shades like hot pink, electric blue, lime green, and sunshine yellow to create butterflies that are impossible to ignore.
The intensity of neon colors allows for creative color combinations that wouldn’t work with traditional polishes. You can create rainbow butterflies, use complementary color schemes, or go monochromatic with different shades of the same neon family.
Neon polishes often require special base coats to achieve their full intensity and may need multiple thin coats to reach opacity. Consider using neon polishes that are specifically formulated for nail art, as they tend to have better pigmentation and flow.
Gradient Butterfly Ombré
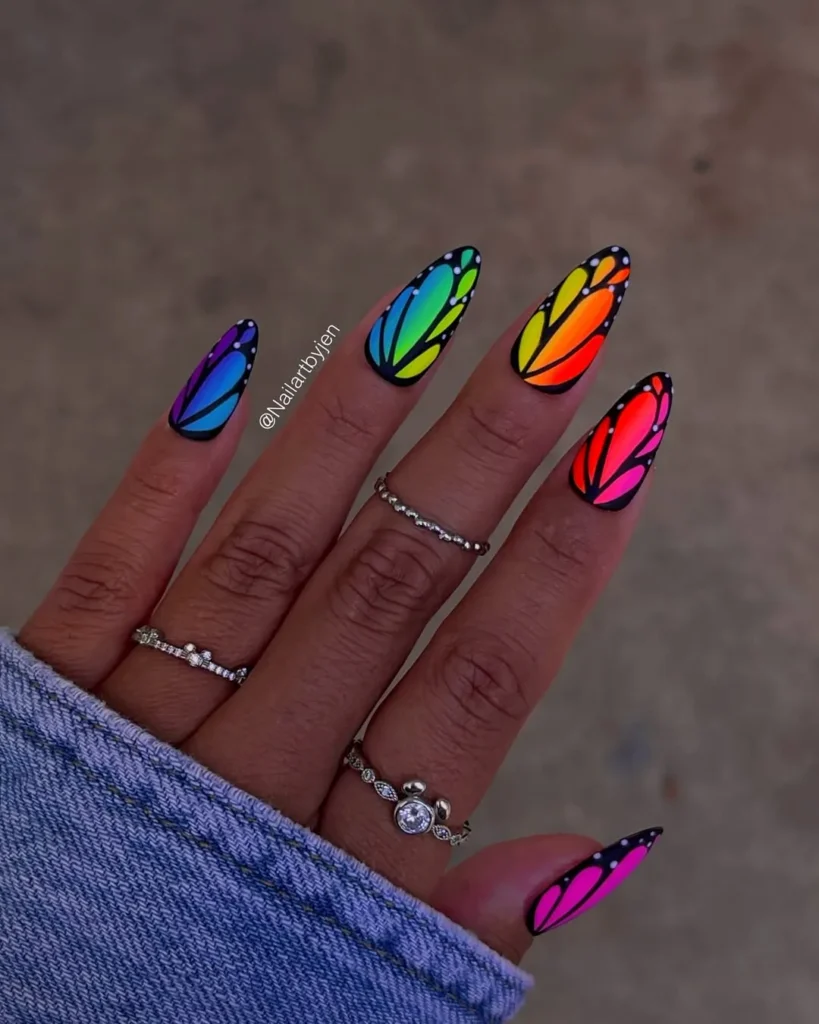
https://www.instagram.com/nailartbyjen
Gradient butterfly nails combine the popular ombré technique with delicate butterfly motifs, creating wings that seamlessly blend from one color to another. This technique works beautifully with complementary colors like pink to purple, blue to turquoise, or orange to yellow.
The ombré effect adds depth and movement to butterfly designs, making them appear more dynamic and three-dimensional. You can create the gradient effect within individual butterfly wings or across the entire nail, with butterflies positioned over the color transition.
Creating smooth gradients requires practice and the right tools. Use a makeup sponge to blend colors while they’re still wet, working quickly to avoid harsh lines and building up the effect gradually.
Metallic Butterfly Accents
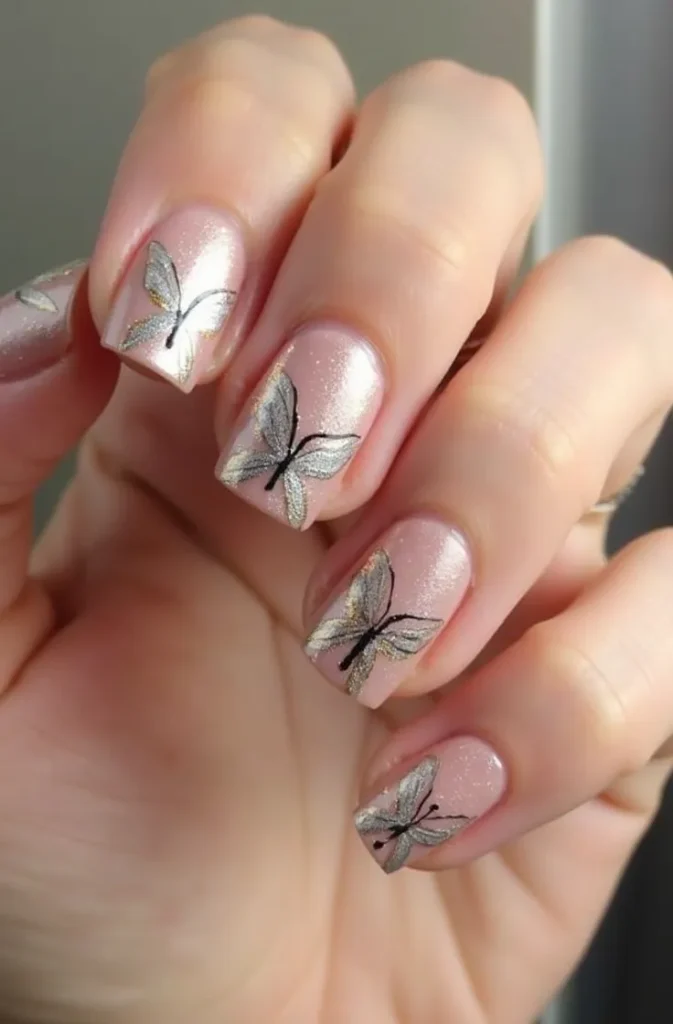
Metallic butterfly nails add glamour and sophistication with gold, silver, or rose gold finishes that catch and reflect light beautifully. These designs can feature fully metallic butterflies or incorporate metallic accents into colorful butterfly wings.
The versatility of metallic butterflies makes them suitable for various color schemes and nail lengths. Gold butterflies pair beautifully with warm tones, while silver complements cool colors, and rose gold offers a romantic, feminine option.
Metallic polishes require specific application techniques to achieve smooth, even coverage. Use thin coats and avoid overworking the polish, as this can cause streaking, and finish with a high-gloss top coat to enhance the metallic shine.
Abstract Butterfly Interpretations
https://www.instagram.com/nailsby_nnat
Abstract butterfly nails take creative liberties with traditional butterfly shapes, focusing on capturing the essence and movement of butterflies rather than realistic representation. These designs might feature geometric wing patterns, asymmetrical shapes, or stylized interpretations that suggest butterflies without being literal.
This style is perfect for those who want butterfly nail art that feels modern and unique. Abstract butterflies can incorporate various techniques like color blocking, negative space, or mixed media elements.
Creating abstract butterflies requires a willingness to experiment and play with different shapes and techniques. Start with basic butterfly proportions, then modify and stylize elements to create your unique interpretation.
Monochromatic Butterfly Elegance
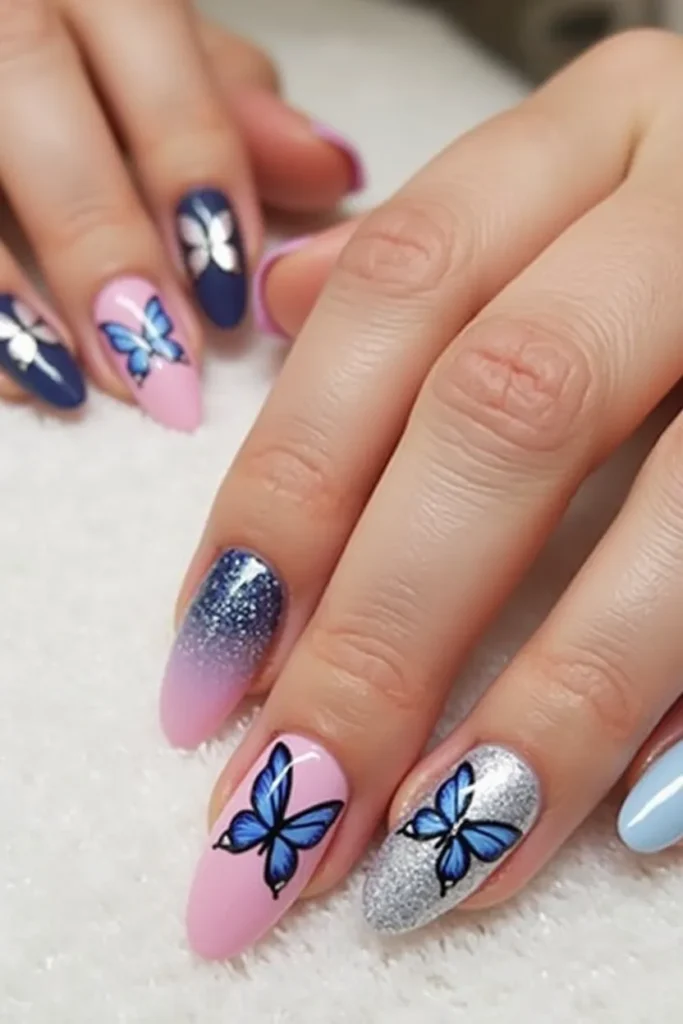
Monochromatic butterfly designs use varying shades of a single color to create sophisticated, cohesive nail art. This approach might use different tones of blue, from navy to sky blue, or various shades of pink from blush to fuchsia.
The beauty of monochromatic butterflies lies in their subtle complexity. While using only one color family, you can create depth and interest through different shades, textures, and finishes.
This technique requires careful color selection to ensure enough contrast between shades while maintaining the monochromatic harmony. Use the lightest shade as your base color, then gradually build up with medium and darker tones.
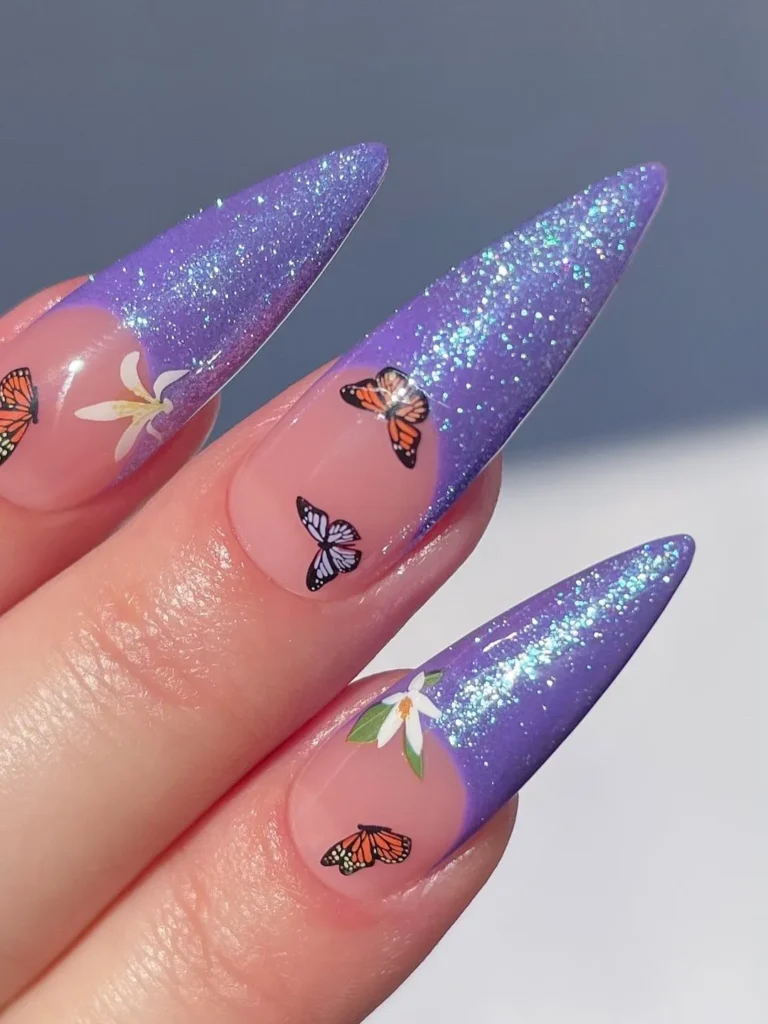
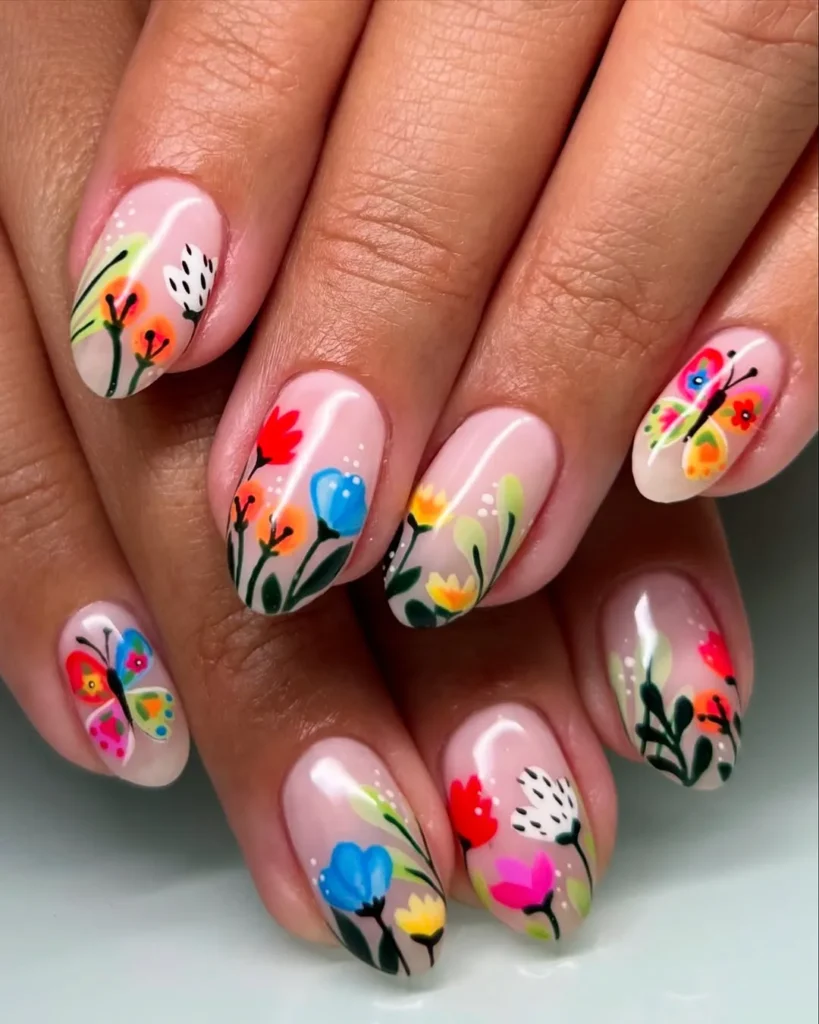
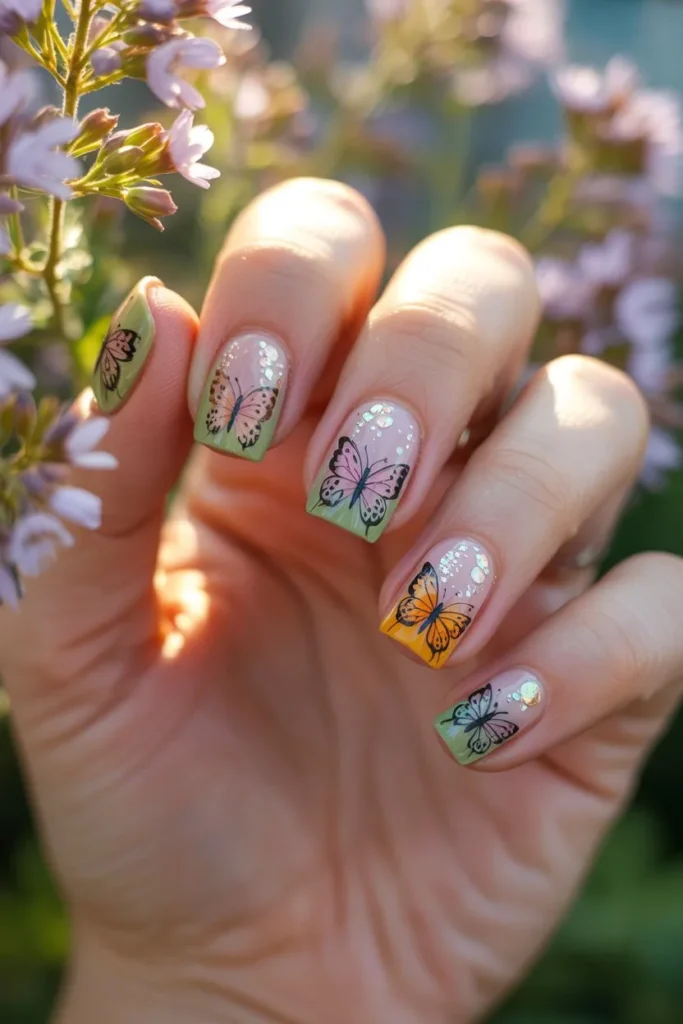
Floral Butterfly Combinations
https://www.instagram.com/thenaildetails
Floral butterfly nails combine two of the most popular nail art motifs – flowers and butterflies – creating designs that celebrate natural beauty. These designs might feature butterflies perched on flowers, flying around floral arrangements, or integrated into garden scenes.
The pairing of flowers and butterflies allows for rich, detailed designs that tell a story on your nails. You can create seasonal themes, like butterflies on cherry blossoms for spring or monarchs on sunflowers for summer.
This style requires planning and patience, as you’re essentially creating two types of nail art simultaneously. Start with the larger elements (usually the flowers) and then add butterflies as accents using complementary colors.
Negative Space Butterfly Designs
https://www.instagram.com/nailzbyvas
Negative space butterfly nails use the natural nail color as part of the design, creating butterflies through strategic placement of color and clear areas. This technique creates a modern, minimalist look that’s both striking and sophisticated.
The negative space technique works particularly well with butterfly motifs because it can create the illusion of transparent wings or highlight specific parts of the butterfly. You might paint the wing outlines and leave the centers clear, or create butterfly silhouettes with colored backgrounds.
Creating negative space butterflies requires precision and planning. Use tape, stencils, or careful freehand painting to define the areas you want to keep clear, ensuring clean, crisp lines between the polished and natural areas.
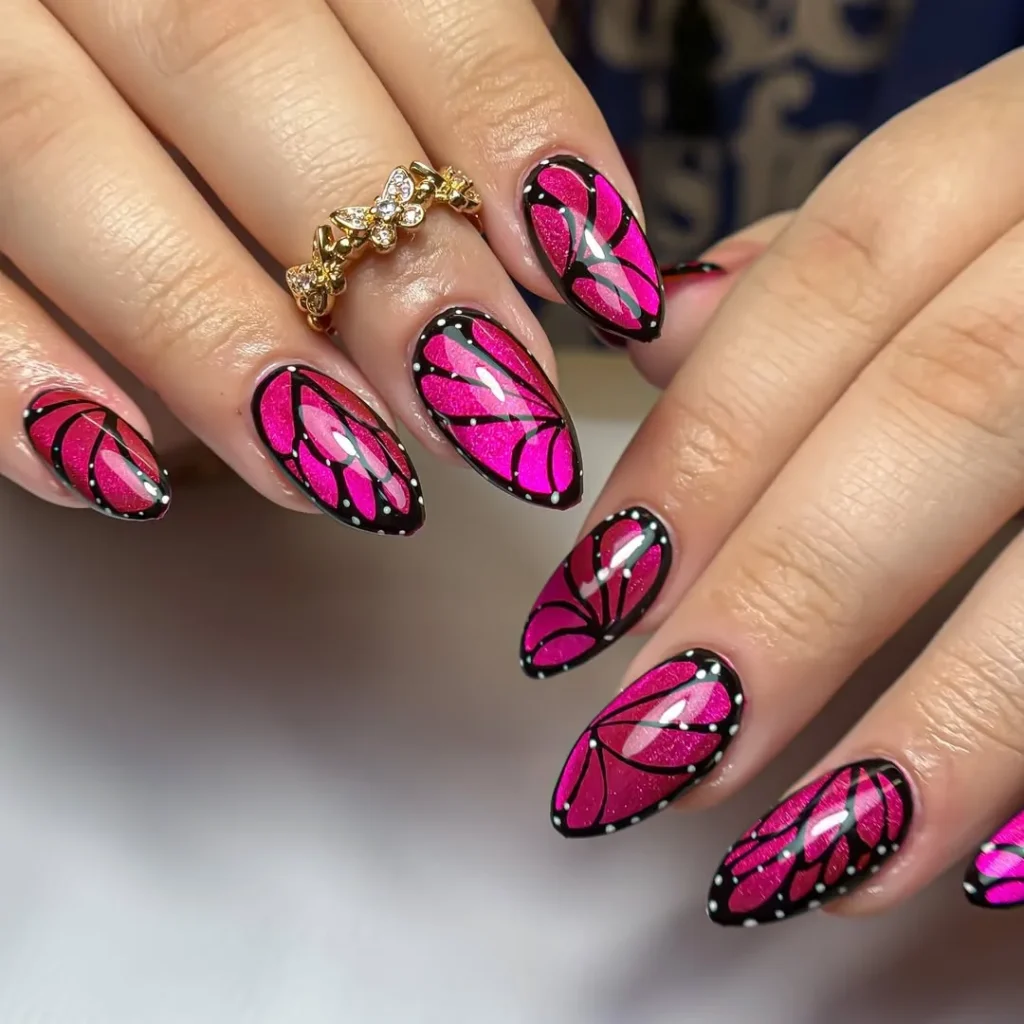
Stained Glass Butterfly Art
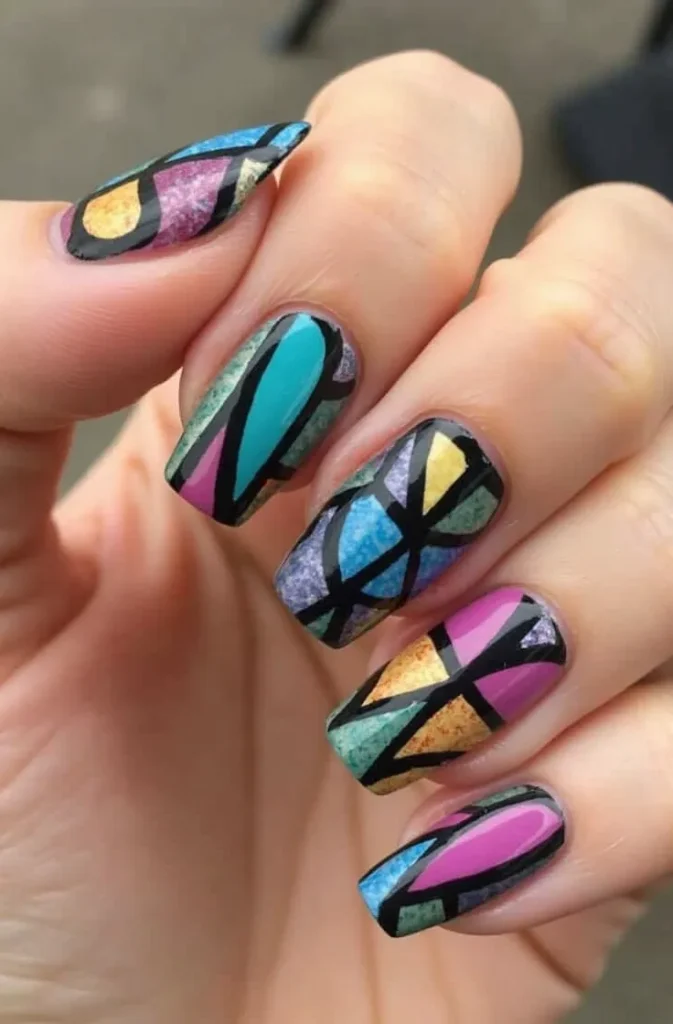
Stained glass butterfly nails mimic the appearance of colorful church windows with bold outlines and vibrant, translucent colors. This technique uses black or dark polish to create the “lead” lines that separate different colored sections, just like real stained glass.
The stained glass effect works beautifully with butterfly motifs because the natural divisions in butterfly wings lend themselves to the segmented style. You can use any color combination, from traditional jewel tones to modern pastels.
This technique requires patience and a steady hand for the outline work. Start by mapping out your butterfly design and deciding where the divisions will be, then apply the colored sections first before adding the black outlines.
Cosmic Butterfly Galaxy
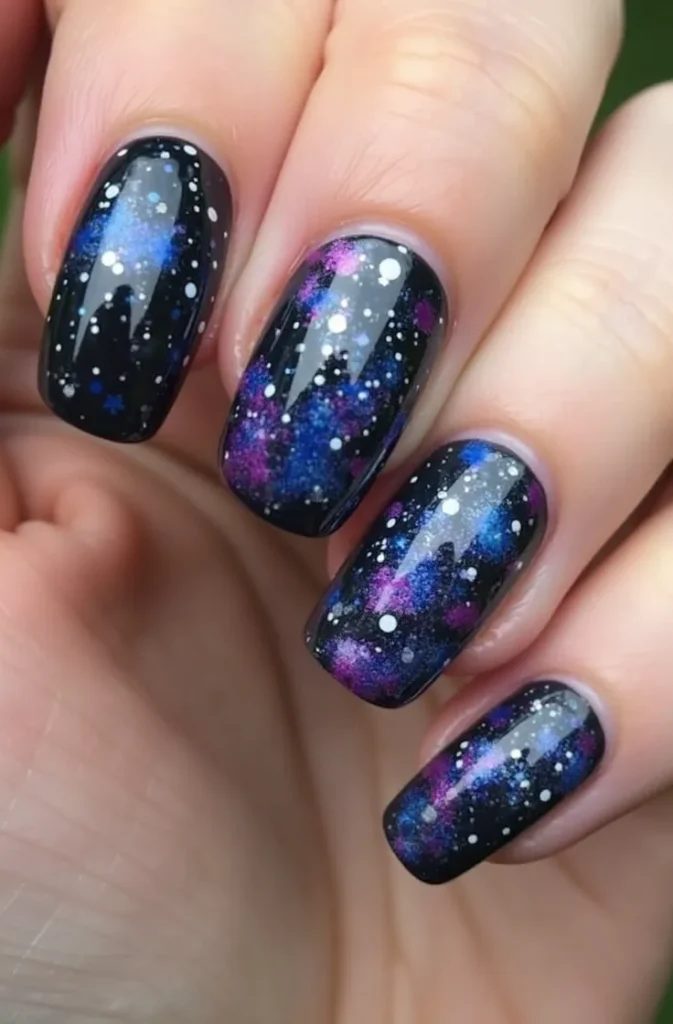
Cosmic butterfly nails combine the delicate beauty of butterflies with the mystery of space, creating designs that feature galaxy-colored wings filled with stars, nebulae, and cosmic dust. These designs use deep blues, purples, and blacks as base colors, then add glitter, holographic elements, and metallic accents.
The cosmic theme allows for incredible creativity in color combinations and special effects. You can create butterflies with wings that look like different planets, star clusters, or aurora borealis.
Creating cosmic butterflies requires layering different techniques and materials. Start with a dark base color, then use sponges to blend in lighter colors and create the nebula effect, adding glitter and holographic elements while the polish is still tacky.
Seasonal Butterfly Transitions
Seasonal butterfly nails change the butterfly colors and surrounding elements to reflect different times of year. Spring butterflies might feature pastel colors with fresh green accents, summer designs could use bright, tropical colors, autumn butterflies might incorporate warm oranges and browns.
This approach allows you to keep the butterfly theme year-round while keeping your nail art fresh and seasonally appropriate. You can create sets that transition from one season to another, or focus on the current season’s palette.
Creating seasonal butterfly designs requires understanding color theory and seasonal associations. Research the colors and patterns of butterflies that are actually active during different seasons, and incorporate seasonal elements like leaves, flowers, or snowflakes into the background.